In the realm of digital art, efficiency and creative exploration are paramount. Procreate's Symmetry Tool emerges as a powerful ally, enabling artists to generate concepts with remarkable ease and craft stunning patterns in mere seconds. By understanding and manipulating its various features, creators can unlock new avenues of design and significantly accelerate their digital workflow, leading to more amazing and intricate artwork. This comprehensive guide delves into every aspect of Procreate's Symmetry Tool, illustrating how to harness its capabilities for your artistic endeavors.
Locating and Activating the Symmetry Tool
The journey to utilizing Procreate's symmetry features begins within the Actions menu. Navigate to Actions > Drawing Guides. It's crucial to note that the Symmetry Tool is only accessible when the "Drawing Guide" option is toggled on. By default, this setting is off. Once "Drawing Guide" is activated, the "Edit Drawing Guide" option will become available, no longer grayed out.
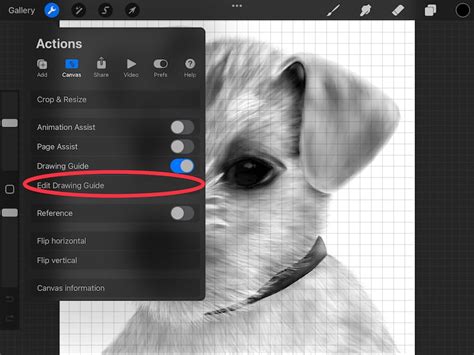
Tapping on "Drawing Guide" reveals a panel containing four potent digital art tools. The tool of primary focus here resides in the rightmost option, dedicated to symmetry.
The Drawing Guide Panel: Customization at Your Fingertips
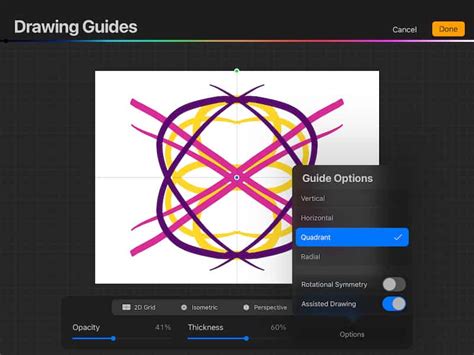
Within the Drawing Guide panel, artists are presented with a suite of options to tailor their symmetry experience. Here, you can select the specific guide you wish to employ, adjust the opacity and thickness of the symmetry lines to suit your visibility preferences, and even change the color of these guides to contrast effectively with your artwork. This level of customization ensures that the symmetry lines enhance, rather than obstruct, your creative process.
Exploring the Different Symmetry Guides
Procreate's Symmetry Tool is comprised of four distinct guide options: Vertical, Horizontal, Quadrant, and Radial. Each offers a unique approach to mirroring artwork, and understanding their individual applications is key to unlocking their full potential.
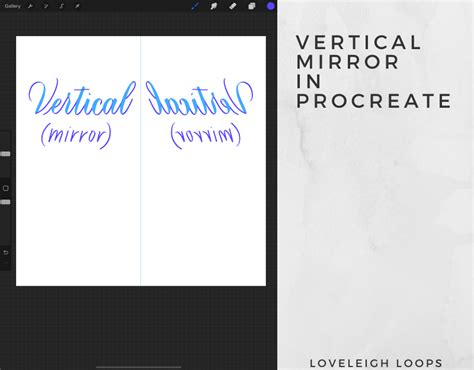
Vertical Symmetry: The Mirror Image Effect
As its name clearly indicates, Vertical Symmetry creates a perfect mirror image along a central vertical axis. Any mark made on the left side of the canvas is instantaneously replicated on the right side, and vice versa. This feature is particularly invaluable for concept artists, as it effectively halves the time spent on brainstorming and idea generation. By instantly visualizing mirrored designs, artists can rapidly iterate on character designs, logos, or any symmetrical element, leading to a much faster and more efficient creative output.
Horizontal Symmetry: Top-to-Bottom Reflection
Complementing Vertical Symmetry, the Horizontal Symmetry option mirrors strokes made in the upper portion of the canvas directly to the bottom portion. This creates a reflection along a central horizontal line, proving useful for designs that exhibit top-to-bottom balance, such as certain types of lettering, symmetrical landscapes, or decorative borders.

Quadrant Symmetry: The Four-Way Mirror
Quadrant Symmetry intelligently divides your canvas into four equal sections. Functionally, this guide acts as a combination of both Vertical and Horizontal Guides. When you draw in one quadrant, your strokes are mirrored across both the vertical and horizontal axes, appearing simultaneously in all four sections. This is ideal for creating more complex, balanced designs that require symmetry in both directions, such as symmetrical emblems or foundational elements for more intricate patterns.
Radial Symmetry: Expanding the Mirrored Universe
The most advanced of the standard symmetry guides, Radial Symmetry, takes the concept of mirroring to a new level. Instead of dividing the canvas into four parts, it splits it into eight equal segments. This is achieved through a combination of vertical, horizontal, and diagonal guidelines. Strokes made in one segment are mirrored across all seven other segments. This guide is exceptionally useful for crafting intricate and mesmerizing patterns, particularly those found in mandalas, rosettes, or other circular, radiating designs. The ability to generate such complex patterns with a single stroke is a testament to the power of this tool.

Advanced Manipulation: Beyond the Basic Guides
While the four primary symmetry guides offer a robust foundation, Procreate allows for further manipulation to create even more sophisticated and unique designs.
Manipulating Symmetry Lines: Angle and Position
Once a symmetry guide is active, you'll notice two distinctively colored dots positioned on the symmetry line itself. The green dot is your control for rotation. By tapping and dragging this dot, you can rotate the symmetry lines to any angle desired, liberating your symmetry from purely horizontal or vertical constraints. This opens up possibilities for angled symmetry, crucial for dynamic compositions or specific stylistic choices.
The blue dot, on the other hand, controls the position of the symmetry line. Dragging this dot allows you to move the entire symmetry guide to any location on your canvas. This is incredibly useful for focusing symmetry on a specific area of your artwork, rather than having it span the entire canvas. You can now create symmetries that are off-center or confined to a particular part of your illustration, offering immense flexibility.
With these controls, you gain the power to position and orient your symmetry guides precisely where your artistic vision demands, enabling the creation of complex symmetries at any angle and in any location within your piece.
The Power of Rotational Symmetry
A particularly game-changing feature is the "Rotational Symmetry" toggle. This option can be applied in conjunction with any of the four primary symmetry guides. When activated, it introduces an additional layer of mirroring. Essentially, your strokes are reflected not only according to the chosen symmetry type but are also rotated.
While this might initially sound complex, the effect is a fascinating expansion of the mirrored patterns. Think of it as your initial stroke being mirrored, and then that mirrored version is also rotated around the center point. Experimentation is key to fully grasping its impact. Toggling this option on can lead to surprisingly intricate and unexpected results, pushing the boundaries of pattern generation and encouraging artistic exploration. The visual output when this is toggled on can be dramatically different and often more complex than standard symmetry.
For instance, with Vertical Symmetry and Rotational Symmetry enabled, a simple stroke might result in a pattern that not only mirrors left-to-right but also rotates around the center. The same principle applies to Horizontal, Quadrant, and Radial symmetry, each yielding unique and often stunning outcomes when combined with the Rotational Symmetry toggle. Playing around with this feature is highly recommended to discover novel artistic effects and generate unique visual elements that you might not have conceived of otherwise.
Procreate 4.1 How to Create Cool Art with Symmetry and Liquify
Disabling and Managing Symmetry Guides
Once your creative endeavors with the Symmetry Tool are complete, you'll want to know how to disable it. The process is straightforward. Open the Layer panel, tap on the layer you've been working on, and then disable "Drawing Assist." It's important to understand that simply toggling off "Drawing Guide" in the main menu will only hide the visual representation of the symmetry line; it will not disable the underlying symmetry effect on your strokes. Therefore, to completely turn off symmetry, you must disable "Drawing Assist" on the specific layer.
Disabling "Drawing Assist" ensures that subsequent strokes are no longer mirrored, allowing you to refine details or add elements without the influence of the symmetry guides. This offers a clean break, enabling you to transition from symmetrical creation to freehand drawing or other techniques.
Embracing the Full Spectrum of Artistic Tools
To truly excel as an artist and create not just an awesome work but also to become the best possible version of yourself, it is vital to utilize every tool available in your digital arsenal. The Symmetry Tool in Procreate is a prime example of such a powerful asset. Now that you are equipped with a thorough understanding of what Symmetry Tools are, how to access them, and the myriad ways you can manipulate them â from basic mirroring to advanced rotational effects â the canvas is yours to explore. Unleash your imagination and see what incredible designs and patterns you can bring to life. The ability to generate complex visual forms with efficiency and precision empowers your creativity and allows for a more expansive artistic journey.