In the realm of digital design, the subtle art of shape plays a crucial role in evoking specific emotions and guiding viewer perception. While sharp, angular forms can convey a sense of rigidity and seriousness, softer, more organic shapes tend to foster feelings of warmth, friendliness, and approachability. Among these, the circle is often lauded as the epitome of these positive attributes, and its influence extends to the subtle yet impactful element of rounded corners. These softened edges offer a more visually pleasing aesthetic than stark right angles, making them a desirable feature for a variety of design applications, from web graphics to print layouts.
When working with photographs, the inherent sharp corners can sometimes detract from the overall composition, especially when integrating images into a larger design or collage. Fortunately, Photoshop offers a versatile toolkit to address this, allowing designers to imbue their images with the welcoming appeal of rounded corners. This guide delves into a sophisticated yet accessible method for achieving this effect, leveraging the power of vector masks, a tool often overlooked but incredibly potent for precise image manipulation.
Understanding the Foundation: Shapes and Their Psychological Impact
The power of shapes in design is undeniable. A square, with its definitive lines and 90-degree angles, can feel stable and orderly, but perhaps also a bit unyielding. A circle, on the other hand, is perceived as continuous, harmonious, and fluid. This inherent difference in perception is why rounded corners often feel more inviting and less abrupt. Even a slight softening of sharp edges can significantly alter the emotional resonance of an image or design element. This principle is fundamental to understanding why rounded corners are so frequently employed in user interfaces, branding, and visual storytelling.
The natural world rarely presents perfectly sharp corners. Leaves, pebbles, and even the gentle curves of a human face all possess soft, rounded contours. Our eyes and brains are, in many ways, predisposed to find these organic forms more aesthetically pleasing and less jarring. This innate preference is why, even in photographs of vibrant events like children's birthday parties, the starkness of the image's sharp corners can sometimes feel out of sync with the joyous subject matter.
The Power of Vector Masks: A Precise Approach to Rounded Corners
While there are numerous ways to achieve rounded corners in Photoshop, this tutorial focuses on a method that utilizes vector masks. This approach offers a high degree of control and scalability, as vector masks are resolution-independent. Unlike pixel-based layer masks, which involve painting with brushes, vector masks are defined by mathematical paths. This means that the edges of your rounded corners will remain crisp and clean, regardless of how much you zoom in or resize your image.
To begin, it's helpful to have your image open in Photoshop. For clarity during the process, consider placing your photo on a layer above a solid color background, such as black. This contrast will make it easier to see the effects of the mask as you apply it.
Step 1: Setting Up Your Document and Initial Layers
- Open your image: Start by opening the photograph you wish to modify in Photoshop.
- Create a background layer (optional but recommended): If your image is on a locked "Background" layer, it's often beneficial to unlock it or create a new layer beneath your image. A common practice for this tutorial is to fill a new layer with black. This provides a visual contrast that helps in observing the masking process.
- Place your photo: Drag your chosen photo into the new Photoshop document. It should appear on a layer above the background.
Step 2: Introducing the Vector Mask
This is where the unique aspect of this method comes into play. We'll be using a vector mask, which is distinct from a standard layer mask.
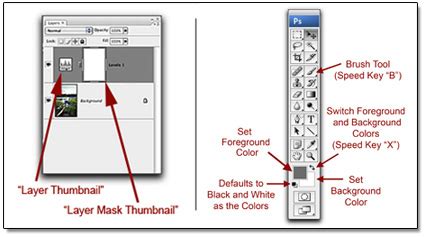
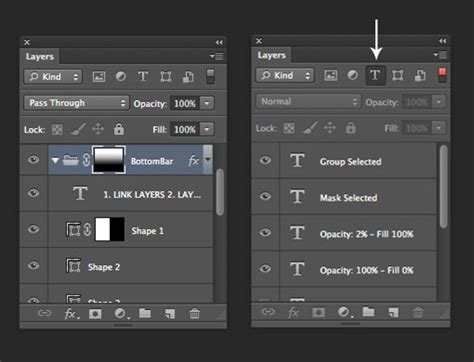
- Add a layer mask: With your photo layer selected in the Layers palette, click on the "Add layer mask" icon at the bottom of the Layers palette. This icon typically looks like a rectangle with a circle inside it. A layer mask thumbnail will appear next to your layer thumbnail.
- The crucial second click: Here's the often-overlooked step. If you hover your mouse over the "Add layer mask" icon, the tooltip will usually say "Add layer mask." However, if you click this icon a second time while the layer mask thumbnail is already present, something changes. The tooltip will now read "Add vector mask," and a new thumbnail will appear to the right of the existing layer mask thumbnail. This new thumbnail represents your vector mask.
Understanding the Difference: While both layer masks and vector masks control the visibility of a layer, they operate differently. Layer masks use grayscale values: white reveals, black conceals, and shades of gray create transparency. You "paint" on layer masks using tools like the Brush Tool. Vector masks, on the other hand, are based on vector shapes. You cannot paint on them; instead, you use shape tools to define which parts of the layer are visible or hidden.
Step 3: Utilizing the Rounded Rectangle Tool
Now that we have our vector mask in place, we can use a shape tool to define the rounded corners.
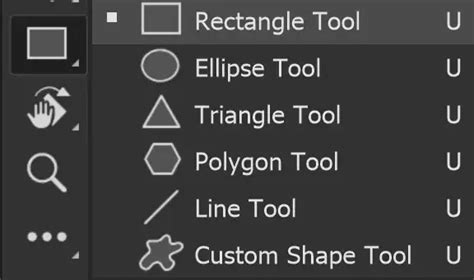
- Select the Rounded Rectangle Tool: Go to your Tools palette. The Rounded Rectangle Tool is often nested with the standard Rectangle Tool. Click and hold on the Rectangle Tool icon, and then select the "Rounded Rectangle Tool" from the fly-out menu. Be careful not to confuse this with the Marquee Tools, which are used for creating selections.
- Configure the Options Bar: With the Rounded Rectangle Tool selected, look at the Options Bar at the top of the Photoshop window.
- Shape Layers Icon: Ensure that the "Shape layers" icon (often depicted as a square with a filled circle) is selected. This tells Photoshop to create a vector shape.
- Radius Option: To the right of the shape type icons, you'll find the "Radius" option. This is where you control the roundness of your corners. A higher value will result in more pronounced curves, while a lower value will produce subtler rounding. Experiment with values between 10-20 pixels as a starting point.
Step 4: Drawing the Rounded Rectangle on the Vector Mask
With the vector mask active and the Rounded Rectangle Tool configured, it's time to draw.
- Select the Vector Mask Thumbnail: In the Layers palette, click on the vector mask thumbnail (the one on the right) to ensure it is selected. You'll see a white highlight border appear around it, indicating it's the active element.
- Draw your shape: Click and drag on your canvas. Even though it appears you're drawing on the image itself, you are actually drawing the vector shape onto the active vector mask. The area inside this shape will remain visible, while everything outside will be hidden.
- To cover the entire image: Start in the top-left corner of your photo and drag diagonally down to the bottom-right corner.
- Repositioning while drawing: If you need to adjust the position of your shape as you're drawing, hold down the spacebar, drag to reposition, and then release the spacebar to continue drawing.
Once you release the mouse button, your photo will be masked by the rounded rectangle shape, giving the appearance of rounded corners.
Adding a Stylish Border with Rounded Corners
Having achieved rounded corners, you might want to enhance the image further with a border. The beauty of this method is that any border you add will also conform to the rounded edges.
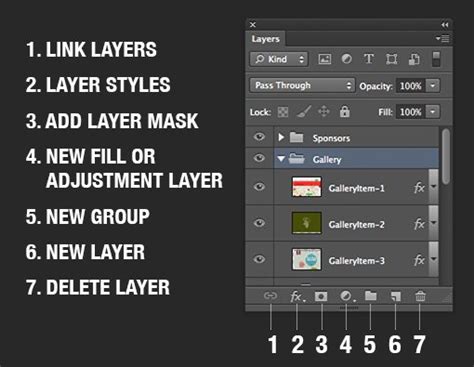
- Access Layer Styles: With your photo layer still selected, click on the "Layer Styles" icon at the bottom of the Layers palette (it often looks like "fx").
- Select "Stroke": From the drop-down menu, choose "Stroke." This will open the Layer Style dialog box, with the Stroke options displayed.
- Configure the Stroke:
- Size: Adjust the "Size" of the stroke. A value of 10-20 pixels is a good starting point, but this will depend on your image's resolution and desired effect.
- Position: Keep the "Position" set to "Outside." This ensures the border is applied to the exterior of your rounded shape.
- Color: Click on the color swatch. By default, it might be red. Select your desired border color from the Color Picker. White is often a clean choice.
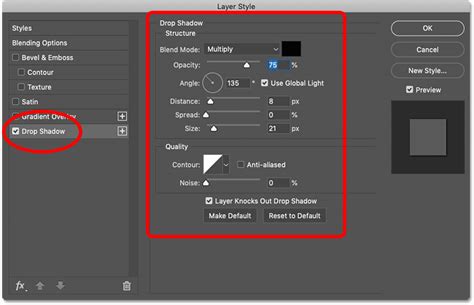
- Apply the Style: Click "OK" to exit the Layer Style dialog box and apply the stroke.
Your image will now have perfectly rounded corners and a border that follows the same smooth curvature.
Alternative Adjustments and Considerations
Photoshop offers dynamic ways to refine your rounded corners even after the initial shape is created.
Refining Corner Radius in Properties Panel
If you find that the initial radius wasn't quite right, or you want to adjust it further:
- Ensure the Shape Tool is Active: Make sure the Rounded Rectangle Tool (or any other shape tool used to create the mask) is still selected.
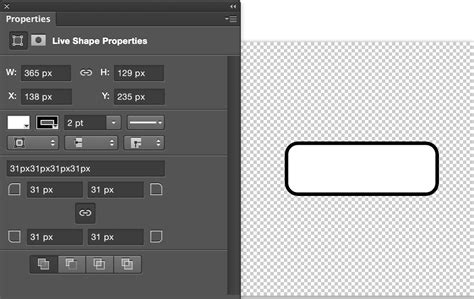
- Locate the Properties Panel: If you don't see the Properties panel, go to Window > Properties.
- Adjust Corner Radius: Within the Properties panel, you'll find "Corner Radius" options. You can enter a value directly into these boxes to modify the roundness. If the lock icon between the radius inputs is active, all corners will adjust together. Clicking it to unlock allows you to adjust each corner individually.
Masking an Image within a Rounded Shape
Another approach involves creating the rounded shape first and then placing your image within it.
- Create a New Document: Start with a new Photoshop document.
- Draw a Rounded Rectangle Shape: Use the Rounded Rectangle Tool set to "Shape layers" and adjust the "Radius" to your preference.
- Set Fill to None and Stroke: In the Options Bar, set the "Fill" color to "None" and configure the "Stroke" color and size as desired.
- Center the Shape: Use the "Align Horizontal Centers" and "Align Vertical Centers" icons in the Options Bar to position the shape precisely in the middle of your canvas.
- Import Your Image: Drag your photo into this document. It will appear on a new layer above the shape.
- Create a Clipping Mask: With your photo layer selected, right-click and choose "Create Clipping Mask." This will confine your photo to the boundaries of the rounded rectangle shape below it.
Saving for Transparency
When saving an image with rounded corners, especially if you intend to use it on a website or in a design where transparency is important, you need to choose a file format that supports it. JPEG does not support transparency, so formats like PNG are essential.
- Trim Unused Pixels: To ensure a clean export, go to Image > Trim. Select "Transparent Pixels" and ensure "Top, Bottom, Left, and Right" are checked. Click OK.
- Save As: Go to File > Save As and choose a format like PNG.
Frequently Asked Questions About Rounded Corners in Photoshop
What are the different methods to create rounded corners in Photoshop?
Several methods exist for creating rounded corners in Photoshop. The most common involve using the Shape Tools, particularly the Rounded Rectangle Tool, to draw a shape with rounded corners over your image or as a standalone shape. Another approach is using selection tools like the Elliptical Marquee Tool to create a circular selection and then manipulating it. The Pen Tool offers precise manual control for drawing custom shapes with rounded corners. For specific versions like Photoshop CC, there are often built-in features that simplify the process, sometimes allowing direct adjustment of corner radii on shape layers.
How can I adjust the radius of the rounded corners in Photoshop?
The radius of rounded corners can be adjusted in multiple ways. When using the Rounded Rectangle Tool in "Shape layers" mode, the "Radius" option is directly available in the Options Bar before you draw. After a shape has been created, you can often adjust the radius using the Properties panel. If you need finer control or want to adjust individual corners, you can select the anchor points of the shape using the Direct Selection Tool and then manipulate their handles or input specific radius values.
Can I create rounded corners on a specific layer in Photoshop?
Yes, absolutely. The key is to select the target layer first. Then, you can employ the Rounded Rectangle Tool or other shape-creating methods. It's good practice to create a new layer for your shape or mask if you wish to keep the original layer's content intact and non-destructive.
How can I create rounded corners without cropping the image?
To achieve rounded corners without cropping the original image, the most effective method is to use a Clipping Mask. First, create a shape with rounded corners (using the Rounded Rectangle Tool, for instance) on a separate layer. Then, place your image on a layer above the shape layer. Right-click on the image layer and select "Create Clipping Mask." This will constrain the visibility of your image to the boundaries of the rounded shape, effectively giving your image rounded corners without altering the original pixel data.
Can I save a shape with rounded corners as a custom shape in Photoshop?
Yes, you can. Once you have created a shape with rounded corners, you can save it for future use. Navigate to Edit > Define Custom Shape. This will prompt you to name your shape, and it will then be added to your Custom Shape Picker, accessible via the Custom Shape Tool.
How can I create rounded corners on a selection in Photoshop?
Creating rounded corners on a selection can be done through a few methods. One way is to use the Select menu > Modify > Smooth option, which can help soften sharp corners. Alternatively, you can use selection tools like the Rounded Rectangular Marquee Tool (if available as a selection tool, distinct from the shape tool) or create an elliptical selection and then refine its edges.
Can I create rounded corners on text in Photoshop?
Yes, you can create rounded corners on text, but it requires a conversion step. Text layers are vector-based by nature, but to manipulate their individual corners like a shape, you first need to convert the text layer into a shape layer. You can do this by right-clicking the text layer and selecting "Convert to Shape." Once converted, you can use the Direct Selection Tool to modify the corner anchor points and adjust their radius.
How can I create a border with rounded corners in Photoshop?
Creating a border with rounded corners is straightforward once you have a rounded shape. After creating your rounded rectangle shape (or any shape with rounded corners), you can apply a Stroke Layer Style. Access this by clicking the "fx" icon at the bottom of the Layers palette and selecting "Stroke." You can then define the border's size, position (outside is usually best for a border), and color. The stroke will automatically conform to the rounded edges of your shape.
Can I create rounded corners on an image in Photoshop Elements?
Yes, Photoshop Elements, a lighter version of Photoshop, also supports creating rounded corners. The process is generally similar, often involving the use of shape tools like the Rounded Rectangle Tool or selection tools to achieve the desired effect.
How can I create rounded corners on multiple images at once in Photoshop?
To efficiently apply rounded corners to multiple images simultaneously, Photoshop's Actions feature is invaluable. You can record an Action that performs all the steps necessary to round the corners of one image. Once recorded, you can use the Batch command (File > Automate > Batch) to apply this recorded Action to an entire folder of images.