Achieving a brighter, more captivating smile in your photographs is a common desire for both professional photographers and casual users alike. While the natural color of teeth can vary from person to person and be affected by factors like diet, age, and even the lighting conditions during a shoot, software like Adobe Lightroom offers powerful tools to subtly enhance them. This guide will walk you through the process of whitening teeth in Lightroom, from utilizing built-in presets to fine-tuning your adjustments for a natural and impactful result. We will explore how to import images, navigate the Develop module, employ the Adjustment Brush, and understand the nuances of color and exposure to ensure your retouched smiles look authentic and appealing.
Importing Your Images into Lightroom
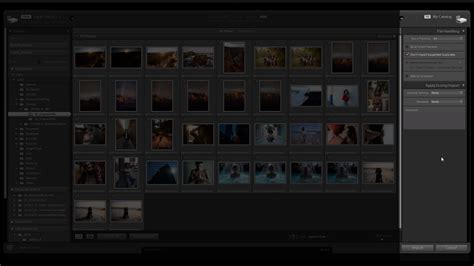
Before you can begin the editing process, your photograph needs to be within the Lightroom catalog. If you haven't already imported your image, this should be your first step. Select File > Import Photos and Video, then navigate through your files and import the one you need. Alternatively, you can simply drag and drop your image directly into the Library workspace. It's crucial to remember that Lightroom operates non-destructively. This means that no matter how you import your file, you'll be working on a copy, leaving your original image untouched. The importing process itself takes place within the Library module.
Navigating the Develop Module and Selective Adjustments
Once your image is imported, you'll move to the Develop module. This is where you'll discover all of Lightroom's powerful photo-editing tools. If you intend to make any general edits to your photos or apply a preset, the Develop module is your central hub. On the right-hand side of your screen, you'll find various editing tools organized into different panels. Positioned towards the top, nestled between the Histogram and the Basic panel, are the selective adjustment tools.
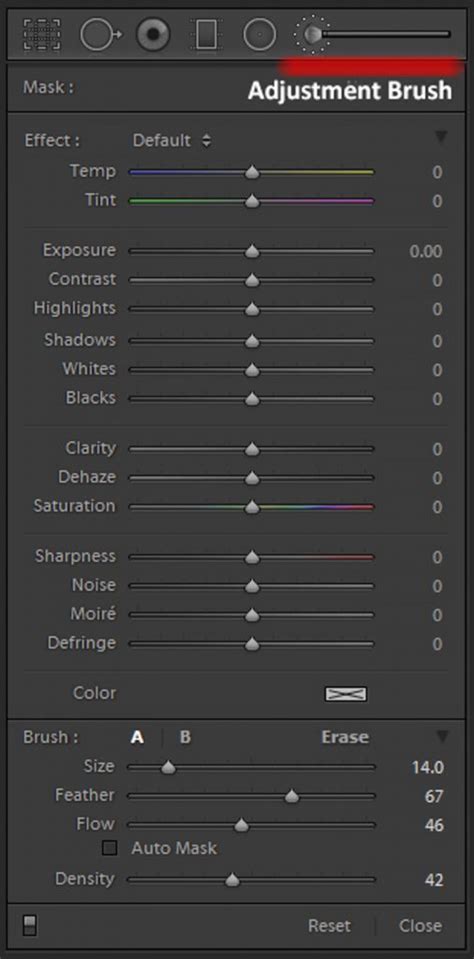
Utilizing the Adjustment Brush for Precision
When you select one of the selective adjustment tools, Lightroom will typically open the Adjustment Brush panel. Within this panel, you have the ability to create masks, adjust brush options, and meticulously edit specific areas of your image. To prepare for selecting the teeth, you'll start by adjusting the brush settings. Scroll down until you find these options, and then fine-tune the Size and Feathering. The optimal settings for these will depend on the specifics of your particular image. It's worth noting that you'll likely require a smaller brush when working near the edges of the teeth for greater precision. Fortunately, Lightroom offers the flexibility to create and save two distinct brush presets (labeled A and B), allowing you to switch between different brush characteristics easily. Enabling Auto Mask is highly recommended, as it helps to create a border around your selection, preventing the brush from affecting areas outside of the teeth. Once your brush is set up, you can carefully brush over the teeth you wish to whiten.
Leveraging the Built-in Teeth Whitening Preset
Teeth whitening is such a common retouching task that Lightroom conveniently includes a dedicated Teeth Whitening preset. To access this, open the Effect drop-down menu within the Adjustment Brush panel and select "Teeth Whitening." After applying the preset, your subject's teeth should appear whiter. If you are satisfied with the immediate effect, you can finalize the edit by clicking "Done." It's important to observe that applying a preset will automatically adjust certain sliders.
Fine-Tuning the Whitening Effect
Once the preset is applied, you'll notice that several sliders have changed. The next crucial step is to adjust the Exposure and Saturation sliders to best match your image. Constantly zoom in and out of your photograph to evaluate the overall result. The goal is to achieve a natural-looking brightness without making the teeth appear unnaturally stark or fake. The "Before" view is invaluable here, allowing you to compare the original image with your edited version.
If you are pleased with the whitening effect you've achieved, you have the option to save it as a custom preset. A dialog window will pop up, enabling you to select the specific elements you wish to include in your new preset. This can be a significant time-saver for future editing sessions.
Quick Natural Teeth Whitening Technique in Adobe Lightroom - Easy Tutorial
Understanding When and How to Whiten Teeth Naturally
It's essential to approach teeth whitening with a thoughtful and nuanced perspective. Teeth are not naturally a pure, stark white. Each individual possesses unique tooth tones, and applying a uniform whitening effect to every smile can look artificial. Therefore, you should refrain from adding teeth whitening as a default, automatic part of your workflow. Instead, consider it a tool to enhance specific images where it's needed.
When you do decide to whiten teeth, ensure that the result harmonizes with the overall mood and ambiance of the picture. For instance, if you've applied a vintage filter to your photograph, making the teeth exceptionally white can create a jarring contrast that detracts from the intended aesthetic.
Addressing Common Issues and Their Solutions
Several factors can make teeth appear less than ideal in photographs:
- Unflattering Shadows: Sometimes, an unflattering shadow can cast darkness or a stained appearance on teeth. This issue can often be resolved by simply adding more light using the Exposure slider.
- Lighting-Induced Yellowing: Certain lighting conditions can impart a yellowish hue to teeth. For example, using tungsten light or a golden reflector, while potentially creating pleasing warm tones for skin, can also cause teeth to appear yellower.
- Color Reflections: Teeth have a reflective surface and can easily pick up colors from nearby objects. This is a common occurrence and can lead to teeth appearing discolored.
- Underexposure: Teeth might appear underexposed due to lighting problems during the photoshoot or as a consequence of color editing during post-processing. If you are whitening teeth to correct these specific issues, the process is generally straightforward.
Ethical Considerations in Retouching
A critical aspect of retouching, especially when altering a person's appearance, is ethical consideration. If a client has not explicitly requested aesthetic changes, it is generally advisable not to assume they desire them. Natural discoloration is a part of the aging process for many individuals. If this is the case, avoid automatically applying teeth whitening as a standard part of your workflow. Always prioritize client consent and maintain a realistic portrayal unless otherwise instructed.
Advanced Techniques and Workflow Tips
When working with the Adjustment Brush, several tips can significantly improve your workflow and the quality of your results:
- Revisiting Selections: Anytime you need to go back and edit a previously made selection, simply click on the corresponding pin to reactivate it. If you feel you've overcorrected or are unhappy with the results, reactivating the selection allows you to refine it.
- Using the Erase Tool: If you accidentally select areas like the gums, lips, or anything else that shouldn't be affected by the teeth whitening, don't worry. You can always use the Erase tool. Within the Adjustment Brush panel, next to the Brush A/B presets, you'll find the word "Erase." Clicking this will allow you to remove parts of your selection.
- Maintaining Realism: Teeth discoloration is a natural part of aging. To keep your photo retouching realistic, avoid overdoing the whitening effect. Consider that a younger model would naturally have whiter teeth than an older one. This is one of the key reasons why you cannot use the same settings for every single photo.
- The Power of a Break: This advice is useful for any type of retouching. Whenever you're done with a session, take a break and come back to the image later with fresh eyes. Sometimes, you can become so focused on a specific part of the image that you lose sight of the bigger picture. Closing the computer for a while, going outside for some natural light, or simply resting your eyes can provide a new perspective when you return.
- Practice Makes Perfect: Continuously practice your teeth whitening techniques. Improving your skills in this area will undoubtedly enhance your photographs. Do you have any personal tips for teeth whitening? Have you tried whitening teeth in post-processing before? How did it turn out?
As we consume beverages like coffee, soda, and tea, and as we age, our teeth tend to yellow slightly. While visiting a dentist for a professional cleaning is beneficial for both cosmetic and health reasons, teeth can often appear a bit yellow on camera. Fortunately, Lightroom makes this easy to fix.
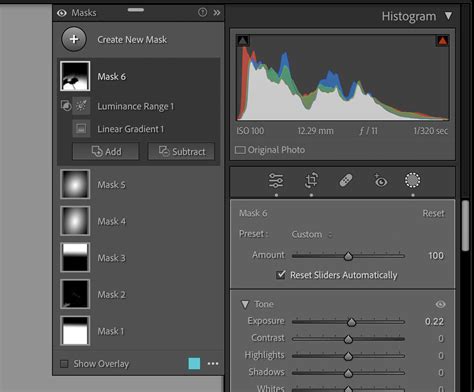
Exploring Lightroom's Masking Features for Targeted Edits
Lightroom's masking tools have seen significant updates, offering powerful ways to retouch portraits with speed and ease. While this guide focuses on teeth whitening, these masking capabilities can be applied to other areas, such as eyes.
To begin with masking, you'll typically find the option within the right-hand editing panel. You can also often use a keyboard shortcut, such as "M," to open the Masking panel. Once the panel is open, Lightroom may automatically analyze your image to detect subjects. For portraits, it can often identify human subjects and create avatars, allowing for easy management of multiple individuals in a photo.
When working with the "Person" mask, you'll find options to target specific areas like "Eye Sclera" (the whites of the eyes) or "Iris and Pupil." These presets are designed to subtly adjust parameters like Exposure and Saturation to achieve the desired effect. For instance, selecting "Eye Sclera" might involve increasing exposure slightly and reducing saturation to make the whites of the eyes appear brighter and purer. Similarly, enhancing the irises might involve a slight increase in both exposure and saturation to make them more captivating.
Manual Masking Adjustments for Teeth
To manually adjust teeth, you can follow a similar process. Within the "Person" mask options, select the "Teeth" option and click "Create." The "Whiten Teeth" preset is a good starting point, but for finer control, you can manually adjust sliders.
For an effective, subtle effect, consider these manual adjustments:
- Exposure: A slight increase, around +0.40, can help brighten the teeth without making them look unnatural.
- Saturation: A slight decrease, perhaps to -0.30, can reduce any unwanted yellow tones. If the teeth look too white, the image will feel manipulated, so aim for subtlety.
- Texture: Lowering texture values, for example, to -20, can help hide minor imperfections on the teeth's surface.
- Dehaze: Reducing Dehaze, to around -40, can soften the overall appearance and blend the teeth more harmoniously with the rest of the image.
Retouching is an exciting and rewarding process, but it often requires patience and precision. The search for that perfect balance between enhancement and naturalism is what makes the work so incredible.
Beyond Teeth: Enhancing Eyes in Lightroom
The same masking techniques used for teeth can be effectively applied to enhance eyes, making them more vibrant and engaging. To whiten the whites of the eyes, you can use the Adjustment Brush and select the "Dodge (Lighten)" brush or the "Eye Sclera" mask option. You may need to increase the exposure slightly and play with other settings to achieve your desired result. For the irises, you can use the "Iris Enhance" preset or manually adjust exposure and saturation to bring out their color and detail.
When editing eyes, as with teeth, it's crucial to keep the changes subtle and natural. The goal is to make the eyes look more alive and intense, as if they are truly looking back at the viewer, without appearing artificial. By carefully adjusting brush settings, size, and opacity for each person and for different areas of the eyes, you can ensure the effect is as natural as possible.
The Importance of a Natural Aesthetic
While Lightroom offers powerful tools for cosmetic enhancements, it's vital to remember the importance of a natural aesthetic. Over-editing can lead to images that look artificial and detract from the subject's genuine appearance. The goal of retouching should be to subtly improve an image, not to create an unrealistic representation. This applies to both teeth whitening and eye enhancement.
When you're done with your editing session, take a moment to step away from the image. A short break can provide a fresh perspective, allowing you to spot any areas where the editing might be too heavy-handed or unnatural. This "second look" is invaluable for ensuring your final image is both polished and authentic.
Ultimately, mastering teeth whitening and other portrait enhancements in Lightroom is about understanding the tools available and applying them judiciously. By following these guidelines and practicing regularly, you can significantly improve the impact of your photographs, ensuring every smile looks its absolute best.