Adobe Lightroom is a powerful tool for photographers, but like any complex software, it can sometimes experience slowdowns. A significant factor contributing to performance issues is the accumulation of cached data. This article delves into the intricacies of Lightroom's cache, explaining what it is, why clearing it is beneficial, and most importantly, how to do it effectively across different Lightroom versions, ensuring a smoother and more efficient editing experience.
Understanding the Lightroom Cache
The Lightroom cache is essentially a temporary storage area where the application keeps frequently accessed data to speed up operations. This includes various types of previews, metadata, and other information crucial for the editing process. When you import and edit images, Lightroom generates different kinds of previews to facilitate quick viewing and manipulation.
- Minimal Previews: These are the small, low-resolution JPEG previews embedded in the photos, generated by your camera. They are the fastest to create and offer a quick initial view.
- Standard Previews: Lightroom Classic creates these previews using the Camera Raw engine. They can sometimes appear different from minimal or embedded previews, especially if you've applied adjustments in the Develop module. You can specify the size of the Standard preview based on your display.
- 1:1 Previews: These previews offer a 100% view of actual pixels, also processed by the Camera Raw engine. When Lightroom Classic generates 1:1 previews, it also generates minimal and standard previews. Due to the extensive data processed, 1:1 previews can take a significant amount of time to create.
Lightroom Classic requires either a standard or 1:1 preview to display and work with photos. If you only import with Minimal or Embedded previews, Lightroom Classic automatically creates Standard and 1:1 previews as you work, which can hinder performance. Managing when and how these previews are rendered is key to increasing productivity.

Why Clearing the Cache is Essential
Over time, the cache can grow substantially, consuming valuable disk space and potentially leading to performance degradation. Clearing the cache offers several key benefits:
- Improved Performance: By removing temporary, and sometimes outdated, data, you free up system resources. This can lead to faster loading times, quicker application response, and a more fluid editing workflow.
- Storage Optimization: Preview files, particularly 1:1 previews, can consume gigabytes of disk space. Regularly clearing the cache helps reclaim this space, which is especially important for users with smaller hard drives or Solid State Drives (SSDs).
- Preventing Errors and Glitches: Accumulated cache data can sometimes become corrupted or outdated, leading to unexpected errors, glitches, or display issues within Lightroom. Clearing the cache can resolve these problems.
- Ensuring Catalog Health: While not directly deleting your original photos, managing cache files is part of maintaining a healthy Lightroom catalog.
Managing Previews for Optimal Performance
The management of previews is central to understanding cache optimization in Lightroom Classic.
Rendering 1:1 Previews:To render 1:1 previews on import, use the File Handling panel of the import window and choose "Render Previews > 1:1." Alternatively, for a speedier import, render minimal or standard previews and then, at any time, select multiple photos in the Grid view of the Library module and choose "Library > Previews > Render 1:1 Previews."
Standard Preview Size:For Standard Preview Size, choose the dimension closest to the longest edge of your screen resolution, but not shorter than it. Larger monitors and higher resolutions require Lightroom to perform more calculations for previews and pixel updates.
Discarding 1:1 Previews:Because 1:1 previews can quickly consume disk space, Lightroom Classic offers the option to discard them regularly-daily, weekly, or monthly. As long as disk space isn't an issue, keeping 1:1 previews for longer can optimize performance. However, the [Catalog name] Previews.lrdata file, which contains these previews, can grow significantly if the option to delete previews is set to "Never" or "30 days." This file resides in the same folder as your catalog file ([Catalog name].lrcat). If you experience low hard disk space issues, checking the size of this file is crucial.
Preview Cache Location:By default, Lightroom Classic keeps the preview cache file ([Catalog name] Previews.lrdata) in the same folder as the catalog file. If you move the catalog file or store it separately from the cache, Lightroom Classic will have to regenerate the previews.
Clearing the Cache in Lightroom Classic
Lightroom Classic provides several ways to manage its cache and previews:
1. Optimizing the Catalog:Lightroom Classic constantly writes changes to the catalog file (.lrcat). When performance slows, optimizing the catalog is a crucial step. Go to "File > Optimize Catalog." To further enhance performance and catalog stability, when you exit Lightroom Classic and back up the catalog, choose the options "Test Integrity Before Backing Up" and "Optimize The Catalog After Backing Up."

2. Managing Preview Cache Settings:You can view the size of your Preview Cache by going to "Lightroom Classic > Catalog Settings" (Mac) or "Edit > Catalog Settings" (PC) and clicking on "Previews" (or "File Handling" in Lightroom Classic 13 and earlier).
- Automatically Discard 1:1 Previews: To manage the space taken by 1:1 previews, set "Automatically Discard 1:1 Previews" to "After 30 Days," "After One Week," or "After One Day." The default setting is typically one week.
- Manual Deletion of 1:1 Previews: You can also delete 1:1 previews manually. Select the photos, and Lightroom Classic will eventually remove them from the cache. Note that there's a delay in deleting them from the Preview Cache to allow for Undo actions.
- Standard Previews Size: In "Catalog Settings," you can set the Standard Preview size. "Auto" selects the smallest size required for your monitor.
- Preview Cache Size Limit: Lightroom Classic allows you to set a limit for the Preview cache size in "Catalog Settings > Previews." When the cache approaches this limit, Lightroom purges old previews. The downside is that Lightroom will need to rebuild previews when you view older photos.
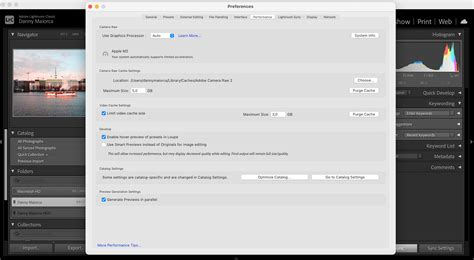
3. Purging Camera Raw Cache:Every time you view or edit raw images in the Develop module, Lightroom Classic generates up-to-date, high-quality previews. This process is faster if the original image data is in the Camera Raw cache. By default, Lightroom Classic sets the Camera Raw cache to 5 GB. To speed up the cache, keep it on a fast hard disk.
To delete all Develop module previews, go to "Edit > Preferences" (Windows) or "Lightroom Classic > Preferences" (Mac), navigate to the "Performance" tab, and click the "Purge Cache" button under "Camera Raw Cache Settings." This can reclaim significant hard drive space.
4. Deleting Old Catalog Files:Each year, Adobe releases a new version of Lightroom Classic, which updates the catalog and creates new catalog and preview files. Crucially, it doesn't delete old catalog files. Over time, these old files can accumulate and take up considerable disk space. You can safely delete older catalog and preview files from your Lightroom folder.

5. Moving the Catalog to an External Drive:For users running out of space on their internal drive, moving the Lightroom Classic catalog to an external SSD is a highly effective solution. This not only frees up internal storage but also allows you to use your catalog with any computer that has Lightroom Classic installed, provided you sign in with your Adobe ID and connect the external SSD.
Clearing the Cache in Lightroom CC (Cloud-based)
Lightroom CC, the cloud-based version, also has cache management options, though they are handled slightly differently.
1. Lightroom CC Preferences:In Lightroom CC, cache settings are often managed implicitly by the application's intelligent storage management. However, you can adjust preferences related to local storage and cache size. Access preferences by clicking the cloud icon in the upper-right corner and then the gear icon.
2. Clearing the Cache:If you're experiencing performance issues or need to free up space, you can manually clear the cache. This process removes temporary files that are safely stored in the cloud, so you don't risk losing original photos. The exact steps may vary slightly between versions, but generally involve navigating to preferences and finding an option to clear the cache.
Clearing the Cache in Lightroom Mobile
Lightroom Mobile, designed for phones and tablets, can also consume significant storage space.
1. Accessing Local Storage Settings:On iOS/iPadOS, tap the three dots (menu) in the upper right corner, then go to "App Settings > Local Storage." On Android, the location might vary (e.g., "Device Care" on Samsung). This section shows you how much space Lightroom is using.
2. Clearing the Cache:Within the "Local Storage" settings, you'll find a "Clear Cache" button. Tapping this removes cached files that are already safely stored in the cloud, ensuring your originals are not affected.
How to Fully CLEAR CACHE in Lightroom (3 Easy Ways)
3. Managing Locally Stored Albums:Albums marked to "Store Locally" are protected from cache clearing for offline editing. If you need to free up more space, you can toggle "Store Locally" off for these albums. This makes them part of the standard photo cache, which can then be cleared. Albums marked for local storage typically display a small blue icon.
Potential Risks of Clearing the Cache
While clearing the cache is generally beneficial, it's important to be aware of potential risks:
- Loss of Preview Images: If the cache is cleared without proper backup or synchronization, there's a theoretical risk of losing preview images. However, Lightroom's design prioritizes the safety of original files and catalog data.
- Loss of Edits and Adjustments (Temporary): Clearing the cache removes temporary data, which might include some recent, unsaved adjustments. This is why regularly saving or syncing your work is crucial. It's important to note that clearing the cache does not delete your original image files or permanent metadata.
- Slow Initial Loading Time: After clearing the cache, Lightroom may experience a slower initial loading time as it needs to regenerate necessary previews. This is a temporary effect and is a trade-off for improved ongoing performance.
How Often Should You Clear the Cache?
The frequency of clearing your Lightroom cache depends on several factors:
- Available Disk Space: If you notice your hard drive filling up, it's a strong indicator that cache clearing is needed.
- Editing Volume: Photographers who import and edit a large number of photos frequently may need to clear their cache more often.
- Performance Issues: If you experience noticeable slowdowns or glitches in Lightroom, clearing the cache is a primary troubleshooting step.
As a general guideline, consider clearing the cache every few months, or more frequently if you're actively managing limited storage space or experiencing performance issues.
Advanced Considerations and Tips
- XMP Sidecar Files: Changes made in Lightroom are stored in the catalog. For compatibility with other Adobe applications like Bridge and Camera Raw, these edits can be saved as XMP data. However, automatically saving changes to XMP can significantly degrade Lightroom Classic performance. Consider turning off "autowrite XMP" if you don't regularly switch between these applications, and manually save metadata changes when needed. Lightroom Classic now temporarily pauses automatic XMP writing during imports.
- Camera Raw Cache Size: In Lightroom Classic, the Camera Raw cache size can be adjusted in the "Preferences > Performance" section. The default is 5 GB. Increasing this size can sometimes improve performance if you work extensively with raw files, but it will also consume more disk space.
- Spot Removal and Local Corrections: The Spot Removal Tool and Local Corrections Brush are not designed for hundreds or thousands of corrections on a single image. Excessive local corrections can impact performance. Check your History panel for the number of applied corrections.
- Presets: A large number of presets (2,000 or more) can also reduce performance as the Develop module generates thumbnails for each in the Navigator panel.
By understanding and actively managing Lightroom's cache, you can significantly enhance its performance, optimize your storage, and ensure a more efficient and enjoyable photo editing workflow. Regularly applying these cache-clearing and management techniques will help keep your Lightroom experience smooth and productive.