Adobe InDesign, a powerful software designed for print and digital layout, offers extensive capabilities for creating professional book designs. While InDesign can seem complex, particularly for those new to graphic design, utilizing pre-made book design templates can significantly streamline the process. This guide will walk you through the essential steps of working with InDesign book templates, from setting up basic formatting to designing a complete book cover, empowering you to create polished, bookshelf-quality publications.
Leveraging InDesign Book Templates for Efficient Design
Rather than starting from scratch, this guide to InDesign formatting will assume you’re using one of the available InDesign book templates. This approach allows us to bypass many technical intricacies that are not essential for basic customization. Even so, InDesign can be frustratingly complex. For an initial setup, it's often recommended to hire a professional on platforms like Fiverr.com to handle the intricate formatting. However, possessing a working knowledge of InDesign is invaluable for making minor adjustments or correcting typos independently, eliminating the need to rely on a designer for every small change.
Understanding the Power of Master Pages
A core concept in InDesign for consistent document design is the "master page." Think of a master page as a page style that can be applied to multiple pages throughout your document. This is particularly useful for elements that repeat, such as headers, footers, and consistent margins. Once your master pages are established, you can efficiently tweak elements like headers and fonts, ensuring a uniform look across your entire book.
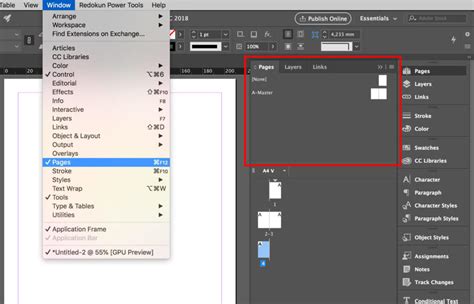
When working with a basic InDesign Book Template, you'll often find pre-configured master pages. For instance, one master page might be entirely blank, intended for chapter beginnings or introductory sections (often designated with an "H" or "A"). Another master page might include headers and page numbers (often designated with an "I" or "B").
Setting Up Paragraph Styles for Consistency
Paragraph styles are fundamental to maintaining a consistent typographical hierarchy within your book. They allow you to define and save formatting for different types of text, such as headings, body paragraphs, and captions.
To illustrate, let's consider setting up styles for a chapter heading and the first paragraph of a chapter. You might start by highlighting the "Chapter One" text. You would then select a desired font, such as Trajan Pro, and set it to all caps to match the book cover's aesthetic. Next, with the text still highlighted, you would access the Paragraph Styles panel and click the "new style" button. This action creates a new paragraph style, which you can name "Header1." Subsequently, any chapter heading can be formatted by simply highlighting the text and applying the "Header1" style.
The same process applies to other text elements. For a subtitle, you might increase the font size, ensure the text is centered, and choose a font like "Lato" to complement the cover. This style could then be saved as "Scene." For the initial paragraph of a chapter, you might select a font like Sabon at 11pt with 18pt line spacing. This formatting can be saved as a new style, "NoIndent." You would then open this "NoIndent" style and adjust the "Indents and spacing" settings to remove any default indent. If your imported text already has a default style applied, you can often redefine that existing style to match your desired formatting, saving considerable time.
Managing Pages and Overset Text
InDesign's page management is crucial for handling the flow of your content. When you import text into a template, InDesign will automatically add pages as needed to accommodate the content. However, if your imported text exceeds the pre-defined page count of a template (e.g., a 49-page template), you'll encounter "overset text," indicated by a small red plus sign.
To resolve this, you first need to insert additional pages into your document. After adding pages, you can click on the red plus sign, which will place the overset text onto your cursor. You can then click onto the next available page to flow the text. A more efficient method to avoid dealing with overset text is to hold down the "Shift" key while clicking to place the text; this will automatically create as many new pages as necessary to accommodate all the remaining text.
Alternatively, a quick workaround involves copying and pasting the formatted first paragraph and heading from an existing chapter to the beginning of other chapters. You would then replace the placeholder text with your actual chapter content.
For those aiming for professional, bookshelf-quality books, investing in comprehensive template packages and in-depth tutorial videos can be highly beneficial. These resources often provide over 100 formatting templates and detailed guidance, accelerating your learning curve and improving the final output.
Designing a Professional Book Cover in InDesign
Creating a compelling book cover is paramount to attracting readers. InDesign, combined with Adobe Illustrator, provides the tools to design both the front cover and the full paperback wrap-around cover.
Setting Up the Document for Cover Design
When commencing cover design, it’s advisable to first focus solely on the front cover before proceeding to the full wrap-around design.
- New Document Setup: Go to
File > New > Document. Set theIntenttoPrint. Increase theNumber of Pagesto2and deselectFacing Pages. - Custom Size: Name the custom size
Paperback Book. Set theWidthto132 mmandHeightto197 mm. These dimensions are common for paperback books but can be adjusted based on your specific requirements. - Margins and Bleed: Set the
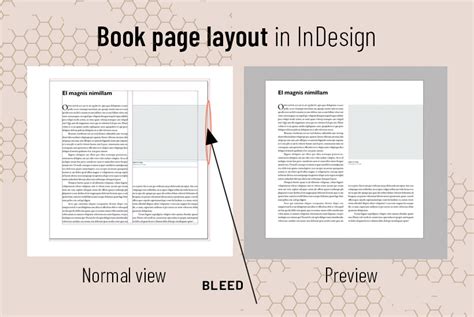
Marginson all sides to11 mm. TheBleedshould be set to5 mm. The bleed area is crucial; it ensures that colors or images extending to the edge of the page will not appear with white borders after trimming.

Designing the Front Cover
On Page 1 of your document, you'll work on the front cover design.
- Background Color/Gradient: Utilize the
Rectangle Tool (M)to draw a shape that covers the entire page, extending to the bleed edges on the top, right, and bottom. Open theSwatchespanel (Window > Color > Swatches) and create a newCMYK Process swatchwith specific color values (e.g., C=100, M=97, Y=48, K=56). You can also create gradients by adjusting theGradient Rampstops in theColorpanel. - Layers: Organize your design elements using layers. Open the
Layerspanel (Window > Layers) and rename the defaultLayer 1to something descriptive, like "Background." Create new layers for different elements (e.g., "Graphics," "Text"). - Placing Images: For graphical elements, you can import images. With a vector shape selected (perhaps created in Illustrator), go to
File > Placeand choose your desired image. Use theFill Frame Proportionallybutton in the control panel to size the image within the frame. You can double-click inside the frame to manually adjust the image's scale and position. For specific effects, you might need toFlip Vertical(Ctrl-Click (Mac) or Right-Click (Windows) > Transform > Flip Vertical). - Typography: For text elements, especially titles, it's often best to set individual characters in separate text frames. This provides greater freedom in precisely positioning each letter. Unlock all layers in the
Layerspanel and select all elements on the page.
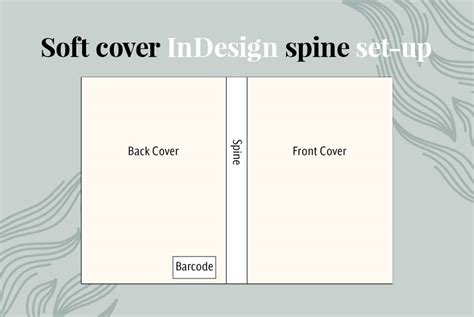
Creating the Full Wrap-Around Cover
To create the full cover, including the spine and back cover, you need to adjust the document size to accommodate all three sections.
- Extending the Page: Select the
Page Tool (Shift + P). Hold downOption(Windows) orAlt(Mac) and drag the left-hand edge of the page outward to increase the page width to the full width of your cover (e.g.,337.7 mm). This combined width typically includes the front cover, spine, and back cover. - Spine Design: The width of the spine is determined by the number of pages in your book and the paper stock used. Create a shape using the
Rectangle Tool (M)that spans the calculated spine width and extends to the bleed on the top and bottom. Apply a background color or gradient, such as "Blue Gradient Spine," to this shape. - Back Cover Design: Create a second shape using the
Rectangle Tool (M)that covers the entire back cover area, extending to the left edge of the spine and to the bleed on all relevant sides. - Adding Graphics and Text to the Back Cover: You can copy and paste graphical elements from the front cover to the back cover, arranging them as desired. For the title on the spine, create multiple text frames, one for each line, and mimic the typography from the front cover but at a smaller font size. For a blurb or synopsis on the back cover, create a text frame, align the text centrally, and choose an appropriate font and size (e.g., Columna Solid, 10.5 pt, Leading 13 pt).
- Effects and Transparency: To create visual depth or specific effects, you can use InDesign's
Effectspanel (Object > Effects > Transparency). For example, aGradient Feathercan be applied to image frames for a subtle fade.
Exporting the Cover for Print
Once your cover design is complete, it needs to be exported in a format suitable for printing.
- Export Settings: Go to
File > Export. ChooseAdobe PDF (Print)from theFormatdrop-down menu. - Marks and Bleeds: In the export window, navigate to the
Marks and Bleedssection. Ensure thatCrop MarksandUse Document Bleed Settingsare selected. This ensures the printer receives the file with the correct trim lines and the necessary bleed area. - Compression: In the
Compressiontab, turn off all compression settings to avoid any unnecessary quality loss, especially for high-resolution images. - Output: In the
Outputtab, if your images are in CMYK, chooseNo Color Conversion. If your images are in RGB, selectConvert to Destination (Preserve Numbers)and choose an appropriate color profile based on your printer's requirements (e.g.,Japan Color 2001 Coatedfor coated paper).
Top tip: It's often best practice to export your cover and inside pages as separate PDF files.
Typesetting the Interior Pages of Your Book
Typesetting, the process of arranging text on the inside pages of a book, is a critical step in creating a professional publication. While it might seem daunting, understanding the basics of InDesign can empower you to typeset your own books.
Creating a Book File for Long Documents
For lengthy books composed of multiple InDesign documents (e.g., one document per chapter), InDesign's "Book Files" feature is invaluable. A book file acts as a container for individual documents, allowing them to be managed collectively.
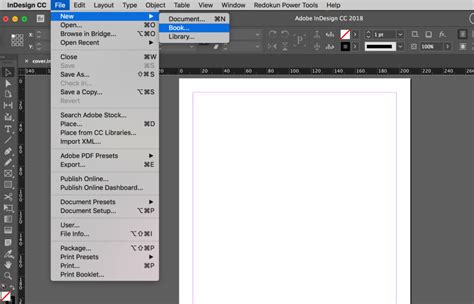
- Creating a Book File: Go to
File > New > Bookin InDesign. This will open theBookpanel. - Adding Documents: From the
Bookpanel's main menu, chooseAdd Document. You can then add your individual chapter InDesign files to the book. - Style Source: The first document added to a book file typically serves as the "style source," meaning its styles, swatches, and master pages can be synchronized across all documents in the book. You can change the style source at any time from the
Bookpanel menu.
Page Numbering and Section Management
Proper page numbering is essential for a well-organized book. InDesign's Numbering & Section Options dialog box allows precise control over how pages and chapters are numbered.
- Starting Page Numbers: Within each document (or through the Book panel), you can specify the starting page number for a section. For instance, you might want page 1 of your book to begin on the first page of the opening chapter. In the
New Sectionwindow, checkStart Page Numbering atand set it to1. - Roman Numerals: For front matter (like the table of contents or preface), you might want to use Roman numerals. You can set this up by checking
Start Page Numbering atand setting it to1, then choosingi, ii, iii, iv...from theStylemenu. - Automatic Updates: When using a Book File, InDesign automatically updates page and section numbering as you add, remove, or reorder documents. If the numbering appears incorrect, check your
General Preferencesto ensure absolute numbers aren't being displayed instead of section numbers.
Importing and Formatting Text
When importing text from sources like Microsoft Word, InDesign will attempt to apply existing paragraph styles.
- Pasting Text: You can copy and paste text directly from a Word document into InDesign text frames.
- Redefining Styles: If the imported text has an unwanted default style, you can redefine the current style to match your desired formatting. This will apply the changes to all text using that style.
- Threading Text: For continuous text flow across multiple pages, you need to "thread" text frames. After placing text in a frame, a small white square symbol at the bottom-right indicates overflowing text. Click this symbol, and your cursor will transform into a few lines of text. Clicking into another text frame will link them, allowing the text to flow seamlessly.
Designing a Basic Book Page Template
When creating a book layout template from scratch, you'll define the fundamental structure of your pages.
- Page Size: Start by setting the
WidthandHeightof your document pages (e.g.,5 x 8 inches). - Master Pages: Apply master pages for recurring elements. For example, a master page named "B-Master" might contain placeholders for chapter titles, author names, and publisher information, along with running headers and footers. Right-click on the "B-Master" icon and select
Apply Master to Pagesto apply it to your document pages. - Text Frames and Guides: Use text frames to hold your content. Utilize InDesign's guides to align text accurately. For instance, a text frame's baseline can be aligned with a horizontal guide.
- Creating Chapters: Use the first chapter as a model for subsequent chapters. You can copy and paste formatted text frames and then replace the content with the new chapter's text.
Advanced Techniques and Considerations
Beyond the core formatting and design elements, several advanced techniques and considerations contribute to a polished book.
Understanding Print Specifications
When preparing a book for print, understanding printer specifications is crucial. This includes:
- Paper Stock: The weight and type of paper stock affect the book's overall feel and the spine's width. Heavier paper stock results in a thicker book.
- Standard Sizes: Adhering to standard book sizes (e.g., 5x8 inches, 6x9 inches) ensures your book will fit on retail shelves and is recognizable within its genre.
- Resolution: Images for print should have a resolution of at least 300 pixels per inch (ppi) or dots per inch (dpi), with 400 ppi/dpi being acceptable.
Booklet and Zine Creation
InDesign is also suitable for creating smaller print projects like booklets and zines.
- Document Setup: When creating a new document for a booklet, choose an appropriate paper size (e.g., "half-letter" or "letter"). Ensure the total page count is a multiple of 4 for proper binding.
- Printing Booklets: When printing, select the "2-up Saddle Stitch" option (or similar, depending on your binding method). Use the
Previewbutton to verify your layout before printing. - Binding: For saddle-stitched booklets, you can use a saddle stapler or stitch the pages together manually.
Utilizing Resources for Further Learning
The journey of mastering InDesign for book design is ongoing. Several resources can aid in this process:
- Free Templates: Signing up for free packages of book formatting templates can provide a valuable starting point.
- Master Packages: For in-depth learning, consider comprehensive master packages that include over 100 formatting templates and detailed tutorial videos. These resources often cover advanced topics and share insights from experienced writers and publishers.
- Inspiration: Explore online resources like Pinterest and the Book Cover Archive for book design inspiration. Observing creative and diverse cover designs can spark ideas for your own projects.
- Video Tutorials: Numerous video tutorials are available on platforms like YouTube, offering step-by-step visual guidance for specific InDesign tasks. For example, a tutorial by Ashlee Harrell from Envato Tuts+ can demonstrate how to create a book layout template.
HOW TO LAYOUT YOUR BOOK IN INDESIGN!
Embracing Inclusivity in Design
Adobe is committed to inclusivity, and this extends to its software. InDesign versions 2022 (17.0) and later are being updated to replace non-inclusive language, reflecting core Adobe values. This ongoing development ensures that InDesign remains a relevant and ethical tool for all creators.
By understanding and applying the principles of template utilization, master pages, paragraph styles, page management, and cover design within Adobe InDesign, you can significantly enhance your ability to produce professional and visually appealing books. Whether you are a novice or an experienced designer, leveraging these techniques will undoubtedly elevate the quality and impact of your literary projects.