Adobe InDesign offers a robust suite of tools for precise control over document dimensions, a fundamental aspect of professional design. Whether you are embarking on a new project or refining an existing one, understanding how to effectively change page sizes is paramount for achieving polished and purposeful layouts. This capability is particularly vital when working with diverse design collateral, from intricate brochures and multi-page magazines to specific digital outputs and even book templates.
Setting the Stage: New Document Dimensions
When initiating a new project in InDesign, the process of defining the page size is integrated into the very first steps. The New Document dialog box presents users with a convenient dropdown menu labeled “Page Size.” This menu is pre-populated with a wide array of industry-standard and commonly used dimensions. These presets are a significant time-saver, offering immediate access to popular formats such as A4, Letter, and Legal. International paper sizes, largely governed by the ISO 216 standard, are also represented, encompassing the A, B, and C series. The A series, in particular, is ubiquitous, with A4 (measuring 210 x 297 mm) being a prevalent choice for everything from everyday documents and brochures to promotional flyers.
Should the predefined options not align perfectly with the unique requirements of your project, InDesign provides the flexibility to define custom dimensions. Within the same New Document dialog box, dedicated fields for “Width” and “Height” allow you to input exact measurements, empowering you to design for any specific print or digital output. This level of granular control ensures that your design specifications are met from the outset.
Adapting Existing Documents: The Document Setup Dialog
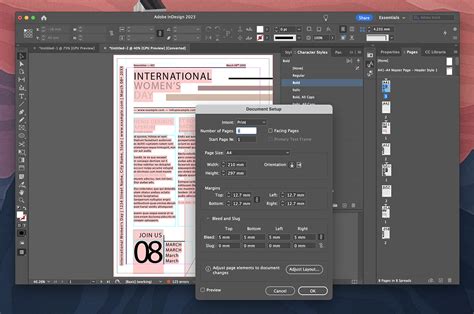
For projects already in progress, modifying the page size is managed through the Document Setup dialog box. This is where you can alter the fundamental dimensions of your entire document. Accessing this dialog box allows you to change the “Width” and “Height” values, effectively redefining the canvas for all your content. It is crucial to note that when changing the page size of an existing document, especially a complex one, the layout of your content may be impacted. Elements might shift, overflow, or appear out of proportion if not managed carefully.

The "Adjust Layout" Feature: Intelligent Resizing
To mitigate the potential disruptions caused by resizing an established document, InDesign offers the intelligent Adjust Layout feature. When you choose to resize your document via the Document Setup dialog, you can enable “Preview” to see the changes. If you then select the “Adjust Layout” option, InDesign attempts to intelligently reflow and resize your content to fit the new page dimensions. This feature can be a lifesaver, preventing hours of manual repositioning and resizing of individual elements.
The Adjust Layout dialog box provides further granular control. You can opt to auto-adjust margins to accommodate the new page size or retain the original margin settings. A particularly valuable option within this dialog is Adjust Font Size. This setting allows you to determine whether the text within your document should scale proportionally with the page dimensions or maintain its original font size. For instance, when resizing a document from a larger format to a smaller one, you might choose not to adjust font size to ensure readability. Conversely, for a document intended for a different screen size or a scaled-up print, allowing fonts to resize proportionally can maintain visual harmony. The ability to set limits on font resizing further refines this control.
When creating custom page sizes within the Document Setup dialog, you can also save these custom dimensions for future use. In the Custom Page Size option window, you can name these new presets, such as “Project 1,” and define their width and height. This streamlines the process for recurring project types.
Precision Control: Resizing Individual Pages and Spreads
InDesign’s versatility extends to managing different page sizes within a single document. This capability is invaluable for projects that incorporate unique elements, such as booklets featuring fold-out pages, gatefold brochures, or magazine layouts with pull-out sections.
To adjust the size of individual pages or a selection of pages, the Page Tool (activated by pressing Shift-P) becomes your primary instrument. Once the Page Tool is active, you can select a specific page on your layout. The Control panel, typically located at the top of the InDesign interface, then displays relevant options for the selected page. Here, you can directly input new “Width” and “Height” values.
Leveraging the Page Tool and Liquid Page Rules
When using the Page Tool for resizing, the interaction with Liquid Page Rules is critical for managing how content adapts. The Control panel offers Liquid Page Rule options, which provide flexibility in how pages and their content behave when resized. These rules can be set to “Off,” “Scale,” “Re-center,” “Object-based,” or “Generate Report.”
For instance, if you are working with an InDesign brochure template, especially a trifold or gatefold design, and need to adjust specific page dimensions, the Page Tool is essential. You can select a page, choose a reference point (e.g., the top-right corner), and set the Liquid Page Rule to “Off.” Then, by entering a new width, the page will resize, and elements will generally maintain their relative positions unless the “Objects Move with Page” option is also engaged.
Conversely, setting the Liquid Page Rule to “Scale” can be instrumental when you want the content to resize proportionally with the page. For example, if you select a page, choose the top-left corner reference point, set the Liquid Page Rule to “Scale,” and then change the width, the page content will scale to fit the new dimensions. This is particularly effective for maintaining proportional relationships across a design.
The "Change Page Size" Option: Targeted Adjustments
The Change Page Size option, accessible via the Control bar when using the Page Tool, is specifically designed for modifying a single page or multiple selected pages without necessarily wanting all elements to resize automatically. This is an excellent approach when you aim to create specific layouts like gatefold or trifold brochures, magazine fold-outs, or even book templates that require a distinct spine width.
In the Control bar, within the section dedicated to page tools, you’ll find the Liquid Page Rule options. As mentioned, these offer different behaviors for content adaptation. Crucially, there's also a checkbox labeled Objects Move with Page. When this is enabled, InDesign will attempt to readjust the elements on the page to fit the new dimensions. If this checkbox is not selected, the content will remain in its original position and size, potentially leading to overflow or empty space depending on the resize operation.
For a practical demonstration, consider resizing a page for a gatefold brochure. Using the Page Tool, you select the relevant page. You might then choose a reference point (e.g., top-right corner) and ensure the Liquid Page Rule is set appropriately, perhaps to “Off” initially. By then adjusting the width, you can precisely control how that specific page’s dimensions change. For another page, you might opt for a different reference point and set the Liquid Page Rule to “Scale” to observe how the content adapts differently. This hands-on approach reveals the nuances of each setting.
📏 Changing Page Size and Margins in Adobe InDesign 2024 | Essential Training
Practical Applications: Brochures, Magazines, and Books
The ability to manipulate page sizes in InDesign is not merely an abstract feature; it has direct and significant implications for various design projects.
Brochures: From Trifolds to Gatefolds
When designing brochures, especially those with complex folds like trifolds or gatefolds, precise page dimension control is non-negotiable. An InDesign brochure template might provide a starting point, but often, custom dimensions are required to ensure the final folded product has the correct proportions and that content fits neatly within each panel. Resizing individual pages using the Page Tool and experimenting with Liquid Page Rules allows designers to craft these intricate layouts effectively. For example, a gatefold brochure might involve a central spread with two outer panels that fold inwards. Each of these sections might require specific, albeit related, dimensions that can be precisely set.
Magazines and Fold-outs
Magazine design frequently involves dynamic layouts, including pull-out sections or spreads that extend beyond the standard page size. InDesign’s page resizing capabilities enable designers to create these visually engaging elements. Whether it’s a larger-than-life advertisement that unfolds or a special feature that spans multiple, dynamically sized pages, the tools discussed allow for such creative freedom. Editorial designers often utilize these techniques to add visual impact and interactive elements to their publications.
Books and Book Jackets
For book templates and book jackets, page size management is equally critical. A book’s interior pages might all adhere to a standard size, but the book jacket often requires a different set of dimensions to accommodate the front cover, back cover, and spine. The spine width, in particular, is directly related to the number of pages and the paper stock thickness, necessitating precise adjustments. Resizing entire documents or specific pages to fit these varied requirements ensures a professional and cohesive final product.
Product Catalogs and Alternate Layouts
Consider the scenario of a 60-page product catalog originally designed for an 8.5 x 11-inch format, which now needs to be adapted to a smaller 4.25 x 5.5-inch format, potentially with pricing and scaling information removed. Manually re-laying out hundreds of products would be an arduous task. InDesign’s Alternate Layout feature, used in conjunction with precise page resizing and the Liquid Page Rule set to “Scale,” can automate much of this process. By creating a new master page with the desired smaller dimensions and applying the scaled liquid layout to all original pages, the core content can be proportionally resized. This allows designers to then focus on refining the text and any specific elements that might require manual adjustment in the new, scaled-down format. This approach significantly reduces the manual effort involved in repurposing large documents.
Advanced Techniques and Considerations
When resizing pages, especially in complex documents, several advanced considerations come into play:
Understanding the Impact on Content
As reiterated, changing page size can significantly affect your content. Elements might be cut off, overlap awkwardly, or become disproportionately sized. Always preview changes and utilize the Adjust Layout and Liquid Page Rule features thoughtfully.
Page Tool Reference Points
The reference point selected in the Page Tool options dictates the anchor for resizing. Choosing the top-left corner means the bottom-right will move as the page resizes, while selecting the center will expand or contract the page outwards from the middle. Understanding this is key to predictable resizing.
Consistency Across Spreads
When working with spreads (facing pages), ensuring consistency is important. Resizing one page in a spread might necessitate corresponding adjustments to its facing page, depending on the design’s intent. The Pages panel allows for easy manipulation of spreads and individual pages.
Utilizing Templates Effectively
While InDesign templates offer a great starting point, they are often designed with specific dimensions in mind. Knowing how to resize these templates to fit new requirements is a crucial skill. Whether it's an InDesign newsletter template, an InDesign brochure template, or even more complex book templates, the principles of page resizing remain consistent.
The Power of "Objects Move with Page"
This checkbox in the Control panel is a powerful ally. When active, it attempts to move and resize objects relative to the page boundaries. This is often desirable when scaling down a document, ensuring that elements that were previously near the edge remain near the new, smaller edge. However, for precise control or when you want elements to maintain their absolute position on a larger canvas, you might disable this option.
In conclusion, mastering page size adjustments in Adobe InDesign is an indispensable skill for any designer. The software provides a comprehensive toolkit, from initial document setup to fine-tuned control over individual pages within existing documents. By understanding and strategically employing features like Document Setup, the Page Tool, Adjust Layout, and Liquid Page Rules, designers can confidently adapt their work to a vast array of project requirements, ensuring both aesthetic integrity and functional suitability.