In the intricate world of video editing, DaVinci Resolve stands as a robust platform, a vital tool for both burgeoning creators and seasoned professionals. Among its extensive features, the ability to seamlessly zoom in and out of video clips holds significant power for narrative impact. This capability transcends mere technical manipulation; it is an art form, the art of the dynamic zoom in DaVinci Resolve, which imbues projects with a cinematic quality. This comprehensive guide will serve as your compass, demystifying the process and equipping you with the knowledge to craft compelling visual narratives.
Before we delve into the practicalities, it's essential to appreciate why mastering the zoom effect in DaVinci Resolve is a worthwhile endeavor. The zoom effect is far more than a simple alteration of the viewer's proximity to the scene. It is a deliberate act of controlling focus, guiding attention to critical details, and instilling a sense of motion within even static shots. Imagine the power to direct your audience's gaze towards a fleeting expression on an actor's face or an overlooked object that carries narrative weight. Furthermore, the zoom effect possesses the capacity to profoundly enhance storytelling. It cultivates an intimate connection between the viewer and the video content, fostering deeper engagement with the narrative. While seemingly straightforward, its influence on the audience's viewing experience can be remarkably significant.
As we embark on this tutorial, the importance of utilizing high-quality video clips cannot be overstated. Resources like Envato Elements, with its vast repository of professional-grade digital assets, prove invaluable. Whether you seek sweeping landscapes, vibrant urban scenes, or intimate, quiet moments, Envato Elements offers a rich selection. This guide will illustrate how to zoom in and out in DaVinci Resolve, but remember, the efficacy of your zoom effect is intrinsically linked to the quality of the source material.
DaVinci Resolve is replete with features that empower users to produce professional-grade videos. As highlighted, the Zoom effect, when animated, injects dynamism and cinematic flair into your projects.
The Inspector Panel: Your Gateway to Zoom Control
The Inspector panel in DaVinci Resolve serves as your primary control center for editing and manipulating individual clips. To initiate zoom adjustments, begin by opening DaVinci Resolve and navigating to your timeline.
Accessing Transform Controls
Once your clip is selected on the Edit page, locate the Inspector panel, typically found in the top right-hand corner of the interface. Within the Inspector, you will find the "Transform" section. This area houses the fundamental controls for scaling, positioning, and rotating your footage.
The Zoom Parameter
Under the "Transform" section, you will encounter "Zoom X" and "Zoom Y" parameters. These control the horizontal and vertical scaling of your clip, respectively. By default, the zoom value is set to 1.000. Increasing this value will zoom the clip in, making the image appear larger and closer. Conversely, decreasing the value below 1.000 will zoom the clip out, revealing a wider view. For precise adjustments, you can click and drag on the numerical values or type in specific numbers.
Repositioning with Position Controls
As you zoom in, your subject might shift out of the desired frame. The "Position X" and "Position Y" controls, also located within the "Transform" section, allow you to fine-tune the placement of your zoomed-in footage. Adjusting these values enables you to pan (move horizontally) or tilt (move vertically) your clip to perfectly frame your subject or desired area of interest.
Resetting Values
Should you wish to revert any transform parameter back to its default setting, you can simply double-click on the parameter's name or click the circular icon to the right of the input fields.
Animating Zoom with Keyframes
For dynamic and engaging zoom effects, the use of keyframes is indispensable. Keyframes are markers on your timeline that define specific points in time where a change in a parameter occurs. DaVinci Resolve then interpolates, or smoothly transitions, between these keyframes to create animation.
Setting the Initial Keyframe
To begin animating a zoom, first, ensure your clip is selected and the Inspector panel is open. Navigate to the "Zoom" parameter within the "Transform" section. You will notice a small diamond icon (🔷) next to the zoom value. Clicking this icon will set a keyframe at the current playhead position, marking the starting point of your zoom animation. The diamond will turn red, indicating that a keyframe has been created.
Defining the End Keyframe and Zoom Value
Next, move your playhead to the point in the timeline where you want the zoom animation to conclude. Adjust the "Zoom X" and "Zoom Y" values to your desired zoom level for this endpoint. DaVinci Resolve will automatically create a new keyframe at this position with the updated zoom value. The software will then generate a smooth animation between the initial and final keyframes, creating a gradual zoom in or zoom out.
Refining Animation with Ease In/Out
The default animation between keyframes is linear, meaning the zoom occurs at a constant speed. To create more natural and visually appealing transitions, you can apply easing. Right-click on a keyframe in the timeline or in the Keyframe Editor. You will see options for "Ease In," "Ease Out," and "Ease In and Out."
- Ease In: The animation starts slowly and accelerates towards the end.
- Ease Out: The animation starts quickly and decelerates towards the end.
- Ease In and Out: The animation starts slowly, accelerates in the middle, and then decelerates towards the end, providing a very smooth and organic feel.
These easing options allow you to control the acceleration and deceleration of your zoom, adding a polished and professional touch to your animations.
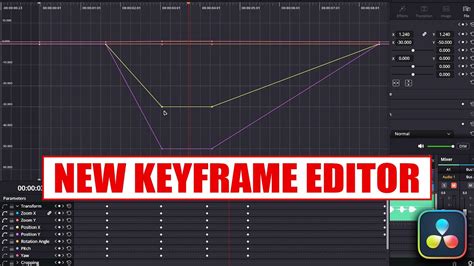
The Keyframe Editor
For more granular control over your animations, DaVinci Resolve offers the Keyframe Editor. This can be accessed by clicking the keyframe icon at the bottom of the clip in the timeline. The Keyframe Editor displays all the keyframes applied to your clip, allowing you to precisely adjust their timing by dragging them left or right. You can also manipulate Bezier handles to fine-tune the animation curves, offering an advanced level of control over the zoom's motion.
Dynamic Zoom: Effortless Cinematic Zooms
DaVinci Resolve's "Dynamic Zoom" feature offers a streamlined approach to creating smooth, automated zoom effects without the need for manual keyframing. This is particularly useful for achieving cinematic pans and zooms across still images or for adding subtle movement to video clips.
Activating Dynamic Zoom
To utilize Dynamic Zoom, select your clip on the timeline and open the Inspector panel. Navigate to the "Dynamic Zoom" section and toggle the option on. By default, this will initiate a gradual zoom-in effect for the entire duration of the clip.
Customizing the Zoom
Within the Viewer, you will see two bounding boxes: a green box representing the start of the zoom and a red box representing the end. These boxes indicate the framing at the beginning and end of the Dynamic Zoom effect. You can adjust the size and position of these boxes to define the area that will be zoomed into or out of.
The "Swap" icon in the Inspector allows you to reverse the direction of the zoom, enabling a zoom-out effect. Similar to keyframed animations, you can also choose different easing options (Linear, Ease In, Ease Out, Ease In and Out) for the Dynamic Zoom effect to control its speed and flow.
DYNAMIC Zoom Camera Movement - DaVinci Resolve TUTORIAL HOW TO Ken Burns Effect
Advanced Zoom Techniques
For more complex and creative zoom effects, DaVinci Resolve provides additional tools and workflows.
The Edit Page Crop Tool
The Crop tool, found within the Inspector panel under the "Cropping" section, can be used in conjunction with the Transform controls for specific zooming scenarios. By cropping the sides of your clip, you effectively zoom into the remaining visible area. Increasing the "Zoom" values under "Transform" then further enlarges this cropped section, allowing for precise framing of a particular element within the original shot. This method is particularly effective for creating close-ups without necessarily scaling the entire image uniformly.
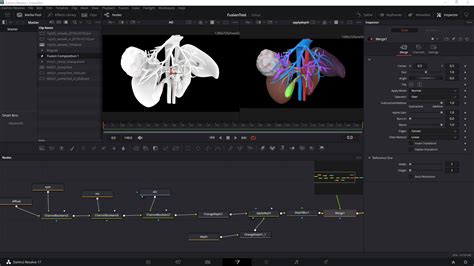
The Fusion Page for Sophisticated Effects
The Fusion page in DaVinci Resolve is a node-based compositing environment that offers unparalleled control over visual effects, including advanced zoom animations.
Zooming in Fusion
To create a zoom effect in Fusion, you'll typically add a "Transform" node to your clip's media input. Within the Inspector for the Transform node, you can adjust the "Size" parameter to zoom in or out. The "Center X/Y" values allow you to reposition the zoomed frame. Crucially, the Fusion page allows for intricate keyframe animation of these parameters, enabling complex zoom paths, motion tracking integration, and sophisticated visual effects that go beyond the capabilities of the Edit page.
Troubleshooting Common Zoom Issues
Even with powerful tools, users can encounter challenges when implementing zoom effects.
Blurry or Pixelated Zoom
If your zoomed footage appears blurry or pixelated, several factors could be at play:
- Source Footage Resolution: Zooming into low-resolution footage is a primary cause of degradation. Ensure you are working with high-resolution source material (e.g., 4K or higher) whenever possible.
- Project Settings: In DaVinci Resolve's Project Settings, under "Image Scaling," ensure the "Resize Filter" is set to "Smoother" to improve the clarity of scaled footage.
- Super Scale: For significant zooms on lower-resolution footage, DaVinci Resolve's "Super Scale" feature can help by intelligently upscaling the image, though it's not a substitute for native high-resolution material.
Zoom Not Working as Expected in Fusion
If your zoom isn't behaving correctly within Fusion:
- Node Connection: Ensure the zoom effect is applied via a "Transform" node connected to your media input, rather than directly to the "MediaIn" node.
- Parameter Reset: Resetting the "Zoom" and "Position" (or "Size" and "Center") parameters within the Inspector can often resolve unexpected behavior.
Laggy Playback
Applying complex zoom animations or effects can sometimes lead to playback lag. To mitigate this:
- Render Cache: Enable the Render Cache under "Playback > Render Cache > Smart." This allows DaVinci Resolve to pre-render sections of your timeline, providing smoother playback.
- Playback Resolution: Temporarily lower the playback resolution in the timeline viewer (e.g., to "Half" or "Quarter") to reduce the processing load during editing.
- Optimized Media: For very demanding projects, consider generating "Optimized Media," which creates lower-resolution proxy files for smoother editing.
Conclusion: Elevating Your Visuals with Zoom
Mastering the zoom effect in DaVinci Resolve is a fundamental skill that can dramatically enhance the visual appeal and narrative power of your video projects. From the straightforward adjustments offered by the Inspector's Transform controls to the automated elegance of Dynamic Zoom and the deep customization of the Fusion page, DaVinci Resolve provides a comprehensive toolkit for every level of editor. By understanding these techniques, experimenting with keyframes and easing, and troubleshooting common issues, you can effectively guide your audience's attention, emphasize crucial details, and infuse your videos with dynamic, professional polish. Remember that practice and exploration are key; don't hesitate to experiment with different zoom levels, timings, and animation styles to discover what best serves your unique storytelling needs.