Photoshop offers a powerful array of tools for manipulating and refining colors within an image. Among these, the ability to select by color is paramount, enabling precise adjustments to hue, saturation, and brightness. This guide delves into the various methods for selecting by color in Photoshop, from the intuitive Color Range command to the nuanced control offered by adjustment layers. Understanding these techniques empowers both novice users and seasoned professionals to achieve sophisticated color edits.
The Power of Color Range Selection
The Color Range command is a cornerstone for selecting specific colors within an image. It allows you to create selections based on the color components present in an image, making it exceptionally easy to target a particular color and subsequently alter its hue, saturation, and/or brightness. This method is particularly effective for selecting broken or dispersed areas that share the same color, which would otherwise be time-consuming and difficult to isolate using traditional selection tools like the Lasso or Marquee tools.
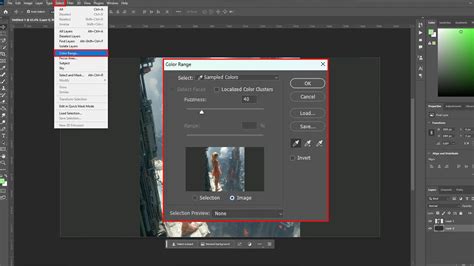
To initiate a Color Range selection, navigate to Select > Color Range. With the selection radio button active, you can click directly within the preview area or on your image to sample the desired color. The dialog box offers additional sampling tools: an eyedropper with a plus sign to add colors to your selection, and one with a minus sign to remove them. These are invaluable for refining your selection when multiple colors need to be included or excluded.
The default Color Range selection works by sampling colors you choose in the preview area. However, there are other useful selection modes. For instance, if you wish to select a color but only from a specific area of the image, you can first make a rough selection using a tool like the Lasso Tool before opening the Color Range dialog. The "Selection Preview" dropdown allows you to see a larger preview of the selected areas directly in your actual image, aiding in precise selection.
Within the Color Range dialog box, you'll encounter two crucial sliders: "Fuzziness" and "Range." Sliding the "Fuzziness" bar to the right (up to 200) increases the range of color values picked up, while sliding it to the left (to 0) results in very few colors being picked up. The "Range" bar controls the distance or spread with which colors are selected. For the "Range" bar to function effectively, the "Localised Colour Clusters" box must be ticked. Sliding the "Range" bar to 100 (right) will pick up colors around a larger distance compared to a setting of 0 (left).
Below the "Save" button in the Colour Range dialog box, you'll find three eyedropper icons. The first is the standard eyedropper, the second has a small plus sign, and the third has a small minus sign. The standard eyedropper is selected by default. By selecting the eyedropper with the plus sign, you add to the current selection (shortcut key: Shift). Conversely, the minus eyedropper allows you to subtract from the selection (shortcut key: Alt/Option). When sampling colors directly from the image, ensure the eyedropper is held over the actual image, not the mask preview. However, keep an eye on the Color Range dialog box preview while selecting. It's important to note that in the pop-up preview menu, white indicates the area that will remain, while black signifies the area that will be replaced or adjusted. Once satisfied with your selection, press "OK."
Advanced Color Matching Process in Photoshop
Leveraging Adjustment Layers for Color Control
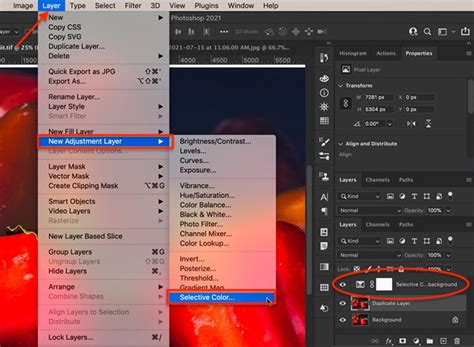
Once a selection has been made using Color Range, the next step is to apply an adjustment layer to modify the color. The Hue/Saturation adjustment layer is a common and highly effective choice for this purpose. With your selection active, add a Hue/Saturation adjustment layer (Layer > New Adjustment Layer > Hue/Saturation). This non-destructive adjustment allows you to alter the color without permanently affecting the original image pixels.
Within the Hue/Saturation properties panel, you can manipulate the "Hue" slider to shift the selected color to a new hue. Experimenting with this slider allows you to select the exact color you desire for the change. This method is generally very flexible and adaptable to a wide range of scenarios, providing a straightforward path to changing colors in an image.
Selective Color: Fine-Tuning Color Components
For more intricate control over color, the Selective Color adjustment layer is indispensable. This adjustment allows you to modify the color components in an image by targeting specific color ranges and adjusting their cyan, magenta, yellow, and black (CMYK) values.
To access this tool, choose Layer > New Adjustment Layer > Selective Color. In the Properties panel, select the color you wish to adjust from the "Colors" menu. You can then fine-tune the CMYK sliders to alter the color. For example, if you select "Blues," you can reduce the cyan component of the blues in the image while leaving the cyan in other color components unaltered. The adjustment can be applied in absolute values or relative to the existing color mix. The adjustment is based on how close a color is to one of the options in the Colors menu. For instance, 50% magenta is midway between white and pure magenta and receives a proportionate mix of corrections defined for the two colors. This offers a granular level of control, allowing you to precisely sculpt the color profile of your image.
Understanding Color Components and Their Interaction
At its core, digital imaging relies on the representation of colors through various color models. In Photoshop, understanding these color components is crucial for effective manipulation. Images are composed of color components, and these components can be broken down into primary colors. For example, in an RGB (Red, Green, Blue) model, every color is a combination of these three primaries. Similarly, in a CMYK (Cyan, Magenta, Yellow, Black) model, colors are constructed from these four inks.
When you adjust a specific color range, you are essentially altering the balance of these underlying components. For instance, if you're adjusting the "Reds" in Selective Color, you're modifying the amount of cyan, magenta, yellow, and black that contribute to the red hues in your image. This is why Selective Color is so powerful; it allows you to target these specific color mixes.
The interaction of these color components is also key. Consider a scenario where you have a color that is 50% magenta. If you apply a correction that adds 10% magenta, the total magenta becomes 60%. However, if the correction is based on absolute values, it directly adds 10% to the magenta channel. If it's relative, it might add 10% of the existing magenta, meaning 5% more magenta (10% of 50% = 5%) for a total of 55% magenta. Photoshop's tools provide the flexibility to work with these nuances.
Advanced Selection Techniques and Considerations
Beyond the basic Color Range, Photoshop offers other ways to select and manipulate colors, often in combination with other tools for enhanced precision.
Skin Tone Selection
The Color Range command includes a specific preset for "Skin Tones." This option is designed to intelligently select colors that resemble common human skin tones, which can be incredibly useful for portrait retouching or any scenario where isolating skin is necessary.
Out-of-Gamut Colors
Photoshop can also identify "out-of-gamut" colors. These are colors that cannot be accurately reproduced in a specific color space, such as CMYK printing. By selecting these colors, you can then adjust them to be within the printable gamut, ensuring better results when preparing images for print.
Combining Selection Methods
Often, the most effective color selections are achieved by combining multiple tools. For instance, you might start with a Color Range selection to isolate a broad area of color, and then refine the edges of that selection using the Quick Selection Tool or by manually painting on a layer mask. This layered approach allows for maximum control and accuracy.
When performing a Color Range selection, remember to utilize the "Add to selection" and "Subtract from selection" eyedropper tools to meticulously build your desired selection. Holding the eyedropper over the actual image while sampling is crucial. Pay close attention to the preview window within the Color Range dialog box to understand which areas will be affected.
Practical Application: Changing Backgrounds
A common practical application of color selection involves changing the background of an image. This process typically involves selecting the subject of the image and then placing a new background behind it.
- Open Photos: Start by opening your primary photo in Photoshop. Then, go to the 'File' menu and select 'Place Embedded' to open the second photo you intend to use as the new background.
- Resize Background: Resize the second image by clicking on one of its corners and dragging until it matches the dimensions of the first photo.
- Unlock Layer: In the Layers panel, click on the padlock icon on the bottom layer to unlock it.
- Select Subject: Ensure the top layer (the one you want to perform the selection on) is selected. Then, go to the 'Select' menu and choose a selection method. For complex subjects, the "Select Subject" command or a combination of Color Range and manual refinement might be most effective.
- Refine Selection: Use the various selection tools and refinement options (like "Select and Mask") to ensure a clean and accurate selection of your subject.
- Isolate Subject: Once the subject is selected, you can either inverse the selection and delete the background, or copy and paste the subject onto a new layer above the background image.
By mastering these color selection techniques in Photoshop, you gain the power to transform your images, enhance their visual appeal, and achieve professional-grade results with precision and creativity.