Adobe Illustrator, a cornerstone for vector graphics, offers robust tools for creating and manipulating artwork. While a white background is the default for new documents, there are numerous compelling reasons why a designer might need to achieve a transparent background. This guide explores two primary use cases: creating artwork from scratch on a transparent canvas and transforming an existing design with a white background into a transparent one. We will also touch upon alternative, streamlined methods using Linearity Curve, highlighting its efficiency for specific tasks.
Enabling a Transparent Background When Starting a New Illustrator File
When embarking on a new design project in Adobe Illustrator, the ability to begin with a transparent background is crucial for many applications, especially for logos, icons, and web graphics. This approach ensures that your artwork can be seamlessly integrated into various other designs without an unwanted solid background.
Step 1: Initiating a New Document
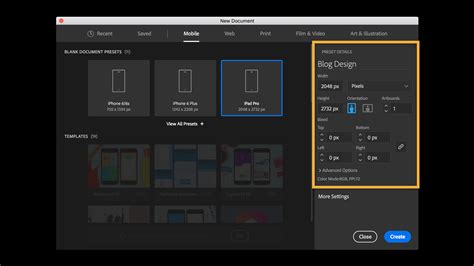
The process begins with creating a new file. On Illustrator's main menu panel, click the "Create new" button. Alternatively, you can initiate this process by navigating to File > New. This action will open the "New Document" dialog box, where you can set your artboard dimensions, color mode, and other essential parameters. While Illustrator doesn't offer a direct "transparent background" option at this initial stage as some other software might, the default artboard, when viewed with the transparency grid, is indeed transparent.
Step 2: Visualizing Transparency with the Transparency Grid
To truly see and work with the transparent background, you need to enable Illustrator's Transparency Grid. This visual aid replaces the default white artboard background with a checkerboard pattern of white and gray squares, clearly indicating transparent areas. To activate it, go to the View tab in the top menu bar, scroll down, and select Show Transparency Grid. Once enabled, your artboard will display this grid, signifying that the background is transparent and ready for your design.
This transparency grid is a visual representation. It's important to understand that even if you don't explicitly see the grid, the background of your artboard is inherently transparent unless you add an object or color to it. The default appearance of white is an emulation of paper, designed to make it easier to work with elements that might be white or light-colored.
Step 3: Designing on a Transparent Canvas
With the transparency grid now visible, you can proceed to create your artwork. Any elements you add - shapes, text, illustrations - will appear on top of this transparent canvas. This is particularly beneficial when designing logos or icons that need to be placed on different colored backgrounds in subsequent applications.
Step 4: Saving Your Transparent Artwork
The final and critical step is saving your file in a format that preserves transparency. When you are ready to export your work, navigate to File > Export > Export As. This will open a dialog box where you can choose your desired file format and destination.
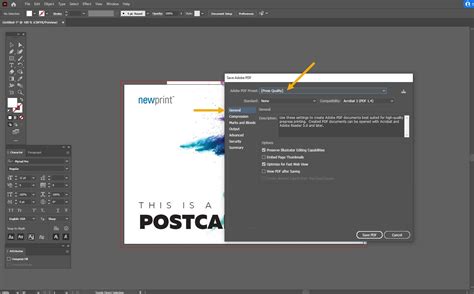
For transparent backgrounds, the most common and recommended file types are PNG, SVG, and TIFF. JPEG files, for instance, do not support transparency and will always default to a white background.
When selecting PNG as your export format, ensure that in the subsequent "PNG Options" window, under the "Preview" section, the "Background Color" is set to "Transparent." This explicit selection guarantees that the transparency information is embedded within the file. The same principle applies when exporting as SVG or TIFF; always look for and select the transparency option during the export process.
Transforming an Existing White Background into Transparency in Illustrator
Often, designers acquire images or graphics that have a solid white background, even when they are intended for use in designs where transparency is required. Fortunately, Adobe Illustrator provides powerful tools to address this common challenge without needing to find an alternative version of the image. The primary tool for this task is Image Trace.
Understanding Image Trace
Image Trace is a versatile feature within Illustrator that converts raster images (like JPEGs, PNGs, or PSDs) into editable vector artwork. It can also be used to vectorize hand-drawn sketches. For the purpose of removing a white background, Image Trace intelligently identifies and removes solid color areas, effectively making them transparent.
Step 1: Opening Your Image
Begin by opening the image you wish to make transparent in Adobe Illustrator. You can do this by going to File > Open and selecting your image file, or by dragging and dropping the file directly onto your Illustrator workspace.
Step 2: Verifying Transparency (Optional but Recommended)
Before proceeding, it's a good practice to quickly check if your image already has a transparent background. You can do this by toggling the transparency grid. Press Ctrl + Shift + D (or Command + Shift + D on a Mac). If you see the checkerboard pattern instead of a solid color where you expect transparency, your image might already be transparent. If not, continue with the following steps.
Step 3: Selecting the Image
Activate the Selection Tool by pressing V on your keyboard. Click on the image on your artboard to select it. This ensures that Image Trace will be applied to your chosen graphic.
Step 4: Activating Image Trace
Navigate to the menu bar at the top of the screen, click on Window, and then select Image Trace. This will open the Image Trace panel, which houses all the settings for converting your image.

Step 5: Adjusting Trace Settings
The Image Trace panel offers various presets and options. For removing a white background, you'll typically want to start by changing the "Mode" from "Black and White" to "Colored." This preserves the colors of your original image.
Step 6: Refining with Advanced Options
To specifically target and remove the white background, click on the small triangle next to "Advanced" to reveal more detailed settings. Within these advanced options, locate and check the box for Ignore White. This instruction tells Image Trace to treat all white areas as transparent. You may also need to adjust the "Threshold" slider to fine-tune how aggressively white areas are detected and removed, depending on the complexity of your image.
Step 7: Tracing the Image
Once you have configured the settings to your satisfaction, click the Trace button, usually located at the bottom right corner of the Image Trace panel. Illustrator will process the image, converting it into a vector format and removing the white background as instructed.
Step 8: Expanding and Exporting
After the trace is complete, it's often necessary to "expand" the traced object to convert the tracing into actual vector paths. You can do this by clicking the Expand button, which usually appears at the top of the Image Trace panel after the trace is finished.
Now, your image is a vector object with a transparent background. You can proceed to export it using the same methods described earlier (File > Export > Export As), ensuring you choose a format like PNG, SVG, or TIFF, and confirm the transparent background setting during the export process.
2 Ways To Remove Difficult Ai Art Backgrounds (Photoshop & Adobe Illustrator Tutorial)
Streamlining Transparency with Linearity Curve
While Adobe Illustrator is a powerful industry-standard tool, its complexity can sometimes be a barrier, especially for users who need to perform common tasks quickly and efficiently. For those seeking a more streamlined approach to achieving transparent backgrounds, especially on mobile devices, Linearity Curve offers a compelling alternative.
The Linearity Curve Advantage
Linearity Curve is designed with user-friendliness and speed in mind. It often requires fewer steps to achieve results that might take longer in more complex software. This is particularly true for tasks like background removal and transparency management.
Making a Transparent Background in Linearity Curve
Linearity Curve simplifies the process of creating or exporting with a transparent background.
Exporting from Linearity Curve: When you are ready to export your artwork, you can typically access export options directly from the layers or artboard settings. On an iPad, for instance, you would go to the
Layerstab in the Inspector panel. Long-pressing on your artboard often reveals more options, includingExport To. From here, you can select formats like PNG, SVG, or PDF, all of which support transparency.Toggling the Background: A modal window will appear with export options. If the white background is toggled on by default, you will find an option to untoggle
Include Background. By unchecking this, you ensure that the exported file will have a transparent background. Then, simply tapExportto finalize.
Auto Trace and AI Features in Linearity
Linearity Curve also boasts features like "Auto Trace," which is akin to Illustrator's Image Trace but often with a more intuitive interface. Furthermore, Linearity offers AI-powered tools such as "AI Backgrounds" for generating new backgrounds and "Background Removal" for one-click background deletion. The "Magic Eraser" tool is another powerful feature that allows for the seamless removal of unwanted elements from images, automatically filling in the gaps with matching pixels, making edits appear natural and effortless. This tool is invaluable for cleaning up photos, whether they are personal snapshots, product images, or social media content.
Understanding the Nature of Transparency in Illustrator
It's a common misconception that the white artboard in Illustrator is a solid background that needs to be deleted. In reality, the white appearance is often an emulation of paper, designed to aid in the visual design process, particularly for light-colored elements.
The Illusion of a White Background
When you create a new document in Illustrator, the artboard itself is not inherently filled with a white color that will export with your artwork. Instead, it's a visual cue. If you were to add no color or objects to your artboard, and then export it as a PNG with transparency enabled, you would receive a truly transparent file. The "white" you see is merely how the software displays the canvas by default.
Simulating Colored Paper for Design Clarity
To make working with white or light-colored logos and icons easier, Illustrator offers a feature to "Simulate Colored Paper." This can be accessed through File > Document Setup. By checking the "Simulate Colored Paper" box and selecting a color, your artboard will display that color. This is purely a visual aid; the chosen color is not part of the artwork and will not be exported. This trick is incredibly useful for:
- Designing white logos: It allows you to see your white logo clearly against a colored backdrop without needing to draw a separate background shape that you might forget to delete later.
- Previewing how artwork will look: You can quickly preview how your design might appear on different colored backgrounds, which is beneficial for branding and UI design.
- Building assets: It's ideal for creating transparent icons, textures, or overlays where visibility against various backgrounds is key.
The Transparency Grid as the True Indicator
The most reliable way to confirm transparency in Illustrator is by using the View > Show Transparency Grid (Ctrl/Cmd + Shift + D). This grid is the definitive visual representation of transparent areas. If you see the checkerboard pattern, those areas are transparent. If you see a solid color, that color is an object or a fill on your artboard, and it will be exported unless removed.
Common Pitfalls and Best Practices
- File Format is Key: Always remember that not all file formats support transparency. JPEGs do not. Always opt for PNG, SVG, or TIFF when transparency is required.
- "Ignore White" in Image Trace: This option is your best friend when cleaning up existing images with solid backgrounds. Experiment with the threshold to achieve the best results.
- Expand After Tracing: After using Image Trace, remember to click "Expand" to convert the traced image into editable vector paths.
- Transparency Grid is Your Guide: Rely on the transparency grid to confirm transparent areas. Don't assume the white artboard is an actual background object.
- Linearity Curve for Speed: For simpler tasks or mobile workflows, Linearity Curve can offer a significantly faster and more intuitive experience for managing transparent backgrounds.
By understanding these methods and the underlying principles of transparency in Illustrator, you can ensure your designs are prepared correctly for any application, from web graphics to print materials.
tags: #illustrator #transparent #artboard #background