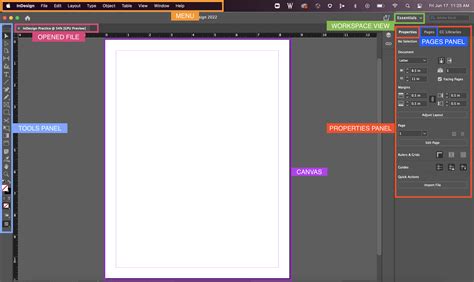
Adobe InDesign is a powerful tool for creating a wide range of publications, from intricate magazines and brochures to comprehensive books. While it's straightforward to set up a document with a consistent page size and orientation from the outset, real-world design projects often demand flexibility. You might need to resize a single page to accommodate a pull-out section within a book, adjust the dimensions of a back cover to meet printer specifications, or adapt an existing template to a new format. This is where InDesign's robust page resizing capabilities become indispensable. This article will guide you through the various methods for changing page sizes in InDesign, from altering individual pages to modifying entire documents, ensuring your content adapts gracefully to new dimensions.
The Page Tool: Your Ally for Individual Page Adjustments
For designers working with layouts where specific pages require unique dimensions, the Page Tool (activated by pressing Shift + P) is the primary instrument. This tool grants you granular control over individual page sizes within a document, a crucial feature for creating complex layouts like magazines with pull-out sections or brochures with varied fold-outs.
Imagine you're designing a magazine, and the printer has requested that the back cover be slightly larger than the internal pages. With the Page Tool selected, you simply click on the back cover page in your layout. This action tells InDesign which page you intend to modify. Once the page is selected, observe the Control panel running along the top of your workspace. New options will appear, specifically designed for page manipulation. Here, you'll find text boxes where you can manually input revised Width and Height measurements. To the right of these fields, a dropdown menu offers a selection of standard page sizes, providing a quick way to switch to common dimensions.
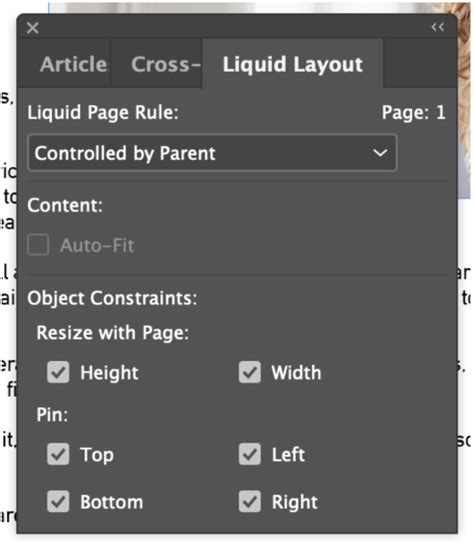
For instance, you might need to add 2 mm to all sides of the page. You can achieve this by manually entering the new Width and Height values. A particularly useful aspect of the Page Tool is its integration with InDesign's Liquid Layout features. While a reduced set of options for applying Liquid Layout is visible in the top control panel, a more comprehensive set of controls is accessible through the full Liquid Layout panel (found under Window > Interactive > Liquid Layout). This panel is only active when the Page Tool is selected, highlighting its purpose in dynamic page resizing.
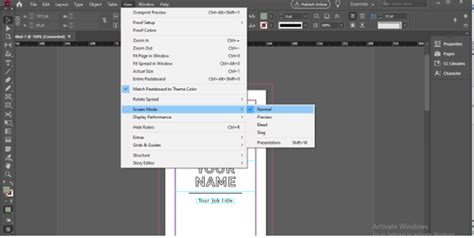
The default Liquid Layout Rule is often set to "Controlled by Master." This means that the page's resizing behavior is dictated by the Master page applied to it. If you examine the Pages panel, you'll see which Master page is applied to your selected page. Selecting the Master page itself and then observing the Liquid Layout panel will reveal its specific Liquid Layout Rule setting, which could be "Off," "Scale," "Re-center," "Object-Based," or "Guide-Based." Understanding these rules is key to controlling how your content reflows when the page size changes.
A critical detail to remember when using the Page Tool for permanent size changes is to hold down the Alt (or Option on Mac) key while resizing. This ensures that the new dimensions are applied permanently, rather than being a temporary adjustment. This functionality is incredibly neat and offers a powerful way to tailor individual pages to specific design requirements.
Resizing the Entire Document: Document Setup for Global Changes
When the intention is to alter the page size for every page in your InDesign document, the Document Setup option is the most efficient route. This method is ideal for scenarios where you've found an InDesign template that you like but its original dimensions aren't suitable for your project, or when you need to resize an entire book or a series of related documents.
To access Document Setup, navigate to File > Document Setup. Within this dialog box, you'll find options to change the overall page size of your document. To see the effect of your changes in real-time, ensure the Preview box is checked. You can then input new Width and Height values. For example, if you change the Width to 8 inches and the Height to 6 inches, you'll observe that all pages in the document expand to these new dimensions.
A significant consideration when resizing an entire document is how the existing content will adapt. By default, elements on the page will retain their original size, potentially leading to awkward scaling or overflow. However, InDesign provides a powerful solution: the Adjust Layout option. When you check this box within the Document Setup, InDesign attempts to intelligently reflow and resize your content to fit the new page dimensions.
The Adjust Layout option opens a secondary window where you can fine-tune how the layout is adjusted. Here, you can choose to auto-adjust margins to match the new page size or maintain the original margin settings. Furthermore, the Adjust Font Size setting offers crucial control. You can opt to have fonts resize proportionally with the page, or you can keep them at their original size. This decision significantly impacts the overall aesthetic and readability of your document. If you choose to adjust font size, you can even set limits on how much the fonts can scale, preventing extreme distortions.
Within the Custom Page Size option in Document Setup, you can also save frequently used page dimensions. This is done by creating a new option, assigning it a name (e.g., "Project 1"), and then setting the desired Width and Height. Clicking "Add" saves this custom size for future use. This feature is particularly handy for maintaining consistency across projects or for adhering to specific industry standards.
Leveraging Liquid Layout for Dynamic Content Adaptation
Liquid Layout is a cornerstone of flexible design in InDesign, especially when dealing with page resizing. It's designed to help your content adapt intelligently to different page sizes and orientations, minimizing manual adjustments. As mentioned earlier, the Liquid Layout panel is typically accessed via Window > Interactive > Liquid Layout, and it becomes active when the Page Tool is selected.
The core of Liquid Layout lies in its rules. The default rule, "Controlled by Master," as we've seen, links the page's resizing behavior to its applied Master page. When you select a Master page and examine its Liquid Layout settings, you'll find several rules to choose from:
- Scale: This rule scales all page elements proportionally to fit the new page dimensions. It's a straightforward approach but can sometimes lead to elements becoming too small or too large.
- Re-center: With this rule, InDesign attempts to keep content centered on the page as it resizes. It's useful for maintaining visual balance.
- Object-Based: This rule allows you to define how individual objects should behave. You can set constraints for each object, determining how it resizes, moves, or stays in place relative to the page edges or other objects. This offers a high degree of control but requires more setup.
- Guide-Based: Similar to Object-Based, this rule utilizes guides to control the behavior of content. You can create guides and then specify how objects should align with or respond to these guides as the page resizes.
When you're resizing a content-heavy page, applying the appropriate Liquid Layout rule is paramount. For instance, if you need to resize a page that forms part of a gatefold brochure or a magazine fold-out, understanding these rules will help you achieve the desired outcome without content becoming jumbled or distorted.
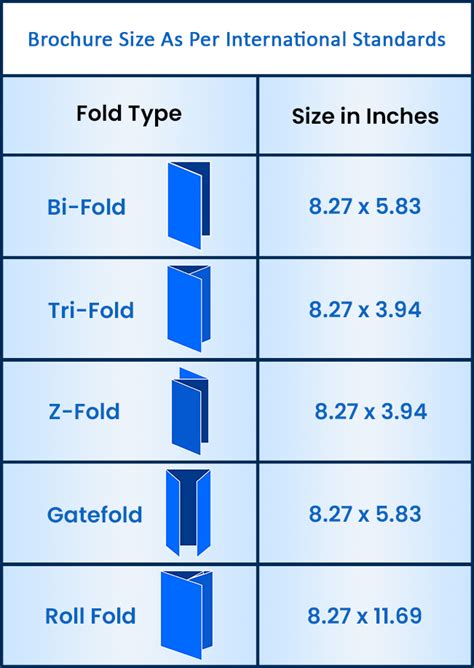
Consider a scenario where you're working with an InDesign brochure template, particularly a trifold or gatefold. Knowing how to resize pages and apply Liquid Layout rules is essential for adapting these templates to different paper sizes or for creating unique folding mechanisms. Similarly, if you've found an InDesign newsletter template style that you like but the dimensions are off, these resizing techniques will be invaluable.
Advanced Scenarios: Gatefolds and Spreads
Creating complex layouts like gatefold brochures or documents with varying page sizes within spreads requires a nuanced understanding of InDesign's page tools. A gatefold brochure, for instance, often involves a central panel that is wider than the two outer panels when folded. This necessitates using different page sizes within the same spread.
To achieve this, you would typically use the Page Tool to adjust the size of individual pages. For example, you might select the central page of your gatefold and increase its width significantly, while keeping the outer pages at their standard dimensions. The "Objects Move with Page" checkbox in the Control panel (or the Page Tool options) becomes critical here. When checked, it ensures that the content on the page moves and resizes along with the page itself, maintaining its relative position.
When working with spreads, it's important to visualize how these different-sized pages will appear together. InDesign's layout window will reflect these discrepancies, allowing you to design accordingly. The ability to create spreads with pages of different sizes is a testament to InDesign's flexibility, enabling designs that would be challenging or impossible in less adaptable software.
Best Practices and Troubleshooting
When embarking on page resizing in InDesign, several best practices can save you time and frustration.
- Type Directly in InDesign: While it might be tempting to import complex designs from other applications like Illustrator, it's generally best practice to create your typography directly within InDesign. This prevents potential issues with font rendering and ensures that text behaves predictably when layouts are adjusted. Importing vector graphics or images as separate files allows for easier editing and prevents your InDesign file from becoming overly bloated.
- Understand Content-to-Page Ratio: Before resizing, consider the amount of content on your page. If a page is heavily laden with text and images, resizing it without careful consideration of Liquid Layout rules can lead to significant rework. For content-heavy pages, experimenting with different Liquid Layout rules (Object-Based or Guide-Based) might be necessary to achieve the desired outcome.
- The "Adjust Layout" Dilemma: Many users encounter the issue where resizing a page, even by a small amount, subtly alters fonts, layouts, and other elements, "knocking everything out of whack." This often stems from a misunderstanding of how "Adjust Layout" and its sub-options (like "Adjust Font Size") function. If your goal is to make the page bigger on one side without affecting the content's relative positioning or size, you might need to disable "Adjust Layout" entirely and then manually reposition and resize elements. Alternatively, explore the "Object-Based" or "Guide-Based" Liquid Layout rules, which offer more precise control over individual elements.
- Inner Margin Adjustments for Binding: A common requirement is to increase the inner margin of a page to accommodate binding. If you find that simply adjusting the margin in Document Setup causes other elements to shift undesirably, you might need to use the Page Tool to manually increase the page width on the binding side and then reposition any affected content. This often involves turning off "Adjust Layout" and performing manual adjustments.
InDesign Power Tip: Resize PDFs Quickly! ft Liz
By mastering these techniques and understanding the interplay between the Page Tool, Document Setup, and Liquid Layout, you can confidently tackle any page resizing challenge in Adobe InDesign, ensuring your designs are both flexible and professional. Whether you're adapting an InDesign template, creating a custom brochure, or designing a book with unique fold-outs, these skills are fundamental to efficient and effective design workflow.