This tutorial is designed to guide you through the entire process of creating a gorgeous, watercolor-style fall leaf using Procreate. Whether you're a beginner looking to explore digital watercolor techniques or an experienced artist seeking to refine your skills, this step-by-step guide will provide valuable insights. We will cover everything from the initial sketch and precise line work to the nuanced blending of watercolor washes and the application of delicate dry brush textures. Furthermore, we'll delve into the essential techniques for rendering realistic shadows, adding depth and dimension to your artwork. This tutorial is particularly beneficial for those who own the "Wash & Dry Watercolor Toolkit" for Procreate and wish to understand its full potential.
The Foundation: Sketching Your Fall Leaf
The first crucial step in creating any digital artwork is establishing a solid foundation through sketching. For this tutorial, we will utilize a simple yet effective sketching approach to define the shape and key features of our fall leaf.
Choosing the Right Sketching Tools
In Procreate, selecting the appropriate brushes can significantly impact the ease and quality of your sketching process. For this initial phase, two brushes from the "Pencil Box" set are recommended:
- Sketching Pencil: This brush offers a natural, graphite-like feel, allowing for expressive and controlled lines. It’s ideal for laying down the initial contours of the leaf, enabling you to easily adjust and refine the shape without committing to permanent lines.
- Ghost Erase: This eraser is a gentle counterpart to the sketching pencil. Its subtle erasing power allows for precise corrections and smudging effects, helping to soften lines or remove unwanted marks without leaving harsh edges. This is particularly useful when you need to make minor adjustments to the leaf's outline or internal details.
Defining the Leaf's Form
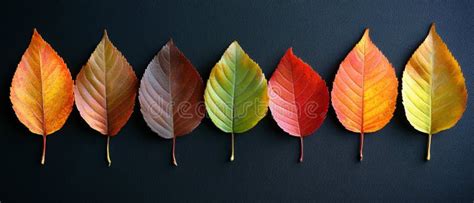
Begin by lightly sketching the overall silhouette of your chosen fall leaf. Consider the natural imperfections and variations that make each leaf unique. Don't aim for perfect symmetry; instead, embrace the organic curves and slight irregularities. Observe real leaves or reference images to capture the characteristic shape. Pay attention to the stem and any subtle indentations or lobes that define the specific type of leaf you are drawing.
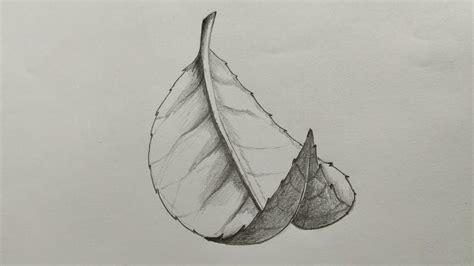
Adding Internal Structure: Veins and Midrib
Once the outer shape is established, it's time to map out the internal structure. Focus on the prominent midrib and the branching veins that radiate outwards. These lines are critical for guiding the subsequent watercolor washes and adding realism to the leaf. Sketch these veins lightly, ensuring they follow the natural flow of the leaf's surface. The midrib should be the most prominent line, with secondary veins branching off it. Tertiary veins can be added later to enhance detail. Remember that these sketched lines will serve as a guide, and their visibility will be softened or incorporated into the final artwork.
Bringing the Leaf to Life: Watercolor Washes
With the sketch complete, we transition to the core of the watercolor effect: applying digital washes. This is where the "Wash & Dry Watercolor Toolkit" truly shines, offering brushes that mimic the beautiful, unpredictable nature of traditional watercolors.
Selecting the Watercolor Brushes
The "Wash & Dry Watercolor Toolkit" provides a curated selection of brushes designed to replicate various watercolor techniques. For this stage, the following brushes are essential:
- Stone Wash: This brush is excellent for laying down broad, textured washes of color. Its characteristics allow for a beautiful, organic spread of pigment, mimicking how watercolor paint saturates paper. It's perfect for the main body of the leaf's color.
- Soaking Wash: Similar to Stone Wash but with a slightly different texture, Soaking Wash can be used to build up layers of color or create softer, more diffused areas. It’s useful for adding depth and variation to the leaf's surface.
- One Sided Wash: This specialized brush is designed to create washes that appear to flow or bleed in one direction, which is ideal for painting along the leaf veins. It helps to create a naturalistic effect where color pools around the veins.
- Wash Edger: As the name suggests, this brush is perfect for defining the edges of your watercolor washes. It can create soft, feathered borders or slightly more defined lines, contributing to the authentic watercolor look.
- Glaze Edge Shaper: This brush is particularly useful for refining the edges of shapes and adding subtle details. It can be used to sharpen the outline of the leaf or to create crisp transitions in color.
- Water Glaze: This brush is designed to simulate the effect of water bleeding into wet paint, creating soft transitions and blending. It’s invaluable for achieving those characteristic watercolor blooms and smooth color gradients.
Laying Down the Base Color
Begin by selecting your desired fall leaf colors - typically warm hues like reds, oranges, yellows, and browns. Using the Stone Wash brush, lay down the initial broad washes of color across the leaf shape. Don't be afraid to let the colors blend and overlap naturally on the canvas. Apply the color in varying pressures to create tonal variations, just as you would with physical watercolors.

Building Depth with Layered Washes
Once the base color is established, use the Soaking Wash brush to add subsequent layers. This technique helps to build depth and complexity in the color. You can introduce slightly different shades or hues to create a more dynamic and naturalistic appearance. Allow each layer to dry slightly before applying the next, or utilize Procreate's layering system to control the opacity and blending modes for more advanced effects.
Defining the Veins with Color
The veins are a critical element in making your leaf look realistic. Use the One Sided Wash brush to apply color along the sketched vein lines. This brush is perfect for creating the effect of the watercolor paint pooling or being held back by the raised surface of the veins. You can vary the intensity of the color along the veins to match the overall tonal variations of the leaf. Subsequently, use the Glaze Edge Shaper to refine the edges of these vein washes, ensuring they integrate smoothly with the surrounding color.
Refining the Leaf Edges
The edges of a watercolor painting are often as important as the interior. Use the Wash Edger brush to soften or slightly define the outer perimeter of your leaf. This brush allows you to create the characteristic feathered or slightly irregular edges often seen in traditional watercolor paintings, adding to the authenticity of the digital rendition.
Adding Realism: Shadows and Texture
To elevate your watercolor leaf from a flat illustration to a lifelike depiction, it's essential to incorporate shadows and textural details.
Creating Realistic Shadows
Shadows are crucial for giving your digital painting a sense of form and dimension. For this, we’ll use the Stone Wash and Wash Detailer brushes.
- Stone Wash: This brush can be used to lay down soft, diffused shadow areas. Apply it with a darker, desaturated version of your leaf's colors, or a cool tone like a muted blue or purple, to create a natural shadow effect.
- Wash Detailer: This brush is excellent for adding more defined shadow edges or subtle variations within the shadow areas. It allows for greater control over the shape and intensity of the shadows.
Consider the light source and how it would interact with the leaf's form. Shadows will typically appear on the underside of the leaf, where it curves away from the light, or where it might be casting a shadow on a surface. Pay attention to how the veins and any natural folds in the leaf might affect the shadow's shape. Blend the edges of the shadows softly to create a natural transition from light to dark.

Incorporating Dry Brush Texture
The "Wash & Dry Watercolor Toolkit" includes brushes specifically designed to mimic the dry brush technique, which adds a wonderful sense of texture and imperfection to watercolor paintings.
- Gentle Grain (light & dark): These brushes are perfect for adding subtle, grainy textures. The "light" version can be used to highlight areas or add a subtle dry-brush effect over existing washes, while the "dark" version can be used to deepen shadows or add textural accents.
Apply the Gentle Grain brushes lightly over the surface of your leaf, particularly in areas where light hits or where you want to suggest the texture of the paper showing through the paint. Vary the pressure and stroke direction to create a natural, organic look. This technique is excellent for adding that final touch of realism, making your digital watercolor appear more tangible.
Advanced Techniques and Considerations
While the core techniques have been covered, several advanced considerations can further enhance your Procreate watercolor leaf.
Color Blending and Transitions
Mastering color blending is key to achieving a believable watercolor effect. Procreate offers several ways to blend colors:
- Smudge Tool: While not a specific brush from the toolkit, the smudge tool can be used with textured brushes to gently blend colors. Use it sparingly to avoid over-mixing.
- Water Glaze Brush: As mentioned, this brush is designed for blending. Use it to soften hard edges between colors or to create smooth gradients. Experiment with its opacity and flow settings for different results.
- Layer Blending Modes: Procreate's layer system allows for powerful blending. Experiment with modes like "Multiply" for darkening colors, "Screen" for lightening, and "Overlay" for enhancing contrast. These can be used to build up color depth and subtle shifts without direct brushwork.
Understanding Brush Dynamics and Settings
Each brush in the "Wash & Dry Watercolor Toolkit" has unique settings that can be tweaked. While the default settings are optimized for a classic watercolor look, understanding brush dynamics like opacity, flow, size, and jitter can unlock further creative possibilities. For instance, reducing the flow of a wash brush can create more subtle layering, while increasing it can lead to more intense color saturation.
Canvas Size and Resolution
The tutorial mentions a canvas size of 3800x2800 pixels. This is a relatively high resolution, which is beneficial for several reasons:
- Detail: It allows for finer details to be rendered without pixelation.
- Print Quality: If you intend to print your artwork, a higher resolution is essential for a crisp, professional output.
- Zooming: It provides more freedom to zoom in and work on intricate areas without losing image quality.
For digital display, this resolution is also more than sufficient. When starting a new project in Procreate, always consider your intended output to choose an appropriate canvas size and DPI (dots per inch). For most digital art, 300 DPI is a good standard.
How to Blend Colors in Procreate | digial watercolor shading ✿ create depth in digital art
Layer Management for Control
Effective layer management is crucial for digital painting, especially when mimicking traditional media. Consider using separate layers for:
- Sketch: Keep your initial sketch on its own layer, which can be lowered in opacity or hidden once the linework and coloring are complete.
- Base Washes: Dedicate layers for the initial broad color applications.
- Vein Details: A separate layer for vein coloring and refinement can provide more control.
- Shadows: Isolating shadows allows for easier adjustments to their intensity and placement.
- Textures: Applying dry brush textures on their own layers allows them to be easily modified or removed.
This organized approach makes it easier to go back and edit specific elements without affecting the rest of your artwork, a significant advantage over traditional media.
Exploring Different Leaf Types and Seasons
While this tutorial focuses on a fall leaf, the techniques learned can be applied to a wide variety of subjects. Experiment with different leaf shapes from other seasons - the vibrant greens of spring, the rich colors of summer, or even the delicate translucency of winter leaves. Each season and leaf type will present unique challenges and opportunities for color and texture.
The Wash & Dry Watercolor Toolkit: A Deeper Dive
The "Wash & Dry Watercolor Toolkit" is designed to bridge the gap between the spontaneity of traditional watercolors and the precision of digital art. It contains a comprehensive set of brushes that simulate:
- Pigment Flow: Brushes like "Stone Wash" and "Soaking Wash" are engineered to mimic how watercolor pigments spread and settle on paper, creating natural-looking variations in color intensity and texture.
- Edge Effects: Brushes like "Wash Edger" and "Glaze Edge Shaper" replicate the characteristic hard and soft edges that form as watercolor paint dries or interacts with the paper's surface.
- Water Interactions: Brushes such as "Water Glaze" are invaluable for simulating the effect of water bleeding into wet paint, creating subtle blooms, backruns, and smooth transitions.
- Textural Qualities: The "Gentle Grain" brushes allow for the addition of the fine, granular texture often seen in high-quality watercolor papers, contributing significantly to the realism of the digital piece.
By understanding the specific purpose and characteristics of each brush within the toolkit, artists can achieve a high degree of fidelity to traditional watercolor aesthetics while benefiting from the flexibility of digital tools. This toolkit empowers users to create diverse watercolor effects, from delicate washes to bold, textured strokes, all within the Procreate environment.
The ability to combine these brushes allows for complex and nuanced results. For example, laying down a base wash with "Stone Wash," then using "Water Glaze" to blend colors and create soft transitions, followed by "One Sided Wash" to define veins, and finally adding "Gentle Grain" for texture, creates a layered and sophisticated digital watercolor painting. This systematic approach, enabled by a well-designed brush set, makes the process both manageable and highly rewarding.