Rotoscoping, a foundational technique in animation and visual effects, offers unparalleled control for creating realistic imagery and intricate animations. This process, which involves meticulously tracing live-action footage frame by frame, empowers creators to isolate subjects, remove unwanted elements, replace backgrounds, and seamlessly integrate computer-generated graphics or text into existing video. While often perceived as a time-consuming endeavor, advancements in software like DaVinci Resolve have streamlined the workflow, making sophisticated rotoscoping more accessible than ever. This tutorial delves into the practical application of rotoscoping within DaVinci Resolve, focusing on a common yet powerful use case: compositing text to appear as if it exists within the scene, between a subject and their background.
Understanding the Core of Rotoscoping
At its heart, rotoscoping is the art of creating pixel-accurate masks that animate over time. It serves as a robust solution when automated keying techniques, such as DaVinci Resolve's 3D Keyer, Magic Mask, or HSL keys, prove insufficient or require excessive refinement. While these automated tools can significantly reduce the manual effort, there are instances where their accuracy falters, or the time spent tweaking them surpasses the efficiency of a manual rotoscoping approach. The process is fundamentally about manually drawing these masks around the elements you wish to isolate. For complex shapes, such as dynamic human figures, this often necessitates breaking down the subject into multiple, more manageable masks.
The goal is to achieve a clean separation of foreground elements from their background, enabling the insertion of new visual information. This could range from replacing a green screen with an entirely new environment to subtly weaving text into the fabric of a scene. The effectiveness of rotoscoping lies in its precision, allowing for the creation of highly detailed mattes that can withstand close scrutiny.
Simple Text Compositing with Rotoscoping in DaVinci Resolve
A common application of rotoscoping is to make text appear as if it's part of the video footage, positioned between a subject and their background. This creates a compelling illusion of depth and integration. The process typically involves isolating the subject through rotoscoping and then compositing text behind them but in front of the background.
Step 1: Masking the Subject on the Color Page
The initial phase involves creating a precise mask around your subject. This is often best achieved within DaVinci Resolve's Color page, which offers intuitive tools for this purpose.
- Select Your Clip and Navigate to the Color Page: Begin by selecting the video clip you intend to work with. Then, navigate to the Color page, accessible via the icons at the bottom of the DaVinci Resolve interface.
- Add a Serial Node: In the Nodes Editor, right-click on the existing clip node and select "Add Node" > "Add Serial." Serial nodes are fundamental to building complex effects and compositions in DaVinci Resolve.
- Utilize the Window Palette and Pen Tool: Access the Window palette and select the pen tool. Crucially, check the "Interactive Mode" checkbox. This mode is invaluable as it allows for manual addition, removal, and editing of tracking points, offering granular control over your mask.
- Draw the Initial Mask: With the playhead positioned at the first frame of your clip, use the pen tool to carefully draw a mask around your subject. For complex shapes, it's often more manageable to create several simpler masks rather than one intricate one. Observe the subject's movements to determine the optimal number of masks required.
- Track the Mask: Navigate to the Tracker palette. Ensure your playhead is at the first frame. Click "Track Forward." DaVinci Resolve will then automatically generate tracking points, attempting to follow your subject's movement throughout the clip. This automated tracking provides an excellent starting point, but manual refinement is almost always necessary.
- Refine the Mask Animation: Scrub through your clip using the arrow keys or by dragging the playhead. Carefully observe how the mask animates with your subject. Identify any frames where the mask no longer accurately aligns. You can refine the mask by clicking and dragging individual points or by using "Shift-click" to draw a bounding box around a group of points, allowing you to shift them collectively. Any extraneous points can be removed using the Delete key.
- Create an Alpha Output: To isolate your subject by removing the background, right-click on any empty space within the Node Editor and select "Add Alpha Output." This will introduce a blue circular output node. Connect the key output (the blue square) from your serial node to this Alpha Output.

Step 2: Compositing Text in the Fusion Page
With the subject isolated, the next step is to integrate the text. This is best performed in the Fusion page, DaVinci Resolve's powerful node-based compositing environment.
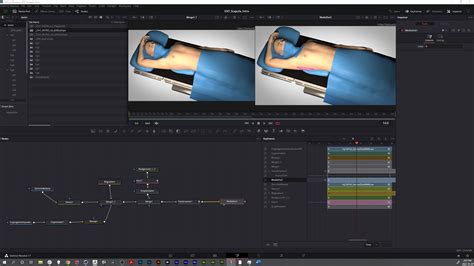
- Navigate to the Edit Page and Set Up Layers: Return to the Edit page. Add a copy of your original video clip onto a track positioned below the track containing your masked clip. This creates a layered structure where elements can be placed between the two clips.
- Open the Lower Clip in Fusion: Right-click on the original clip on the bottom layer and select "Open in Fusion Page." This will load the clip into the Fusion workspace, allowing you to build your composited effect.
- Add a Tracker Node: Select the MediaIn node (representing your clip in Fusion). Press "Shift + Spacebar" to open the Select Tool dialog. Search for "Tracker" and select "Add."
- Position the Tracker: Click and drag the Tracker node from its upper-right corner to position it. Find a point of interest in the background near your subject. A spot with some contrast or detail will yield the best tracking results. The smaller rectangle within the tracker defines the area it will analyze, while the larger rectangle is the search area.
- Track the Background Motion: In the Inspector for the Tracker node, click "Track Forward." DaVinci Resolve will analyze the selected area and track its movement throughout the clip.
- Set Operation to Match Move: Once tracking is complete, navigate to the "Operation" tab within the Inspector. Set the "Operation" to "Match Move." Ensure the merge is set to "FG over BG" (Foreground over Background). This instructs the tracker to follow the background motion and apply it to subsequent elements.
- Create a Text Node: From the toolbar, drag the "Text" icon into the Nodes Editor to create a Text node.
- Connect Text to Tracker: Drag the output from the Text node and connect it to the input of the Tracker node. This links the text generation to the tracked motion.
- Add and Style Your Text: Select the Text node. In the Inspector, you can now add your desired text. Adjust the font, size, color, and any other stylistic elements to your preference. You can also drag the text directly in the viewer to position it within the frame.
By connecting the Text node to the Tracker set to "Match Move," the text will now follow the motion of the background element you tracked, creating the illusion that it is integrated into the scene. You can then return to the Edit or Color page to review the final effect.
Advanced Masking Techniques in Fusion
While the pen tool is effective for many tasks, DaVinci Resolve's Fusion page offers more sophisticated masking tools for complex scenarios.
Utilizing the Polygon Node for Complex Shapes
For subjects with intricate outlines or defined edges, the Polygon node provides greater flexibility than a simple ellipse or rectangle.
- Add a Polygon Node: In the Fusion page, drag the "Polygon" tool from the toolbar into the Nodes Editor to create a Polygon node.
- Trace with Precision: Use the pen tool within the Polygon node to meticulously trace the outline of your subject. Remember that working with multiple simpler masks is generally more manageable than attempting to create one overly complex mask.
- Connect and Refine: Connect your mask node to the MediaIn node to visualize the alpha channel and inspect your mask's edges. If any background is visible within the masked area, select the Mask node and adjust the "Border Width" slider in the Inspector. Decreasing the border width can effectively narrow the mask's edge, helping to eliminate stray background pixels.
- Smoothing Uneven Edges: For areas with fine details like hair, the "Soft Edge" slider can be invaluable. Increasing this value will smooth the mask's edge, creating a more natural transition.
- Handling Complex Background Bleed-Through: In situations where the background persistently shows through the mask, especially with dynamic subjects, a common technique is to create a small, secondary mask and use it to subtract from the main mask. This allows for precise refinement of specific problem areas.
The BEST Masking Tutorial for Davinci Resolve 20
Exploring DaVinci Resolve Studio's Magic Mask
For users with DaVinci Resolve Studio, the Magic Mask tool offers a significantly accelerated approach to rotoscoping.
- Access Magic Mask: Within the Color page, locate and select the Magic Mask tool. You'll have options to mask either an "Object" or a "Person."
- Initial Masking: Draw a rough mask inside the object or person you wish to isolate.
- Track the Magic Mask: Utilize the tracking options to track the Magic Mask forward and backward through the clip. The tool intelligently analyzes the footage to generate a mask based on color and luminosity.
- Refinement: While Magic Mask is powerful, manual refinement of the generated mask may still be necessary for perfect results.
Integrating with Silhouette for Professional Rotoscope
For extremely demanding projects or when dealing with exceptionally complex elements like fine hair or semi-transparent objects, professional rotoscoping software like Silhouette can be integrated with DaVinci Resolve. Silhouette is a powerful, node-based application renowned for its advanced rotoscoping and paint tools.
Workflow with Silhouette
- Setup in Fusion: In DaVinci Resolve's Fusion page, add the Silhouette OFX plugin. Connect your MediaIn node to the Silhouette node.
- Rotoscope within Silhouette: Silhouette will import your clip. Use its extensive toolset, including the Roto node and various tracking methods (point tracking, planar tracking), to create and animate your masks.
- Leveraging AI Tools (Mask ML, Matte Assist ML): Silhouette also incorporates AI-powered tools like Mask ML and Matte Assist ML. Mask ML can automatically generate initial masks, significantly speeding up the process. Matte Assist ML further refines these masks, and tools like Power Matte are specifically designed for challenging elements like hair.
- Rendering and Compositing: Once your rotoscoping is complete within Silhouette, set the render output to "Cutout." Return to DaVinci Resolve's Edit page, and your isolated subject will be ready for further compositing.
Key Considerations for Efficient Rotoscope
- Minimize Keyframes: Strive to use the fewest keyframes necessary. This not only saves time but also leads to smoother, more organic animations. Bi-secting (breaking down complex movements into simpler segments) can be a helpful strategy.
- Strategic Point Placement: Focus on placing fewer, but strategically chosen, points for your masks. The most crucial points will define the contours and movement of your subject.
- Starting Point: Consider not starting your mask creation on frame 0. Instead, find a key frame where the subject is clearly defined and begin your mask there, then let tracking and manual adjustments fill in the rest.
- Understanding "Clip" vs. "Frame" in Power Windows: When refining masks in DaVinci Resolve (especially in Fusion), understanding the difference between "Clip" and "Frame" modes for power windows is crucial. "Clip" mode essentially enables a multi-frame approach, applying refinements like softness across the entire duration of the mask, similar to how multi-frame tools in other software like Mocha Pro or Silhouette operate. "Frame" mode applies refinements only to the currently selected frame.
- Tracker Shape vs. Target Mask: When using planar trackers in Fusion, it's important to remember that the tracking shape itself must remain on the same plane to avoid distortions. It can be tempting to select high-contrast elements for tracking, but if they are not on the same plane as your intended mask, it can lead to undesirable results.
Rotoscoping, while demanding precision and patience, remains an indispensable technique in the visual effects artist's toolkit. By mastering the tools available within DaVinci Resolve and understanding the underlying principles, you can achieve professional-grade compositing results, seamlessly integrating text, graphics, and complex visual effects into your video projects.