Adobe Photoshop Elements, a powerful yet user-friendly image editing application, offers a robust set of tools designed to empower both amateur photographers and budding graphic designers. While it shares many familiar features with its more advanced sibling, Adobe Photoshop CC, Elements distinguishes itself with an intuitive interface and a significantly lower price point, making professional-level editing accessible to a broader audience. This tutorial delves into the intricacies of Photoshop Elements 12, exploring its diverse toolset, enhanced features, and practical applications to help users transform their photographs into stunning visual creations.
Navigating the Elements Workspace: Quick and Advanced Modes
Photoshop Elements 12 presents users with two primary editing environments: Quick mode and Advanced mode. Each mode is tailored to different user needs and skill levels, offering a flexible approach to photo manipulation.
Quick Mode: Simplicity and Speed
The Quick mode is designed for users who prefer a streamlined and straightforward editing experience. Its toolbox is intentionally curated to include a concise set of easy-to-use tools, allowing for rapid adjustments and enhancements. This mode is ideal for beginners or for those who need to perform common edits efficiently.
Within Quick mode, you'll find essential tools for basic photo correction and enhancement. For instance, the Zoom In and Zoom Out tools, found in the Tool Options bar, allow you to magnify or reduce your image for detailed work or a broader overview. The Hand Tool enables you to navigate and reposition your photo within the workspace, simply by dragging the image.
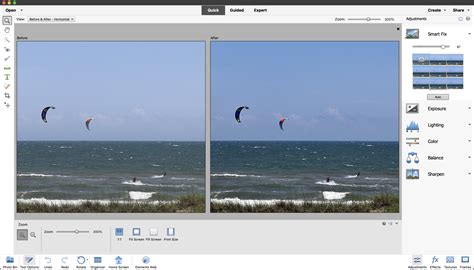
Beyond navigation and zoom, Quick mode offers specialized tools for common photographic issues. The Red Eye Removal tool is invaluable for correcting the unnatural red glow in subjects' eyes caused by flash photography, and it also extends to fixing pet eye effects and closed eyes. For reorienting your images, the Straighten tool allows you to realign a photo either vertically or horizontally.
A standout feature in Quick mode is the Content-Aware Move tool. This AI-powered tool revolutionizes the removal of unwanted objects. With a simple swipe, you can select an object, and the software intelligently analyzes the surrounding pixels to seamlessly fill the void, effectively making the object disappear. Similarly, the Crop Tool allows you to trim unwanted parts of an image according to your selection, refining the composition.
The Move Tool is also present in Quick mode, enabling you to reposition selections or entire layers within your document. This fundamental tool is crucial for organizing elements and preparing them for further manipulation.
Advanced Mode: Depth and Control
Stepping into Advanced mode reveals a significantly richer and more comprehensive toolbox, offering a greater degree of control and a wider array of editing capabilities. This mode is where users can truly explore the depth of Photoshop Elements' potential. The tools in Advanced mode are categorized for easier navigation:
- A. View Tools: These are primarily concerned with how you interact with and navigate your image, including the essential Zoom and Hand tools.
- B. Select Tools: This category encompasses a variety of tools for isolating specific areas of your image, such as the Rectangular Marquee Tool for selecting rectangular areas, and more advanced selection tools.
- C. Enhance Tools: These tools are dedicated to improving the overall quality and appearance of your photos, covering adjustments to color, tone, and detail.
- D. Draw Tools: This group includes tools for adding elements to your image, such as brushes, pens, and shape tools.
- E. Modify Tools: These tools allow for transformations and alterations to existing image elements, including erasers and fill tools.
In Advanced mode, the Zoom In and Zoom Out tools continue to be vital for precise editing. The Hand Tool remains your primary method for moving the image around the workspace. The Move Tool here offers more sophisticated control over selections and layers, essential for complex compositions.
For detailed retouching, the Spot Healing Brush Tool is highly effective at removing blemishes and imperfections from your photos. The Clone Stamp Tool allows you to sample pixels from one area of an image and paint them onto another, making it perfect for duplicating objects, removing distractions, or even painting elements from one photo onto another.
The Blur Tool is used to soften hard edges or areas, reducing detail for a smoother appearance. Conversely, the Sponge Tool can be used to change the color saturation of specific areas, either increasing or decreasing the vibrancy of colors. For artistic effects, the Brush Tool enables you to create soft or hard strokes of color, simulating techniques like airbrushing.
When you need to remove parts of an image, the Eraser Tool allows you to delete pixels by dragging through them. For filling areas with color, the Paint Bucket Tool fills an area with a solid color that matches the color value of the pixels you click. The Gradient Tool offers the ability to fill areas with a smooth transition of colors. The Eyedropper Tool is indispensable for sampling colors from your photo, which you can then use as new foreground or background colors.
The Pen Tool provides precise control for creating hard-edged freehand lines, essential for detailed drawing and path creation. The Crop Tool is also available in Advanced mode for refining image composition. A particularly powerful tool is the Recompose tool, which intelligently resizes photos without distorting important visual content like people, buildings, or animals. This feature is invaluable for adjusting aspect ratios or cropping images without sacrificing key elements.
The Selection Tool in Advanced mode allows you to select an object and then move that selection to a different location or extend it. The Straighten Tool, enhanced in version 12, can now intelligently fill the edges with relevant image data when straightening, rather than simply filling with a background color.
Utilizing Tools and Tool Options
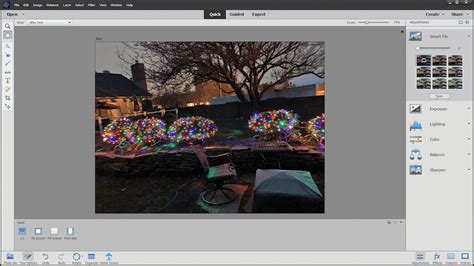
Regardless of whether you are in Quick or Advanced mode, the process of using a tool follows a consistent pattern. First, you select the desired tool from the toolbox. Following this, you utilize the various options presented in the Tool Options bar, which typically appears at the bottom of the Photoshop Elements window, to fine-tune the tool's behavior and achieve your desired outcome.
The Tool Options bar is dynamic, displaying settings relevant to the currently active tool. For example, when the Brush tool is selected, you'll see options for brush size, hardness, and opacity. When the Text tool is active, you'll find settings for font, size, and color.
How to Use the New Contextual Task Bar in Photoshop Elements 2026
An efficient way to work with tools is by using keyboard shortcuts. Each tool has a dedicated shortcut, displayed in its tooltip when you hover over it. For instance, pressing 'B' instantly selects the Brush tool. It's important to note that once a tool is selected, it remains active until you choose a different one.
Customizing Tool Preferences
Photoshop Elements allows for customization of tool behavior through its preferences. Within the Edit > Preferences > Display & Cursors menu (on Windows; the path may vary slightly on macOS), you can find options such as "Use Shift Key for Tool Switch." When this option is enabled, holding down the Shift key while clicking a tool icon will cycle through a set of hidden related tools. If deselected, pressing a tool's keyboard shortcut without holding Shift will cycle through different options for that tool. This level of customization can significantly speed up your workflow once you become familiar with it.
New Features in Photoshop Elements 12
Photoshop Elements 12 introduced several exciting enhancements aimed at improving the editing experience and expanding creative possibilities.
Enhanced Quick Edit Mode
Quick Edit mode received a significant upgrade with the addition of three new panels: Effects, Textures, and Frames. These panels are located alongside the existing Adjustments panel and each contain 10 thumbnails. A single click on any thumbnail instantly applies a corresponding edit or style to your image, making it incredibly easy to achieve popular looks.
Advanced Photo Restoration
The ability to repair and restore old or damaged photographs is a key strength of Photoshop Elements. Images can degrade over time due to environmental factors, poor paper quality, or neglect. After digitizing such photographs, Elements provides a suite of tools to meticulously remove cracks, discoloration, smudges, and other imperfections, breathing new life into cherished memories.
Creative Effects and Guided Edits
Photoshop Elements 12 introduced new ways to achieve creative effects, often through its Guided Edits feature. These step-by-step tutorials guide users through specific editing tasks, making complex processes accessible.
The Zoom Burst effect, for instance, creates a dynamic illusion of motion by drawing attention to the central object, mimicking the camera technique of zooming during an exposure.
The Puzzle Effect Guided Edit allows users to transform their photos into a visual representation of a puzzle, where the image appears to be constructed from individual pieces.
Intelligent Editing Features
Auto Smart Tone is a new feature that employs a smart algorithm to automatically adjust the tonal values of an image, providing a balanced and pleasing result with minimal user input.
The Straighten tool was enhanced to intelligently fill the newly created edges with relevant image data when straightening a photo, rather than defaulting to a solid background color. This results in a more seamless and natural-looking straightened image.
The Content-Aware Move tool, mentioned earlier, is a prime example of intelligent editing. It allows users to select an object, move it to a new location, and the software intelligently recomposes the image, filling the vacated space with matching elements from the original picture.
Print and Sharing Enhancements
Version 12 introduced a highly requested feature: the ability to print a foldable greeting card directly from the software to a local printer. This makes it easier than ever to create personalized stationery.
Furthermore, users can now upload albums to Adobe Revel directly from the Elements Organizer, facilitating cloud-based sharing and access to your photo collections across multiple devices.
Improved Media Management and Search
Photoshop Elements 12 introduced a new Places view for GPS-tagged media. Images are automatically grouped based on their geographic proximity, displayed as stacks on a map, offering a unique way to organize and explore your photos based on location.
The software also made strides in managing image metadata. In previous versions, editing or removing IPTC metadata was a one-file-at-a-time process. Photoshop Elements 12 allows for more efficient batch editing of metadata, saving users considerable time.
Search capabilities were also improved. Visual searches and object-based searches yield more accurate and specific results. When performing an object search, the bounding boxes around detected objects are more precisely placed, leading to better identification and retrieval of images containing specific subjects. To initiate an object search, you would select "Object Search" in the search box and then mark the object of interest within a photo.
Working with RAW Files and Camera Raw
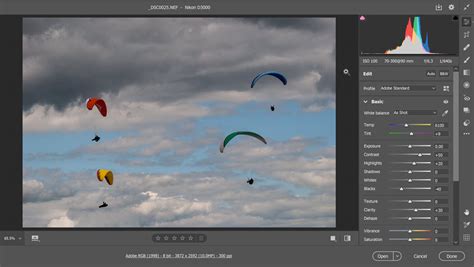
Photoshop Elements 12 offers expanded support for professional-grade image formats. You can now open supported image formats as raw images directly within the Photoshop Elements Editor. This means you can open files like PSD, JPEG, TIFF, or camera raw formats directly in the Adobe Camera Raw (ACR) dialog. This dialog provides a powerful environment for non-destructive editing of raw image data, allowing for extensive adjustments to exposure, white balance, color, and detail before the image is even opened in the main editor.
Advanced Editing Techniques and Features
Beyond the new additions, Photoshop Elements 12 continues to offer a wealth of advanced editing tools and techniques.
Layer-Based Editing
The concept of layers is fundamental to advanced image editing, and Photoshop Elements fully supports this. Layers allow you to stack different elements of your image on top of each other, enabling you to edit them independently without affecting other parts of the composition. This is crucial for complex edits, compositing, and applying various effects. Tutorials on how to use Photoshop Elements Layers are widely available and highly recommended for users looking to deepen their editing skills.
Filters and Effects Gallery
For artistic transformations, the Filter Gallery (accessible via Expert Mode > Filter > Filter gallery) provides a vast collection of artistic, brush stroke, and sketch filters. Users can experiment with different filter settings on the right side of the dialog to achieve unique visual styles.
Text and Shape Tools
Adding text to your photos is straightforward with the Text tool. You can create horizontal or vertical text, or even type text along a custom path or a preset shape. This is ideal for creating invitations, posters, or adding captions to your images. The software also provides various shape options for drawing custom elements within your designs.
Photomerge Group Shot
When capturing group photos, it's common for at least one person to blink or have their eyes closed in each shot. The Photomerge Group Shot feature addresses this by allowing you to combine the best facial expressions from multiple shots of the same group into a single, perfect photograph.
Installation and Activation
The process of installing and activating Photoshop Elements 12 is designed to be straightforward.
Serial Numbers and Activation
Upon purchasing Photoshop Elements, you will receive a serial number, typically starting with "1057" or "1143." This serial number is essential for converting a trial version to a full, activated version of the software. The serial number is usually found on the back of the DVD case or within your purchase confirmation email.
It's important to distinguish between a serial number and a redemption code. Both consist of 24 elements, but a serial number has 24 digits, while a redemption code has 24 alphanumeric characters. Ensure you are entering the correct code into the activation prompt.
Adobe actively blocks serial numbers that have not been legitimately issued by Adobe or have been used fraudulently by unauthorized sellers to produce counterfeit software. If you encounter an error message related to an invalid or expired serial number, it may indicate that the software build you are using has expired, or the serial number itself has reached its validity limit.
Installation Process
For installation, ensure you have a DVD drive connected to your computer. If the installer does not launch automatically via AutoPlay, you can manually navigate to the DVD using Windows Explorer and double-click "Setup.exe" within the "Adobe Photoshop Elements 2022" folder (the folder name may vary slightly depending on the exact version, but the principle remains the same). On macOS, you would typically navigate to the installation folder and launch "Install.app."
Before initiating the installation, it is advisable to temporarily disable any firewalls, antivirus software, or third-party security software. These can sometimes interfere with the installation or activation process.
Licensing and Trials
If you are using a trial version of Photoshop Elements and do not have a valid license associated with your Adobe ID, you will typically be granted a 7-day free trial. During or after this trial period, you can purchase a license on Adobe.com to activate the full version of the software. After activation, you will usually see a "Get Started" screen.
Community and Learning Resources
When adopting new software, engaging with the user community can be incredibly beneficial. Photoshop Elements has a large and active user base, providing a wealth of knowledge, tips, and troubleshooting assistance.
For those new to image editing or Photoshop Elements specifically, numerous tutorials are available. These range from basic introductions to advanced techniques. Some recommended tutorial areas include:
- Basic Photoshop Elements Tutorials: Covering fundamental editing tasks and interface navigation.
- Importing Images in Photoshop Elements: Learning how to bring your photos into the software.
- Using Photoshop Elements to Edit Raw Images: Mastering the nuances of working with raw image files.
- Restoration Tutorials: Focusing on repairing and enhancing damaged photographs.
- Background Manipulation Tutorials: Techniques for altering or replacing image backgrounds.
- Guided Edits Tutorials: Step-by-step guides for specific creative outcomes.
Video tutorials are particularly engaging and effective for visual learners. For example, a video tutorial focusing on refining images using Raw files can provide a clear, step-by-step demonstration of the process. Similarly, learning how to use Photoshop Elements Layers through video can significantly improve understanding.
The availability of resources like "13 Essential Photoshop Elements Tutorials for Beginners" and specific guides on "How to Use Photoshop Elements Layers" or "Top Ten Best Guided Edits Tutorial" highlight the comprehensive learning support available for users of all levels.
Photoshop Elements is more than just a photo editor; it's a creative toolkit that empowers users to enhance, transform, and share their visual stories. With its intuitive interface, powerful features, and extensive learning resources, Photoshop Elements 12 provides a compelling platform for anyone looking to elevate their photography and digital artistry.