Creating a compelling magazine layout in Adobe InDesign is an art form, blending striking visuals with perfectly chosen typography and judicious use of white space. Whether you're a seasoned designer aiming to streamline your workflow or an aspiring creator looking to bring your vision to life, understanding the fundamentals of InDesign magazine design is a crucial first step. This tutorial will guide you through the process of setting up professional magazine templates, from the cover to the interior spreads, leveraging InDesign's powerful features to ensure a polished and consistent final product. We'll explore essential techniques like setting up documents, utilizing master pages, defining column grids, and managing page numbering, all while keeping an eye on best practices for print production.
Setting the Foundation: Document and Page Setup
The journey to a well-designed magazine begins with a meticulously configured InDesign document. When initiating a new project, it's vital to establish the correct document intent and page dimensions that align with standard printing practices. For print publications, ensure the "Intent" is set to "Print." The choice of page size is paramount; magazines come in a variety of dimensions, which can differ based on the publication type and geographical market. Researching standard magazine sizes for your region will provide a solid understanding of what printers typically handle and what retailers expect. However, for a more localized publication, flexibility in sizing might be an option.

When you open the "New Document" window, keep the "Intent" set to "Print." For initial setup, setting the "Margins" on all sides to an equal width is a good starting point; a common choice is 13 mm. This ensures a consistent visual buffer around the content.
Crafting the Magazine Cover Template
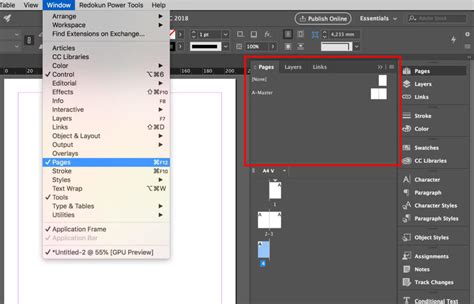
The magazine cover is the initial point of contact, demanding a distinct and engaging design. To create a flexible cover template, begin by expanding the "Pages" panel (Window > Pages), typically docked on the right side of your workspace. Duplicate the "Page 1" icon by clicking and dragging it onto the "Create New Page" button at the bottom of the panel. This action inserts a new page directly into the center of the spread, which will serve as the spine of your cover. To achieve a narrow spine width, you might need to reduce the margin size of this specific page. Navigate to "Layout > Margins and Columns" and decrease the margins to a minimal setting, such as 1 or 2 mm. Subsequently, from the "Controls" panel at the top of the screen, adjust the "Width" of this page. With these steps, you've established an easily editable cover template, ready for your creative embellishments.
Designing Interior Page Templates
Once the cover is prepared, attention shifts to setting up the templates for the magazine's interior pages. It's advisable to set an even "Number of Pages" initially, for instance, 16 pages. This configuration will yield an opening right-hand page and a closing left-hand page for your INDD magazine template, with the flexibility to add or remove spreads later as your design evolves. For "Page Size," ensure the "Width" and "Height" match the dimensions previously set for your cover. A common choice is to select a preset like "US Magazine" from the drop-down menu.
Strategic Margin and Bleed Setup
Setting appropriate margins is critical for InDesign magazine templates. The binding method significantly influences margin requirements. If your magazine can be opened fully, allowing all elements near the inside edge (the spine) to be visible, you can maintain even margins across all page edges. However, for magazines with around 30 pages or more, perfect binding (where pages are glued into the spine) is typical. In such cases, the inside margin needs to be more generous to accommodate the binding.
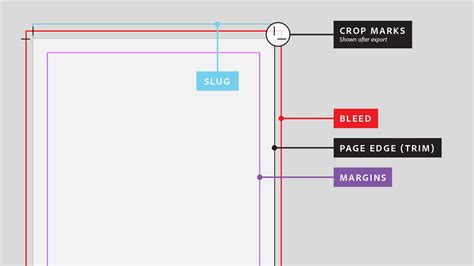
For a template suited for a perfect-bound magazine, a more generous inside margin is essential. Furthermore, it's crucial to add a "Bleed" of 5 mm to all edges of the page, except for the "Inside" edge, which can be set to 0 mm. The bleed ensures that any graphical elements or colors extending to the edge of the page are printed correctly, preventing unprinted white borders after trimming.
Leveraging Master Pages for Consistency
Master pages are a cornerstone of efficient magazine design in InDesign. They act as templates for recurring elements such as headers, footers, page numbers, and consistent layout structures. With your inside pages template open, access the "Pages" panel (Window > Pages) and double-click the "A-Parent" icon in the top section. This opens the master page spread for editing.
Establishing Column Grids and Page Numbers
On the "A-Parent" spread, navigate to "Layout > Margins & Columns." Increase the "Number of columns" to 2 or 3, depending on your design preference. Adjusting the "Gutter" between columns to between 5 and 10 mm will help maintain clear separation between blocks of text. Rename this master page to something descriptive, such as "Parent - Inside Spread," and click "OK."
To incorporate page numbering, select the "Type Tool" (T) and draw a small text frame in the bottom-right corner of the right-hand page of the "A-Parent" spread. Copy this frame ("Edit > Copy") and paste it ("Edit > Paste"). Using the "Type Tool" again, create a longer text frame in the top-left corner of the left-hand page. Copy and paste this frame to the right page, and modify the text to read "ISSUE NO. MONTH."
Next, use the "Type Tool" to draw a text frame on the left-hand page that fits neatly within the first column. Hover over the bottom-right corner of this text frame; a small white square will appear. Click this square, and a chain-link symbol will appear next to your cursor. Click into the next column to link the first text frame to the second. This establishes a text flow, meaning that when you place or paste extensive text into the initial column, it will automatically flow through the subsequent linked columns.
Creating Alternate Master Pages
Not every page in a magazine requires the same layout. For instance, the opening pages of features or articles might benefit from a different design, perhaps without page numbers or with a prominent visual element. You can create alternate master pages to accommodate these variations. In the "Pages" panel, select the "A-Parent" page icon and choose "Duplicate Parent Spread 'A-Parent - Inside Spread'." Double-click the newly created "B-Parent" icon to open it. You can then edit this spread to suit the opening of a feature. For example, you might design it to accommodate a full-size image across the spread to announce the start of an article. You can also select running header text frames and reduce their "Tint" to make them more subtle.
Sectioning and Numbering Your Magazine
Dividing long documents like magazines into sections can significantly improve organization and navigation. Let's assume you want the main content of your issue to begin on the fifth page of your magazine layout. While remaining in your inside pages template, click on "Page 5" in the "Pages" panel to highlight it. Under the "Style" option, choose "1, 2, 3, 4…" and click "OK." This action will renumber "Page 5" as "Page 1" in the panel, effectively marking the start of a new section. You now have a ready-to-save magazine template for both the inside pages and the cover.
Advanced Master Page Techniques: A Deeper Dive
For more intricate designs, consider the "Magazine Conde Nast" custom page size, with a Width of 203.2 mm and a Height of 276.22 mm, a standard used by commercial publishers. In the "New Document" window, set the "Orientation" to "Portrait" and configure the "Columns" to 4. Crucially, set the "Bleed" to 3 mm on the Top, Bottom, and Outside edges, with 0 mm on the Inside edge, as bleed is not required on the inside for this size.
Magazine Cover Design in InDesign | FREE COURSE
Within the "Pages" panel, the default "A-Master" is a two-page facing spread. Any content applied here will appear on all pages using this master. Double-click the "A-Master" icon to access its editor. Guides are indispensable for precise layout. Drag guides from the rulers to establish specific zones for text and graphics. For instance, a guide at the Y position of 9 mm on the left-hand page can define the top edge of a text frame.
Incorporating Typographic Elements on Master Pages
On the "A-Master," use the "Type Tool" (T) to create a text frame in the bottom-left corner of the left-hand page. Type "page" followed by a space. Then, go to "Type > Insert Special Character > Markers > Current Page Number." This will insert a placeholder for the current page number, which will dynamically update on each applied page.
Create a new color swatch (e.g., CMYK: C=0, M=10, Y=11, K=34) for stylistic elements. Use the "Line Tool" to draw a line extending from the page number to the edge of the second column. Adjust the "Stroke" panel for weight, type, and end caps to create a refined look. Copy and paste the page number text frame and line to the right-hand page, mirroring their placement and aligning the text to the right.
For a feature opening page, you might create a "Master â Feature First Spread." Use the "Rectangle Frame Tool" (F) to create a frame that spans the entire right-hand page, extending to the bleed. Overlay this with a rectangle shape set to a specific opacity (e.g., 70%) to create a subtle background effect. Ensure these elements are sent to the back ("Arrange > Send to Back") so they don't obscure the page numbers and lines. Adjust the color of text and strokes to make them visible against the background.
Managing Multiple Master Pages
To create variations, you can generate new master pages. Select "New Master…" from the "Pages" panel's drop-down menu, maintaining the default prefix (e.g., "B"). Paste elements from another master page ("Edit > Paste in Place") or build them from scratch. You can then apply these master pages to specific document pages by dragging and dropping the master page icons onto the desired page numbers in the "Pages" panel. For example, applying the "B-Master" to pages 6 and 7.
Adding and Styling Content
With your master pages established, you can begin populating your document with content. Consider sourcing a selection of images that work harmoniously in terms of subject matter, color, and quality. The "Mini Bridge" panel (Window > Mini Bridge) can be invaluable for managing and placing images.
Typography Choices and Their Impact
Selecting appropriate typefaces is crucial for readability and brand identity. Magazines often employ a standardized "brand" font for body text, page numbers, and running headers. A more decorative font can be used for feature titles and quotations to add visual interest.
For body text, choose a font that is legible in extended passages and small sizes, ensuring adequate line spacing for comfortable reading. For headers, consider distinct styles for chapter, section, and sub-headers. Creating "Paragraph Styles" for these elements, including headers and footers from master pages, ensures consistency and efficiency.
Formatting Text and Images
When placing text, utilize paragraph styles for consistent formatting. For example, create a "Drop Cap" for the first letter of a paragraph by setting the "Drop Cap Number of Lines" in the "Character Formatting Controls" panel. Bold and capitalize the first few words of an article for emphasis.
Images can be placed directly into frames using "File > Place" or by dragging from "Mini Bridge." For a stylized effect, an image can be placed within a text frame, effectively filling the letter. For instance, typing "Y" and setting its font size to a very large point size (e.g., 650 pt) and then placing an image within that frame.
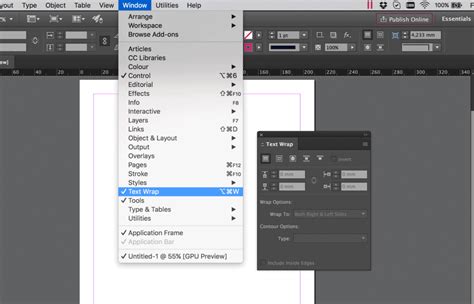
To integrate images with text, use the "Text Wrap" panel. This allows you to create space around images and control how text flows around them. For instance, you can wrap text around a rectangular frame containing an image.
Creating Visual Elements and Layouts
Beyond standard text and image frames, InDesign offers tools for creating more complex visual elements. The "Ellipse Tool" (L) can create perfect circles, which can then be converted into text frames for quotes or call-out boxes. Combining multiple shapes and arranging them ("Arrange > Send to Back") can create layered graphic elements.
For unique layouts, consider using the "Polygon Tool" to create star shapes or other custom frames. These can be used to highlight specific pieces of information or create visual anchors within the design.
Beyond Templates: Enhancing Your Design Workflow
While creating your own templates offers maximum control, a vast array of pre-designed InDesign magazine templates are available, particularly through subscription services like Envato Elements. These professional templates provide a significant head start, offering diverse styles from minimalist to bold, and catering to various niches like architecture, travel, and fashion.
Exploring Diverse Template Styles
The range of available templates is extensive, encompassing:
- Minimalist designs: Emphasizing simplicity, white space, and elegant typography.
- Bold and modern layouts: Featuring strong typography, vibrant colors, and dynamic image placement.
- Niche-specific templates: Tailored for industries like food, fashion, travel, architecture, and education.
- Brochure-style layouts: Offering a more compact and focused design.
- Creative and artistic templates: Incorporating unique graphic elements and unconventional structures.
These templates are not rigid; they are designed for customization, allowing you to adapt them to your specific content and brand identity.
The Power of InDesign's Integrated Workflow
InDesign's strength lies in its integrated workflow with other Adobe Creative Cloud applications. Seamlessly import graphics, photos from Adobe Stock, and utilize Adobe Fonts to enhance your designs. When preparing for print, InDesign supports professional printing standards such as CMYK, Pantone, and spot colors, ensuring accurate color reproduction.
The ability to compose articles directly within InDesign allows you to leverage its paragraph styles and text tools natively, providing immediate visual feedback on how content fits within the layout. Alternatively, composing articles in a word processor and then placing them into InDesign facilitates collaboration with other content creators.
Finalizing for Print
When your magazine design is complete, exporting a print-ready PDF is essential. Go to "File > Adobe PDF Presets > [Press Quality]…" This ensures that your document is exported with the highest quality settings suitable for professional printing.
By mastering these InDesign techniques, you can efficiently create professional, visually engaging magazine layouts that capture your readers' attention and effectively communicate your message.