Navigating the transition from the vibrant world of digital displays to the tangible reality of print can be a complex undertaking, especially when it comes to color. The fundamental difference between how colors are displayed on a screen (RGB) and how they are reproduced with ink on paper (CMYK) necessitates a crucial conversion process. This tutorial delves into the intricacies of converting RGB to CMYK using Adobe Photoshop, empowering designers and creators to achieve accurate and predictable color results in their printed materials. Understanding this conversion is not merely a technical step; it's a gateway to ensuring your visual message resonates precisely as intended, from the initial digital concept to the final printed piece.
The Fundamental Differences: RGB vs. CMYK
Before embarking on the conversion process, it's essential to grasp the core distinctions between RGB and CMYK color modes. Color mode dictates how colors are represented and organized within a digital or printed image. This fundamental concept is paramount because it directly influences how colors are mixed and displayed, ultimately impacting the accuracy and appearance of the final output.
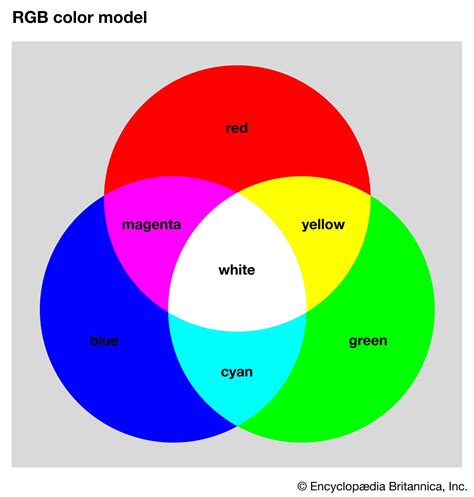
RGB, which stands for Red, Green, and Blue, is an additive color model. This means that colors are created by combining different intensities of light. In RGB, black is the absence of light, and white is the combination of all three primary colors at their fullest intensity. This model is primarily used for digital displays such as computer monitors, televisions, smartphones, and cameras. The colors you see on your screen are rendered through the emission of light.
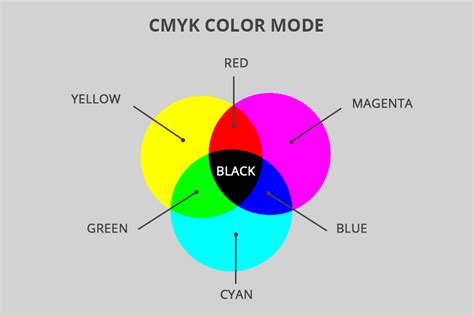
CMYK, on the other hand, is a subtractive color model. It comprises Cyan, Magenta, Yellow, and Key (Black). In this model, colors are created by subtracting light. When inks are applied to a surface, they absorb certain wavelengths of light and reflect others. White is the absence of ink, and black is theoretically achieved by combining all four inks. However, pure black is usually achieved by using the "K" (black) ink. CMYK is the standard color model used in offset and digital printing, often referred to as the "Four-Color Process" or "Process Color." It's also known as "Full-Color Printing" because it can generate a wide spectrum of colors by mixing these four ink colors in various proportions.
The critical takeaway is that different devices and mediums have different color capabilities. Screens emit light, allowing for a broader and more vibrant range of colors (a larger color gamut). Printing uses inks, which have a more limited range of reproducible colors. When we layer colors of inks in CMYK printing, they blend differently compared to how layers of colored light combine in the RGB model. Choosing the right color mode is a critical step for your design to look consistent across different platforms and mediums.
Why Converting RGB to CMYK is Crucial for Printing
The necessity of converting RGB to CMYK stems directly from the fundamental differences in their color spaces and their intended applications. Because there are no methods for printing in RGB, no matter where you print, you must convert your project to a printable format, which is CMYK. This is a crucial step in the printing process and significantly affects how well your colors are represented in the final product.
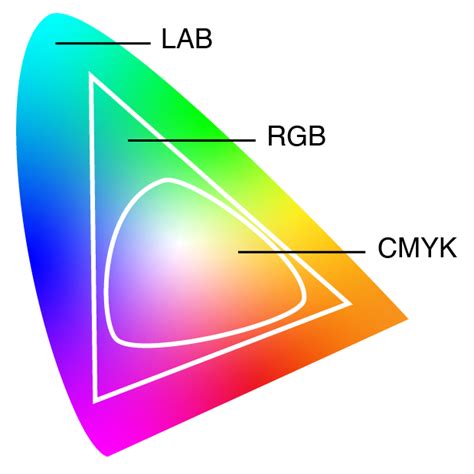
A foundational challenge in print design is converting files from RGB to CMYK while maintaining color accuracy. The CMYK color gamut, or the range of representable colors, is inherently smaller than that of RGB. This means that some of the vibrant, saturated colors achievable on a screen simply cannot be replicated with CMYK inks. When converting RGB files to CMYK for printing, there are often subtle shifts in color. It’s important to convert images and graphics from the internet to CMYK (at a sufficient resolution) before using them for print.
Be prepared for slightly muted or dulled colors in CMYK mode when compared to the original RGB image. This is particularly true for very bright or neon colors, which are notoriously difficult to reproduce accurately with standard CMYK inks. This inherent limitation of the CMYK color space is why a direct, perfect color match is not always achievable.
For instance, a brilliant, luminous blue that pops on your monitor might appear significantly desaturated or a duller shade of blue when printed. This is not a flaw in the conversion process itself but rather a reflection of the physical limitations of ink on paper compared to emitted light on a screen.
Preparing Your Workspace: Calibration and Simulation
To navigate the conversion process with greater confidence and achieve realistic expectations, two key steps are paramount: having your monitor decently calibrated and having CMYK previsualization and simulation turned on from the start.
Monitor Calibration: Your computer's profile is used to simulate the colors on your screen that will eventually be printed. A properly calibrated monitor displays colors more accurately, providing a truer representation of what your design looks like. An uncalibrated monitor can lead to significant discrepancies, where what you see on screen doesn't match the printed output, causing frustration and rework. Calibration ensures that the colors you perceive on your screen are as close as possible to the intended output, making the subsequent conversion process more predictable.
CMYK Simulation/Proofing: Most professional design software, including Photoshop, offers a "Proof Colors" feature or a similar simulation tool. This allows you to see an on-screen preview of how your RGB colors will translate into the CMYK color space. By enabling this feature, you can identify potential color shifts before you commit to the conversion. This soft proofing feature in your image editing software simulates how your RGB colors translate to CMYK. This preview allows you to identify and address color discrepancies before the actual conversion. For example, in Photoshop, you can go to View > Proof Setup and select a CMYK profile that matches your intended printing conditions. This is an invaluable tool for managing expectations and making necessary adjustments proactively.
The Conversion Process in Photoshop: Step-by-Step
Converting an RGB image to CMYK in Adobe Photoshop is a relatively straightforward process, but understanding the options available can significantly impact the final outcome.
Step 1: Open Your ImageLaunch Adobe Photoshop and open the image file you intend to convert by navigating to File > Open and selecting your image.
Step 2: Check the Current Color ModeBefore proceeding, it's crucial to verify the current color mode of your image. Go to Image > Mode. If it's already in CMYK Color, your image is already prepared for print in terms of color mode, and you can proceed to any necessary color adjustments. If it's in RGB, such as "RGB Color," continue to the next step.
Step 3: Convert to CMYKWith your image open and confirmed to be in RGB, navigate to Image > Mode > CMYK Color.
Upon selecting CMYK Color, a dialogue box may appear, warning you about the potential color shift that can occur during the conversion. This warning is standard and reiterates that some RGB colors may not be reproducible in CMYK. Click "OK" to proceed with the conversion. Photoshop will then convert your image's color data from the RGB color space to the CMYK color space, utilizing its default conversion engine and intent settings unless specified otherwise.
Step 4: Understanding Conversion Options (Color Transformation Parameters)
The conversion process involves "color transformation parameters," which are essentially the methods used to "squeeze" the wider RGB color space into the more limited CMYK color space. When you convert to CMYK, you have the option to specify these parameters, which can influence the outcome.
In Photoshop, when you convert to CMYK (Image > Mode > CMYK Color), a " CMYK Color Options" dialog box appears. Here, you can select:
- Conversion Engine: Adobe recommends using "Adobe (ACE)" as your conversion engine, as it generally provides consistent and predictable results across Adobe applications.
- Intent: This is a critical setting that determines how out-of-gamut colors (colors that cannot be reproduced in CMYK) are handled.
- Perceptual: This intent tries to preserve the overall visual relationship between colors, compressing the entire RGB gamut into the CMYK gamut. It's good for photographic images where the overall feel and relationships between colors are more important than exact color matches.
- Relative Colorimetric: This intent maps out-of-gamut colors to the nearest reproducible color within the CMYK gamut, while leaving in-gamut colors untouched. It preserves the white point of the source color space. This is often the preferred choice for graphic elements and logos where specific color accuracy is desired.
- Absolute Colorimetric: Similar to Relative Colorimetric, but it also adjusts the white point of the source color space to match the destination color space. This can lead to a color cast if the white points differ significantly.
- Saturation: This intent prioritizes color saturation over hue and lightness. It's rarely used for print and is more suited for business graphics where vibrant colors are key, even if hue accuracy is sacrificed.
For most general print purposes, Relative Colorimetric is a good starting point, especially if you are aiming for precise color reproduction for elements like logos or specific brand colors. If you are working with photographs and want to maintain the overall mood and color relationships, Perceptual might be a better choice.
Step 5: Adjusting Colors After Conversion
Now that your file has been converted to CMYK, take a look at how your colors have shifted. If you had any very bright blues, reds, or greens, chances are they’ve been reined in to account for CMYK’s reduced color gamut. This is where your artistic judgment and understanding of color come into play.
Because you chose to convert colors yourself, you now have some options to play with your CMYK colors.
- Global Adjustments: For global changes, if you’re working in Photoshop, you can try playing with Levels, Curves, Contrast, and Saturation adjustments. These tools allow you to make broad tonal and color corrections across the entire image. For example, if colors appear too dull, you might increase contrast or adjust curves.
- Individual Color Channel Adjustments: The most thorough way to improve your colors is to go through and alter the CMYK values of the colors themselves. You can use the Color Picker to select specific colors and manually adjust their Cyan, Magenta, Yellow, and Black components. This offers the most granular control.
- Using the Info Panel and Color Picker: As you work, keep the Info panel (Window > Info) open. This panel will show you the RGB and CMYK values of the pixels under your cursor. This allows you to see in real-time how your adjustments affect the CMYK values.
- Soft Proofing Revisited: After making adjustments, it’s a good practice to re-evaluate using the soft proofing feature (View > Proof Setup) to see how your modified CMYK colors will appear in print.
What Is Soft Proofing In Photoshop?
Working with Profiles and Print Providers
When submitting files for professional printing, understanding color profiles and the printer's requirements is paramount.
Color Profiles: A color profile is a set of data that characterizes the color handling capabilities of a device (like your monitor or a printer). When you convert to CMYK, you are typically converting to a specific CMYK profile. For example, "U.S. Web Coated (SWOP) v2" is a common CMYK profile used in the United States for coated paper. Different printing conditions (e.g., paper type, printing press, ink set) require different CMYK profiles.
Printer Recommendations: It's crucial to communicate with your print provider. They will often specify which CMYK profile they prefer you to use for your conversions. At PrintNinja, for instance, they recommend that for submitting files to them, you do not do any further color conversion or embed any color profile information beyond what is standard for your chosen CMYK output. This means that after you convert to a standard CMYK profile, you might save the file without embedding additional profiles if the printer requests it.
However, for other print scenarios, embedding the correct CMYK profile is vital. When saving your file (File > Save As), choose a format like TIFF or PDF. In the save options dialogue, ensure that "Embed Color Profile" is checked. This embeds the profile information within the file, allowing the printing press to interpret the colors accurately.
Submitting RGB vs. CMYK: While it's generally recommended to convert to CMYK yourself to have full control over color shifts, some print providers, like PrintNinja, offer to convert your RGB files for you. If you'd prefer not to modify colors yourself, you are more than welcome to submit your RGB files and let them convert them for you. However, this method provides the least amount of control for you, since they won’t make any changes to your colors beyond the conversion. This means any undesirable color shifts will occur without your direct input.
Generally, the “Press Quality” default settings in InDesign and Photoshop are great for general purposes. However, for submitting files to specific printers, always adhere to their guidelines. If you want to learn more about why printing files must be in CMYK, consult advanced color guides provided by reputable printing services.
Can I Get the Same Color from RGB to CMYK?
Achieving the exact same color when converting from RGB to CMYK can be challenging due to the inherent differences between the two color models. As discussed, RGB has a wider color gamut than CMYK, meaning it can produce more vibrant and diverse colors. When converting to CMYK, some of these colors may appear duller or less saturated because CMYK has a more limited range of colors. Color accuracy from RGB to CMYK is not always achievable, especially for very bright or neon colors.
For critical color matches, consider using Pantone colors. Pantone is a standardized color system used in printing, and it is the standard method for consistent color reproduction. If a specific color is absolutely critical for branding or visual identity, working with Pantone colors from the outset and ensuring your printer can match them is the most reliable approach.
Always create a printed proof before running the final print job. This will give you a chance to see how the colors look on paper and make any necessary adjustments. This is the most definitive way to ensure your colors are as intended.
Converting RGB to CMYK in Other Adobe Applications
While Photoshop is a primary tool for image manipulation, the conversion process is also integrated into other Adobe Creative Suite applications:
Adobe InDesign: If you’re starting a new project in InDesign with a print intent, the color mode will default to CMYK. For existing documents, you can convert colors via Edit > Convert to Profile. For RGB images placed in InDesign, you would typically convert them to CMYK in Photoshop before placing them, or you can edit them directly through the Links panel (Window > Links) by right-clicking and selecting "Edit With > Adobe Photoshop." When exporting your InDesign document to PDF for print, ensure the Output section in the Export Adobe PDF dialog is set to convert colors to the appropriate CMYK profile.
Adobe Illustrator: Similar to InDesign, you can set the document color mode to CMYK from the start. For an existing RGB document, go to File > Document Color Mode > CMYK Color. For imported RGB images, it's best practice to convert them in Photoshop. When saving, ensure you embed the CMYK profile. Illustrator's "Overprint Preview" (View > Overprint Preview) can help visualize how colors will interact when printed.
Online Tools and Alternatives
While professional software like Photoshop offers the most control, converting RGB to CMYK without it is entirely possible using various online tools. If you’re looking for a quick and easy way to convert RGB colors to CMYK online, there are several free tools available. These online converters can provide a quick approximation of CMYK values for your RGB colors. However, for precise color matching and professional printing, it’s always recommended to use dedicated software like Adobe Photoshop or Illustrator and consult with your printer.
For instance, some online tools allow you to input RGB values and receive their CMYK equivalents. You can also find tools that let you upload an image and download a CMYK version. While these can be useful for simple conversions, they often lack the sophisticated color management and profile handling that professional software provides.
Conclusion: A Journey of Color Accuracy
Converting RGB to CMYK is an indispensable step for anyone aiming to translate their digital designs into high-quality printed materials. While the transition from the luminous world of screens to the inked surface of paper inherently involves color shifts, understanding the underlying principles and utilizing the tools available in software like Adobe Photoshop can significantly mitigate these changes. By calibrating your monitor, employing soft proofing, carefully selecting conversion options, and communicating with your print provider, you can navigate this process with confidence. The goal is not always to achieve an identical match, but rather to ensure that the colors in your final printed piece are as close as possible to your creative vision, maintaining the integrity and impact of your design.