In the realm of digital design and photography, precision is paramount. Whether you're a wedding photographer aiming to correct a slightly tilted building in the background or a graphic designer meticulously crafting a layout, the ability to align elements accurately can elevate your work from good to exceptional. Photoshop, a powerhouse in image manipulation, offers robust tools to achieve this precision: grids and guides. These non-printing visual aids act as invisible rulers and frameworks, floating over your canvas to help you maintain symmetry, balance, and perfect placement of elements within your designs. Understanding how to effectively utilize grids and guides in Photoshop can significantly streamline your workflow, enhance the aesthetic appeal of your projects, and ultimately, save you valuable time.
The Fundamentals of Grids in Photoshop
Grids in Photoshop function as a visual scaffolding, composed of horizontal and vertical lines or dots, that overlay your image or design canvas. Their primary purpose is to provide a structured framework for aligning objects, ensuring consistency, and achieving symmetrical compositions. They are invaluable for tasks ranging from correcting perspective in photographs to designing intricate layouts for posters, marketing materials, and social media posts.
Activating and Customizing Your Grid
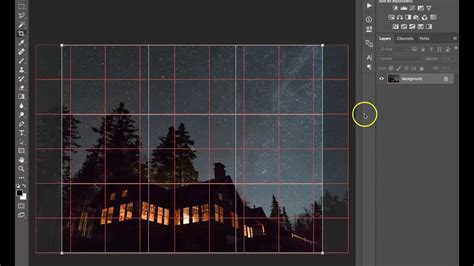
The journey to using grids begins with a simple activation. To display a grid on your canvas, navigate to the "View" menu at the top of your workspace. From the dropdown, select "Show," and then click on "Grid." Immediately, a grid will appear, offering a basic structure to your workspace.
However, the default grid might not always suit your specific needs. Photoshop provides extensive customization options to tailor the grid's appearance and behavior. To access these settings, go to the "Photoshop" menu (or "Edit" on Windows) in the top-left corner of your workspace and select "Preferences." Within the Preferences window, choose "Guides, Grid & Slices." This opens a dedicated dialog box where you can fine-tune various aspects of your grid.
Here, you can define the color of the grid lines, choosing a hue that offers maximum visibility without obscuring your artwork. For instance, a light gray is often recommended as it has minimal presence in most images, allowing you to see the true colors and aesthetics of your photo. Conversely, using a black grid on a dark scene or a white grid on a bright scene would make the grid practically invisible and thus, less useful. You can also select the style of the grid lines, opting for continuous lines, dashed lines, or even dots, depending on your visual preference and the task at hand. Lines generally offer the best visibility, though some designers find them distracting and prefer dotted lines.
The spacing of the grid lines is another critical parameter. You can specify the distance between each grid line, and importantly, the unit of measurement. For web-based projects, pixels are typically the most practical unit. For print work, you might opt for inches or centimeters. Furthermore, you can divide each primary grid line into subdivisions. This allows for even finer control over your alignment. For example, you might set grid lines every 100 pixels and then set four subdivisions per grid line, effectively creating smaller intervals of 25 pixels. This hierarchical structure ensures that you can work with broad alignments or very granular placements as needed.
The Power of Snapping
Beyond just visual guidance, Photoshop's grids offer a powerful feature known as "snapping." When enabled, snapping causes objects, text, or selections to automatically align or "snap" to the nearest grid line or intersection. This eliminates the need for precise manual placement and significantly speeds up the alignment process.
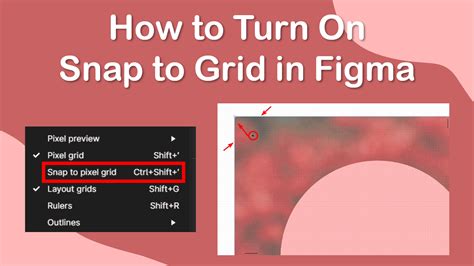
To enable snapping to the grid, go to the "View" menu, select "Snap to," and then choose "Grid" from the subsequent submenu. Once snapping is active, as you move an object across your canvas, it will feel as though it's being magnetically drawn to the grid lines, ensuring perfect alignment with minimal effort. This feature is particularly useful when creating repetitive patterns, aligning multiple elements in a row or column, or ensuring geometric shapes fit precisely within designated areas.
Leveraging Guides for Precision and Flexibility
While grids provide a consistent, overall structure, guides offer a more flexible and targeted approach to alignment. Guides are non-printing lines that you can manually place on your canvas, or create automatically through specific commands. They are incredibly useful for aligning specific elements, controlling spacing, and establishing visual flow within your design.
Creating and Managing Guides
To begin using guides, you first need to ensure that rulers are visible. Navigate to "View" and select "Rulers." This will display rulers along the top and left edges of your Photoshop workspace, showing dimensions in your chosen units.
To create a guide, simply click and drag from one of the rulers onto your canvas. Dragging from the top ruler will create a horizontal guide, while dragging from the left ruler will create a vertical guide. You can place these guides anywhere on your canvas to mark specific alignment points.
Photoshop also offers a more automated way to create guides, particularly useful for establishing a structured layout. Go to "View," then "Guide," and select "New Guide Layout." This opens a dialog box where you can specify the number of rows and columns you wish to create, along with settings for gutters (the space between columns or rows) and margins. This is an excellent method for quickly setting up a grid-like structure for photo collages or complex page designs.
Similar to grids, guides can also be utilized with the snapping feature. By going to "View" > "Snap to" and selecting "Guides," your elements will snap to these manually placed or automatically generated lines, ensuring precise alignment.
How To Place Guides In Exact Positions In Photoshop 2023-2024
Customizing and Locking Guides
The appearance of guides can also be customized within the "Preferences" > "Guides, Grid & Slices" menu. Here, you can change the color of your guides to ensure they stand out against your artwork.
Once guides are in place, you might want to prevent them from being accidentally moved or deleted. This is where the "Lock Guides" feature comes in handy. Navigate to "View" and select "Lock Guides." This action will secure all existing guides in their current positions. To move guides again, you'll need to unlock them by deselecting "Lock Guides."
If you wish to remove individual guides, you can do so by dragging them back to their respective rulers. Alternatively, you can select a guide and then navigate to "View" > "Guide" > "Clear Selected Guide." To remove all guides from your canvas at once, go to "View" and select "Clear Guides."
Advanced Techniques: Creating Photo Grids and Collages
The power of Photoshop's grids and guides truly shines when used to create intricate photo layouts and collages. This is where the combination of shape tools, clipping masks, and precise alignment becomes essential.
Building a Photo Grid from Scratch
To create a photo grid, you'll typically start by defining the structure of your grid. This can be done using the "New Guide Layout" feature as described above, or by manually drawing guides to create the desired number of rows and columns.
Once your guide structure is in place, you can use the "Rectangle Tool" (or other shape tools) to draw the individual frames for your photos. It's crucial to ensure that these shapes snap to your guides for perfect alignment. You can set the fill of these shapes to a placeholder color, or even set them to have no stroke and no fill initially, relying on the clipping mask to define their boundaries.
A common workflow involves creating a single shape, then duplicating it and moving it to the next grid position. To expedite this, you can select the "Move Tool" (shortcut 'V'), hold down the "Alt" (Windows) or "Option" (Mac) key, and drag the shape. This action duplicates the shape and moves it simultaneously, saving considerable time when creating multiple frames.

Filling Shapes with Images Using Clipping Masks
The magic of filling these shapes with your photographs lies in the use of "Clipping Masks." First, open the images you wish to use for your collage. Drag and drop each image onto your grid document, ensuring each image is on its own layer and positioned above the corresponding shape layer.
To create a clipping mask, select the image layer you want to mask. Then, hold down the "Alt" (Windows) or "Option" (Mac) key and hover your cursor between the image layer and the shape layer directly below it in the Layers panel. Your cursor will change to a small downward-pointing arrow. Click to create the clipping mask. This action will confine the visibility of the image to the boundaries of the shape layer beneath it. Repeat this process for each image and shape.
You can also apply layer styles, such as borders, to your shape layers before creating the clipping mask. This allows you to add outlines to your photo grid elements. To apply the same style to multiple layers, you can use the "Copy Layer Style" and "Paste Layer Style" options.
Alternative Methods and Tools
While manual creation offers maximum control, Photoshop also offers alternative approaches and extensions. For instance, the "Frame Tool" can be used to create placeholder frames that can be directly filled with images. You can also define custom patterns using squares or lines and then use the "Fill" command to apply these patterns, effectively creating a grid.
For those who frequently work with complex grid layouts, third-party extensions like "GuideGuide" can be incredibly beneficial. These tools offer advanced options for creating grids and guides with precise measurements and complex arrangements, often through a more streamlined interface.
Grids and Guides: Enhancing Your Design Workflow
The utility of grids and guides in Photoshop extends far beyond mere aesthetic alignment. They are fundamental tools that contribute to efficiency, accuracy, and professional polish in a wide array of design and editing tasks.
Applications in Photography and Design
In photography, grids are instrumental in correcting perspective distortion, ensuring horizons are level, and achieving perfect symmetry in architectural shots or product photography. For wedding photographers, ensuring the couple is perfectly centered or that background elements are balanced can make a significant difference in the final image.
Graphic designers rely heavily on grids for creating consistent layouts for websites, brochures, advertisements, and social media content. They ensure that elements are evenly spaced, aligned with established margins, and maintain a sense of order and professionalism. The "rule of thirds" grid, which can be configured by setting grid lines to 33.3% and 66.7% (or by setting the grid every 100% with 3 subdivisions), is a classic compositional aid used to create visually appealing images.
Benefits for Different Skill Levels
For beginners, grids and guides offer a visual crutch, helping them understand the principles of composition and alignment without needing to develop an innate sense of balance. As users become more experienced, these tools transform into powerful accelerators, allowing them to execute complex layouts with speed and precision. Professionals can leverage advanced customization and snapping features to achieve pixel-perfect results, saving time on revisions and ensuring client satisfaction.
Learning and Resources
Adobe itself provides a wealth of resources for learning Photoshop, including tutorials, tips, and courses available through their website and within the software. For more intensive learning, Photoshop bootcamps offer structured, hands-on training. Online communities and forums also provide a platform for users to ask questions, share tips, and learn from the collective experience of other Photoshop users.
By mastering the use of grids and guides in Photoshop, you equip yourself with essential skills that can dramatically improve the quality and efficiency of your creative work, from intricate photo collages to precise design layouts.