DaVinci Resolve, a titan in the realm of video editing and color correction, is celebrated for its extensive format support. However, even this powerhouse software can present hurdles, particularly when dealing with AVI files. While it might seem counterintuitive that a program with such broad capabilities would struggle with a common video container, the nuances of AVI's structure and the evolution of professional video codecs mean that importing AVI files into DaVinci Resolve can, at times, lead to frustration, unrecognized files, or even application crashes. This comprehensive guide delves into the reasons behind these import and export issues and offers practical solutions to ensure a seamless workflow.
Understanding the AVI Conundrum in DaVinci Resolve
The core of the problem lies in the nature of the AVI (Audio Video Interleave) format itself. AVI is a container format, a digital wrapper that can hold a wide array of video and audio data. Crucially, it has the capacity to contain uncompressed video and audio codecs. While this flexibility was a strength in its heyday, AVI is now largely considered an obsolete format, especially in professional video production environments. Most software developed within the last decade, including advanced editing suites like DaVinci Resolve, has moved towards more modern and efficient container formats. In the professional sphere, AVI has been largely supplanted by MOV (QuickTime File Format) and, in some instances, MXF (Material Exchange Format) files.

When users encounter issues, such as seeing folders in the media browser but not the AVI files within them, or finding that gameplay footage encoded in AVI isn't recognized, the underlying cause is often not DaVinci Resolve's inability to handle AVI as a container, but rather its incompatibility with the specific codecs used to compress the video and audio streams inside that AVI container. This can manifest in several ways: DaVinci Resolve might reject the import entirely, only allow the audio track to be added to the timeline, or even crash when attempting to process the problematic AVI file.
Common Scenarios and Underlying Reasons for AVI Import Failure
Several factors can contribute to the difficulty of importing AVI files into DaVinci Resolve. Understanding these can help in diagnosing and resolving the issue.
1. Outdated DaVinci Resolve Versions: While newer versions of DaVinci Resolve have improved AVI support, older installations might lack the necessary decoding capabilities for certain AVI codecs. For instance, the announcement of DaVinci Resolve 15's support for AVI Grassvalley HQX files marked a significant step, but this doesn't guarantee support for all AVI variants across all versions. If you are using an older version of Resolve, upgrading to the latest release is often the first troubleshooting step.
2. Corrupted AVI Files: Sometimes, the issue isn't with DaVinci Resolve at all, but with the AVI file itself. If an AVI file is corrupted during download, transfer, or recording, it may not be recognized or playable by any software, including DaVinci Resolve. A simple test is to try playing the AVI file in a reliable media player like VLC Media Player to check for integrity. If it doesn't play correctly there, the file itself is likely the problem.
3. Incompatible Codecs Within the AVI Container: This is the most frequent culprit. AVI files can contain data encoded using a vast array of codecs, including, but not limited to, Full Frame (Uncompressed), Intel Real Time (Indeo), Cinepak, Motion JPEG, VDOWave, ClearVideo/RealVideo, QPEG, and various MPEG-4 variants. DaVinci Resolve needs to be compatible with the specific codec used within your AVI file to decode and process it. If the codec is not natively supported or if the necessary codec pack is not installed on your system, DaVinci Resolve will struggle.
4. File Size Limitations: While less common as a primary reason for outright failure, very large AVI files (e.g., 8GB gameplay recordings) can sometimes push the limits of system resources or specific import routines, potentially contributing to playback or import issues, especially if combined with other underlying codec problems.
Strategies for Seamless AVI Import into DaVinci Resolve
Given that codec incompatibility is the most prevalent reason for AVI import failures, the most effective solution is to transcode or convert the AVI files into a format that DaVinci Resolve natively supports and handles efficiently. This process essentially repackages the video and audio data into a new container with a more editing-friendly codec.
Solution 1: Transcoding to Editing-Friendly Formats
Professional editing software like DaVinci Resolve performs best with intermediate or production codecs. These codecs are designed for high-quality playback and editing, with less emphasis on compression and more on preserving image fidelity. Common recommendations include:
- DNxHD (.mov): A high-quality, professional codec developed by Avid that offers excellent editing performance and is well-supported by DaVinci Resolve.
- Apple ProRes (.mov): Another industry-standard intermediate codec, particularly popular in macOS-based workflows, offering superb quality and editing speed. It's important to note that ProRes files typically require significantly more storage space than H.264-based files.
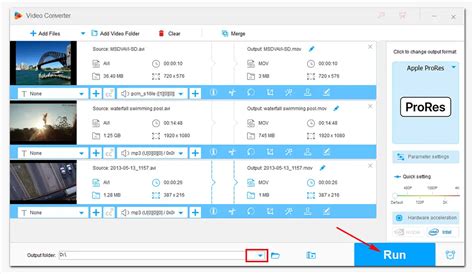
Using Video Converter Software for Transcoding:
Numerous video converter applications can facilitate this conversion. These tools typically offer a user-friendly interface for selecting input files, choosing output formats, and initiating the conversion process.
Step-by-Step Conversion Process (General Example):
- Import AVI Files: Launch your chosen video converter software (e.g., EaseFab Video Converter, Pavtube HD Video Converter, HitPaw Univd). Use the "Add Video" button or drag-and-drop functionality to import your AVI files into the program.
- Select Output Format: Navigate to the output format settings. For DaVinci Resolve, selecting a
.movcontainer with either the DNxHD or Apple ProRes codec is highly recommended. Alternatively, MP4 containers with H.264 or MPEG-4 codecs can also work, though they are generally optimized for delivery rather than editing.- For DNxHD/ProRes: Look for options like "DNxHD (.mov)" or "Apple ProRes 422 (.mov)" under categories like "Editing Software" or "Professional."
- For broader compatibility: MP4 or MOV with H.264 encoding from the "Common Video" category is a widely supported option.
- Configure Settings (Optional but Recommended): Some converters allow you to adjust parameters like video bitrate, frame rate, and audio sample rate. For optimal editing performance, ensure these settings match your source footage or DaVinci Resolve project settings.
- Start Conversion: Click the "Convert" button to begin the transcoding process. The time taken will depend on the file size, the complexity of the codecs involved, and your computer's processing power.
- Import into DaVinci Resolve: Once the conversion is complete, launch DaVinci Resolve. Navigate to the Media Pool and import the newly converted
.movor.mp4files. They should now be recognized and ready for editing.
Solution 2: Checking DaVinci Resolve Permissions (Mac Users)
For Mac users, particularly those who downloaded DaVinci Resolve from the App Store, permission issues can sometimes prevent media from being imported. The application might not have the necessary privileges to access the directories where your media files are stored.
Steps to Adjust Security & Privacy Settings:
- Open System Preferences: Click the Apple menu in the top-left corner of your screen and select "System Preferences."
- Navigate to Security & Privacy: In the System Preferences window, click on "Security & Privacy."
- Access the Privacy Tab: Click the "Privacy" tab at the top of the Security & Privacy window.
- Grant Permissions: In the list of applications on the right, find "DaVinci Resolve." Ensure that the checkbox next to it is checked. If it's not, click the lock icon at the bottom left to make changes (you'll need to enter your administrator password) and then check the box. If DaVinci Resolve is not listed, click the "+" icon below the list, navigate to your Applications folder, and add DaVinci Resolve.
Solution 3: Utilizing the Cut Page for Import
While not a direct solution for AVI compatibility, the Cut Page in DaVinci Resolve is designed for rapid editing and media management. Importing media through the Cut Page, or simply understanding its import workflow, can sometimes streamline the process, especially if you're dealing with multiple files or entire folders.
Steps for Importing via the Cut Page:
- Launch DaVinci Resolve and Navigate to the Cut Page: Open your project and switch to the "Cut" page from the bottom tab bar.
- Access the Media Pool: The Media Pool is usually visible on the left side of the interface.
- Import Media: You can either click the "Import Folder" button to add an entire directory of files or use the drag-and-drop method to pull selected media files directly into the Media Pool.
Exporting from DaVinci Resolve
When it comes to exporting your finished projects from DaVinci Resolve, the software offers a robust set of options to cater to various delivery needs, from web uploads to professional broadcast.
Standard Export Workflow:
- Navigate to the Deliver Page: In DaVinci Resolve, click on the "Deliver" page icon at the bottom of the interface.
- Choose Render Settings: On the left-hand side, you'll find various rendering options.
- Render Presets: DaVinci Resolve offers numerous presets for common platforms like YouTube, Vimeo, and various professional formats.
- Custom Settings: For more control, select "Custom" as the render preset. This allows you to meticulously define parameters such as:
- Format: Common choices include MP4, MOV, and MXF.
- Codec: H.264, H.265 (HEVC), ProRes, DNxHD/HR are frequently used. H.264 is excellent for web delivery due to its balance of quality and file size, while ProRes and DNxHD/HR are preferred for archiving or further editing in other NLEs.
- Resolution and Frame Rate: Ensure these match your project settings or delivery requirements.
- Bitrate: Adjust the bitrate to control the trade-off between file size and visual quality. Higher bitrates generally mean better quality but larger files.
- Audio Settings: Select the appropriate audio codec (e.g., AAC, PCM) and sample rate.
- Set File Location and Name: Specify where you want to save your exported file and give it a descriptive name.
- Add to Render Queue: Click "Add to Render Queue" to add your job.
- Render the File: Once you have multiple jobs in the queue, click "Render All" to begin the export process.
Best Export Settings For Davinci Resolve
Handling Export Incompatibilities
Occasionally, even with the extensive export options, you might encounter situations where DaVinci Resolve cannot directly output a file in a format that is perfectly compatible with a specific device or downstream application. In such cases, a video converter can again be a valuable tool.
Using a Converter for DaVinci Resolve Exports:
- Export from Resolve: First, export your project from DaVinci Resolve in a widely compatible format, such as MP4 with H.264.
- Convert if Necessary: If the exported file still presents issues, import it into a video converter. Here, you can convert it to a different format (e.g., a specific AVI variant if absolutely required, though generally not recommended for editing, or other common formats like WMV) or adjust codecs, bitrates, and other parameters to ensure maximum compatibility.
Advanced Conversion Options:
Video converters offer granular control over video and audio encoders, bitrates, frame rates, sample rates, and channels. This allows for precise tailoring of the output file to meet the exact specifications of your target device or software.
The Importance of Editing Codecs vs. Delivery Codecs:
It's crucial to distinguish between editing codecs and delivery codecs.
- Editing Codecs (e.g., ProRes, DNxHD): These are designed for high-performance editing. They are typically less compressed, meaning higher quality and less strain on your CPU during playback and scrubbing, but result in larger file sizes.
- Delivery Codecs (e.g., H.264, H.265): These are optimized for final delivery and distribution. They employ more aggressive compression to achieve smaller file sizes while maintaining acceptable visual quality, making them ideal for streaming and web uploads.
By understanding the nature of AVI files and the role of codecs, and by employing effective transcoding strategies, users can overcome the import challenges in DaVinci Resolve and ensure a fluid post-production workflow. Similarly, a clear grasp of DaVinci Resolve's export capabilities, coupled with the flexibility of conversion tools, allows for seamless delivery of final projects across a multitude of platforms.