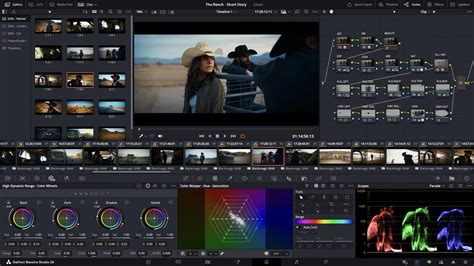
Masking stands as one of the most potent and versatile tools within DaVinci Resolve, empowering editors to precisely isolate specific areas of their footage. This capability is fundamental for a wide array of post-production tasks, including sophisticated color grading, seamless compositing, and the application of creative visual effects. Whether the objective is to meticulously cut out a subject from its background, craft a subtle or dramatic vignette, or apply targeted color corrections to a particular region of the frame, masks offer unparalleled control over the visual outcome. At Video Editor London, the application of these masking techniques is a daily practice, integral to the creation of professional projects that span from polished branded content to compelling cinematic narratives. This guide will walk you through the essential steps of creating and refining masks in DaVinci Resolve, covering the setup of nodes, the crucial role of the alpha output, and advanced techniques for achieving polished results.
Why Employ Masking in DaVinci Resolve?
The strategic use of masking in DaVinci Resolve opens up a world of creative possibilities, allowing editors to:
- Isolate Subjects: Precisely separate a subject from its surrounding background, enabling independent manipulation of each element.
- Targeted Color Correction and Grading: Apply color adjustments, enhancements, or stylistic looks to only a specific part of the image, ensuring a cohesive and intentional aesthetic.
- Selective Blurring or Sharpening: Enhance focus or obscure details by applying blur or sharpening effects to designated areas, guiding the viewer's attention.
- Background Replacement and Compositing: Facilitate the seamless integration of new backgrounds or elements into existing footage.
- Creative Effect Generation: Craft sophisticated visual effects that draw the viewer's eye towards specific points of interest or create unique stylistic expressions.
Developing proficiency in masking techniques will undoubtedly broaden the scope of what can be achieved within DaVinci Resolve, elevating the quality and impact of your video projects.
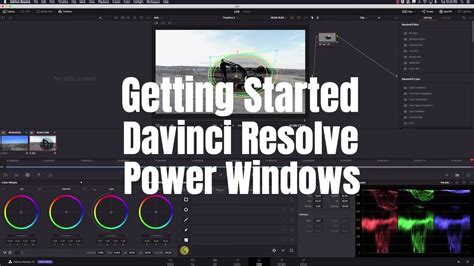
Step-by-Step Guide to Creating a Basic Mask
Embarking on the journey of masking in DaVinci Resolve begins with a few fundamental steps, ensuring a solid foundation for more complex manipulations.
Step 1: Duplicate Your Clip
The initial and crucial step involves duplicating your primary clip on the timeline. This action effectively creates two distinct layers of the same footage:
- Bottom Layer: This serves as your original, untouched clip, providing a reference and the base for your composite.
- Top Layer: This is the layer where all masking operations will be applied. Any adjustments or effects made to this layer will be confined to the masked area.
Step 2: Add a Serial Node
With your top layer selected in the timeline, navigate to the Color workspace. Within the Color page, you will work with nodes to build your grading and masking effects. To begin applying your mask, add a new Serial Node. This can be achieved by pressing Alt+S on Windows or Option+S on a Mac. This newly created node is dedicated to housing your mask and its associated effects.

Step 3: Connect the Alpha Output
For your mask to function and define the area of influence, it needs to be connected to the Alpha Output. This step is vital for telling Resolve which part of the image the mask should affect.
- Right-click anywhere within the Node Editor space.
- From the context menu that appears, select Add Alpha Output.
- You will observe a small blue dot, representing the Alpha Output, appearing in your node graph.
- Drag the connection point from your new serial node and connect it to this Alpha Output.
This connection establishes the pathway for the mask's information to be processed, essentially defining the "cut-out" or "visible" area.
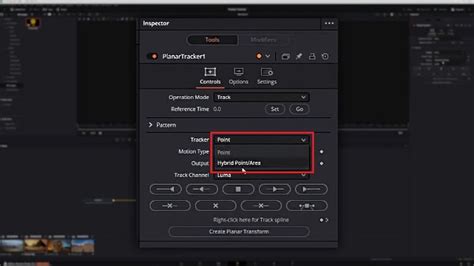
Step 4: Select the Masking Tool
Now, it's time to begin the creative process of defining your mask.
- Locate and click on the Masking icon, which is visually represented by a pen-shaped tool.
- Ensure your playhead is positioned at the beginning of your clip. This is important for accurate tracking from the outset.
- Utilize the + Eyedropper tool (or a similar selection tool depending on the mask type you choose) to begin defining the area you wish to isolate.
- Continue clicking on different points along the edge of your desired area. As you place anchor points, you will see a red mask overlay appear, indicating the masked region.
- 💡 Tip: Make sure the Mask Overlay toggle is activated. This crucial setting allows you to visually see the red masked area while you are actively working on its shape and position.

Step 5: Refine and Track the Mask
Once you have initially defined the shape of your mask by placing anchor points, the next phase involves refining its appearance and ensuring it remains consistent throughout the clip.
- Press Play on the mask timeline (often found within the Power Window controls). DaVinci Resolve will then process each frame of your clip.
- The mask will automatically track through your footage, making adjustments frame by frame to follow the defined edges. This automated tracking is essential for maintaining a consistent masked area, even when your subject or the camera is in motion.
- Periodically, you may need to manually adjust the mask. If the tracking deviates or the subject's movement is complex, you can pause the playback, reposition the mask points, and then resume tracking. This process can involve creating keyframes manually by adjusting the mask's position or shape at specific frames.
- Once you are satisfied with the mask's adherence to your subject, remember to turn off the Mask Overlay toggle to hide the red highlight and see the true effect of your mask.
Step 6: Apply Effects and Finish
With your mask accurately defined and tracked, it is now active and ready for use.
- Ensure the Mask Overlay toggle is turned off to get a clear view of your footage without the red overlay.
- Your mask is now active, and you can proceed to apply any desired color grading, effects, or compositing adjustments. These adjustments will only affect the area within the mask.
- This completes the fundamental process of creating a mask in DaVinci Resolve.
Advanced Masking Techniques and Creative Applications
Beyond basic isolation, DaVinci Resolve's masking tools offer sophisticated features for more intricate effects.
Creative Masking Effect 1: Eye Reflection with Computer Code
This technique demonstrates how to create a compelling visual effect by masking a computer coding screen to appear as a reflection within a person's eye.
- Layering Clips: Place the clip containing the eye on the bottom track and the computer coding screen clip on the track above it. In the Inspector on the Edit page, reduce the opacity of the top clip to around 45% so the eye beneath is visible.
- Color Page Setup: Navigate to the Color page. Open the Power Window and select the Pen tool.
- Drawing the Mask: Click on the edge of the iris to place your first anchor point. Drag your cursor to create a curve that follows the iris's shape. Continue adding points to complete the mask around the iris. You can click and move existing points to refine the shape.
- Alpha Output: Right-click in the node graph, select Add Alpha Output, and connect the blue dot from your serial node to the Alpha Output. This ensures only the area within the mask is visible. Turn off the Power Window border to better assess the mask's edge.
- Refining Edges: Adjust the softness of the mask's edge. A softness value of around six can provide a more realistic integration.
- Tracking: While auto-tracking might not be ideal here, use the tracker panel to manually adjust the mask frame by frame. Scroll through the timeline, repositioning the mask anchor points as the eye moves or blinks to ensure it stays perfectly aligned with the iris. Keyframes are automatically created when you adjust the mask's position.
- Editing the Timeline: If the eye closes significantly, you might need to adjust the start and end points of the coding clip on the Edit page to align with the eye's open state.
Eye Zoom Transition FREE! | Davinci Resolve Tutorial
Creative Masking Effect 2: Masking Transition for Scene Changes
This technique creates a dynamic transition between two clips by using a mask that moves with a subject, revealing a new scene underneath.
- Layering Clips: Place the clip intended for the transition (e.g., a person walking) on the top track and the scene to be revealed (e.g., a nature scene) on the track below.
- Color Page Masking: Select the top clip, go to the Color page, and use the Pen tool in the Power Window. Draw a mask around the entire frame just before the subject's back leg begins to reveal the background.
- Frame-by-Frame Tracking: In the tracker panel, select Frame and click the keyframe icon to set your first keyframe. Move one frame to the right, adjust the mask's anchor points to precisely follow the edge of the leg. Add extra keyframes as needed, adjusting curves and positions. Continue this process frame by frame, ensuring the mask accurately follows the moving leg.
- Alpha Output: Add an Alpha Output in the node graph and connect your serial node to it.
- Softness and Refinement: Turn off the Power Window border to see the mask's edge. Increase the softness of the mask to around 80 for a natural blend. Continue tracking frame by frame, speeding up the process in your edit for demonstration purposes. As the leg moves off-screen, drag the mask off-screen as well.
- Result: This creates a seamless transition where the masked area reveals the underlying scene as the subject moves.
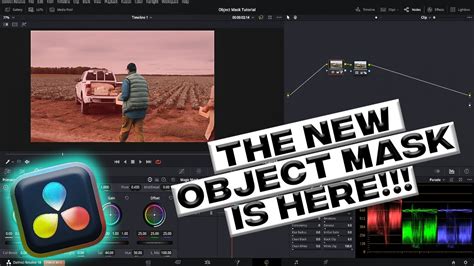
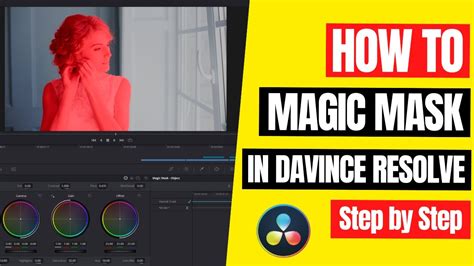
Creative Masking Effect 3: Revealing Text Behind Moving Objects with Magic Mask
Magic Mask is a powerful AI-driven tool that simplifies complex masking tasks, such as placing text behind moving objects.
- Setup: In the Color page, open Magic Mask and select Object. Use the plus qualifier tool to scribble over the object you want to isolate (e.g., rocks). Track forward and backward.
- Alpha Output and Refinement: Add an Alpha Output and connect it. Turn off the mask overlay. If Magic Mask incorrectly selects areas (like a larger rock), use the minus qualifier tool to remove them.
- Edge Cleanup: Adjust Clean Black, Clean White, and Blur Radius in the Magic Mask settings to refine the mask's edges for a cleaner look. Track again after making adjustments.
- Text Integration: On the Edit page, duplicate your original clip (
Alt/Option + Drag). On the bottom clip (the original), right-click, choose Remove Attributes, and checkmark Color Correction. This removes the mask from the original footage. - Adding Text: Open the Effects library and search for Text+. Drag it onto the V2 track above your clips. Extend its duration to match. In the Inspector, write your desired text (e.g., "DESERT"). Adjust the font, size, and position so it's framed by the rocks.
- Text Animation: To ensure the text remains centered as the clip plays, add a keyframe for the text's position at the beginning of the clip. Then, move to the end of the clip and adjust the X and Y axes of the text's position to maintain its placement within the opening.
Creative Masking Effect 4: Dynamic Background Changes with Magic Mask
This technique uses Magic Mask to isolate a subject and then synchronize background changes with their movement.
- Isolation: Duplicate your clip. Turn off the visibility of the original track and lock it. Go to the Fusion page. Add the Magic Mask node. Use the stroke mode (e.g., Add) to draw over your person to isolate them. Choose Better quality and Track.
- Return to Edit Page: Go back to the Edit page and turn the original clip's visibility back on.
- Background Sequencing: Place subsequent background clips on tracks below the main subject clip. For the first step, use the original background. For the second background, trim its beginning and drag it underneath. To match the direction of movement, right-click on the background clip, choose Change Clip Speed, and select Reverse Speed.
- Speed Adjustment: If the subject's movement appears too slow, you can adjust their clip speed (e.g., to 200%) on both the original and the masked clip.
- Further Backgrounds: For the third background, cut it after the subject's step. To create a sense of movement with a static background, use the Zoom Blur effect from the Inspector. Adjust the X-axis at the beginning and end of the clip to simulate panning.
Creative Masking Effect 5: Removing Distracting Elements
Masking is invaluable for seamlessly removing unwanted objects from a shot by cloning a nearby area.
- Duplicate Clip: Duplicate your clip. Enable the bottom clip (V1) and disable the top clip (V2) for now.
- Color Page Setup: Go to the Color page. Create a new node (
Alt/Option + S). - Masking the Distraction: Use the Pen tool in the Power Window to draw a mask around the distracting element (e.g., a light).
- Cloning and Blending: Position the mask over a clean area of the wall that you want to use to cover the distraction. Add an Alpha Output and connect your node. Soften the edges of the mask to blend it naturally.
- Positioning and Tracking: Return to the Edit page. With the masked clip (V2) selected, use the Position Y-axis in the Inspector to drag the cloned wall section down to cover the distracting light.
- Tracking: Go back to the Color page and use the tracker panel to track left and right. This ensures the cloned patch stays in place as the camera or subject moves.

Common Masking Tips for Enhanced Results
To further refine your masking work and achieve professional-looking results, consider these essential tips:
- Feathering: Always feather the edges of your masks. This softens the transition between the masked area and the rest of the image, creating a much more natural and integrated look. Adjust the feather amount in the Power Window settings.
- Combining Masks: Don't hesitate to combine multiple masks. You can stack different mask shapes and types, and even use them to subtract from or add to each other, allowing for incredibly complex and precise selections.
- Utilize the Tracking Panel: For any mask that needs to follow movement, leverage the tracking panel. While auto-tracking works well for many scenarios, manual keyframing within the tracker is crucial for challenging movements or subtle adjustments.
- Power Windows: Masks are often referred to as Power Windows in DaVinci Resolve. Familiarize yourself with all the Power Window shapes (circle, rectangle, custom polygon) and how they can be combined with tracking and adjustments.
- Mask Overlay Toggle: Keep the mask overlay toggle on while you are actively shaping and positioning your mask. This visual aid is indispensable for ensuring accuracy. Turn it off to see the final result.
- Node Structure: For complex projects, maintain a clear and organized node structure. Assign dedicated nodes for masking, tracking, and color correction to keep your workflow manageable.
- Practice with Different Tools: Experiment with different masking tools, including the pen tool, ellipse, and rectangle. The Magic Mask offers advanced AI-powered assistance for even faster isolation of subjects.
Mastering masking in DaVinci Resolve is an ongoing process that rewards patience and practice. By understanding these fundamental techniques and creative applications, you are well-equipped to elevate the visual quality and storytelling potential of your video projects.