Clip Studio Paint, a program long familiar to artists and illustrators, offers a powerful, yet often underutilized, feature: the integration of 3D models directly into the creative workflow. Whether you're a seasoned professional or just beginning your artistic journey, understanding how to leverage these digital assets can significantly streamline your process, enhance your compositions, and unlock new creative possibilities. This tutorial delves into the intricacies of using 3D models within Clip Studio Paint, from importing and manipulation to scene construction and conversion for line art.
The Power of Clip Studio Modeler
At the heart of Clip Studio Paint's 3D capabilities lies Clip Studio Modeler (CSM). This indispensable tool, provided completely free of charge, serves as the gateway for setting up and managing 3D materials for use within Clip Studio Paint. CSM allows artists to import 3D data created in other software, transforming them into usable materials within CSP. This interoperability ensures a flexible workflow, enabling artists to bring in a wide array of existing 3D assets.
It is crucial to note a compatibility caveat: 3D object materials created with Clip Studio Modeler versions 1.8.0 and later cannot be imported into earlier versions of Clip Studio Paint or Clip Studio Modeler. Therefore, ensuring you are using compatible versions is key to a seamless experience. Installation of Clip Studio Modeler is straightforward, typically involving downloading an executable file (e.g., CSM_11013w_setup.exe or CSM_1110m_app.pkg) and following the on-screen instructions, including selecting English as the preferred language.
Importing and Organizing Your 3D Assets
Clip Studio Paint's strength lies in its ability to import general 3D data, enabling the creation of materials for a vast range of objects. This includes everyday items like chairs and cups, more complex structures such as musical instruments and backgrounds, and even detailed 3D characters.
Many artists, including myself, Liz Staley, a long-time user and author of several books and video courses on Clip Studio Paint (formerly Manga Studio), find the ability to use 3D models directly within the program to be one of its most compelling features. While CSP comes with a selection of pre-installed models, a far greater variety can be found in the community-created assets directory or from other creators.
When working with external asset packs, such as the Graphixly Ultimate 3D Models Pack, direct import through the menu is often necessary, bypassing the standard Materials Library. The initial step after downloading such a collection involves unzipping the downloaded file onto your hard drive. The exact procedure for unzipping varies by operating system, and a quick internet search can provide detailed instructions if needed. Within the unzipped files, the "3D Assets" folder typically houses all the actual 3D models. For a quick overview of the available models, an "AllAssetsPreview" image is usually provided.
To bring a model into your project, open Clip Studio Paint and create a new canvas or open an existing one. Navigate to the location where your desired 3D model is saved on your hard drive, select the 3D file, and click "Open" to confirm the import.
Navigating and Manipulating 3D Space
Working in 3D space can initially be challenging for those unfamiliar with it. The most critical principle to internalize is to meticulously check your model's placement before finalizing it. Before delving into camera manipulation, it's essential to master the controls for moving, rotating, and scaling your imported models.
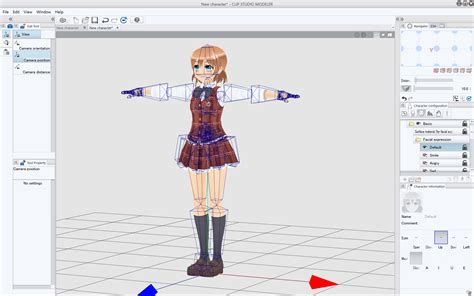
While older versions of Clip Studio Paint relied on a system of small blue icons at the top of a selected model for manipulation, more intuitive controls are now available. To access these, select the model you wish to interact with using the "Object" tool. You will observe several sets of circles and arrows superimposed over the model. These are the interactive controls for manipulating it within the 3D space.
Hovering your mouse cursor over the outermost circle until it changes color indicates that it is the active control. The inner sets of circles are dedicated to rotating the model along the X, Y, or Z-axis. The direction of the circle visually corresponds to the direction of rotation when that control is activated. For instance, if you accidentally rotate a model incorrectly, you can always reset its rotation by selecting the model and clicking the "Reset Model Rotation" icon, typically found in the toolbar at the bottom of the model's controls.
You can ANIMATE with 3D models??! (Clip Studio Paint Tutorial)
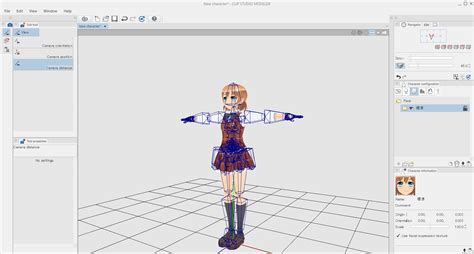
The arrows located at the center of these controls are instrumental for moving the model precisely through the 3D space. Many artists, myself included, prefer these directional controls for their certainty, as they ensure the model moves exactly as intended, avoiding the potential imprecision of older methods. By hovering the mouse over an arrow, it will highlight, allowing you to move the model solely along the axis indicated by that arrow. If a model is accidentally moved too high or too low, causing it to float above or sink below the visible grid (representing the ground level), the "Place Model On Ground Level" icon, usually in the bottom row of icons, can be used to correct its position.
Camera Controls for Scene Composition
Understanding how to manipulate models is only half the battle; mastering the 3D camera is crucial for effectively building scenes and taking full advantage of the 3D environment. The camera controls are typically grouped together, with the first three icons dedicated to camera movement and the remaining ones to model manipulation.
The first camera icon allows for the rotation of the camera within the 3D space, enabling you to orbit around your scene. The second icon controls the camera's pan function, facilitating movement left, right, up, and down. The third icon is used for zooming in and out of the scene.
For those who prefer mouse-based interaction, Clip Studio Paint offers direct camera control. With your 3D layer selected, click on an area of the canvas that does not contain a model. Using the left mouse button will allow you to rotate the camera around your scene. Clicking and dragging with the right mouse button enables zooming in and out.
When constructing a scene, such as the example layout involving a bookshelf, sofa, tables, magazines, and a television, the process involves importing models sequentially. A critical note for scene building: ensure you remain on the layer of your first imported model as you add subsequent models. This action consolidates all imported elements onto a single layer, making them part of the same 3D space and ensuring they move cohesively with the camera. Utilizing the camera tools to acquire different perspectives is vital for accurately lining up elements and achieving the desired composition. This attention to detail becomes particularly important when working with intricate scenes.
Managing Complex Scenes with the Object List
As scenes become more complex, selecting smaller models or toggling the visibility of certain objects can become cumbersome. Clip Studio Paint addresses this with a convenient Object list. By selecting any of your 3D objects and clicking on the wrench icon in the toolbar below the model, you can access this list.
The Object list displays all the 3D models currently present on your active layer. Clicking on a model's name in this list will select it within your scene. Furthermore, the eye icon adjacent to each model's name allows you to toggle its visibility on and off, which is invaluable for isolating elements or simplifying the view when working on specific parts of a complex environment. For instance, in the example scene, certain wall models might need to be made invisible to achieve a specific viewing angle.
Leveraging 3D Models for Efficiency and Creativity
Setting up an entire 3D scene can be a time-consuming endeavor, potentially ranging from several minutes to many hours, depending on the scene's complexity. However, the investment of time often yields significant returns, especially for recurring elements in comic projects. Once an environment is established, you can simply load the file, adjust the camera, and then either capture a screenshot or convert the 3D models into line art to serve as backgrounds for your comic.
Once a 3D setting or object is prepared for integration into your artwork, several options are available. You can use the 3D model as a direct reference, drawing over it to create your own unique background or object. This approach offers a perfectly acceptable method for incorporating these digital assets into your work.
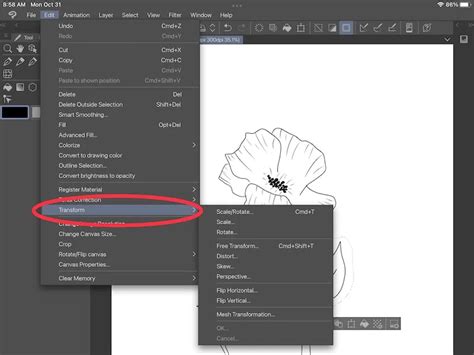
For artists seeking a rapid and straightforward way to integrate 3D elements, converting them using an "LT Conversion" is often the most efficient solution. To initiate this process, ensure your 3D layer is active in the Layer panel. Then, navigate to Layer > LT Conversion of Layer in the menu. The LT Conversion panel can appear complex, but the best approach is to experiment with each option while observing the "Preview" box. This real-time preview allows you to see how each adjustment affects the final output before committing. Once satisfied with the preview, click "OK." Clip Studio Paint will generate a new layer containing the converted line art, leaving your original 3D setup intact for future use.
The utility of 3D models extends beyond complex backgrounds. They are incredibly useful for smaller applications, such as depicting a character holding a phone or incorporating other small, specific objects into a scene. Furthermore, 3D models can significantly enhance character posing. By importing a character model and adjusting its pose, artists can gain a clear understanding of how a character will appear in a specific stance, which helps in avoiding anatomical inaccuracies or awkward compositions.
Pros and Cons of Using 3D Models
Before fully embracing 3D models in your workflow, it's beneficial to consider their advantages and disadvantages. A primary requirement for effective use is the availability of high-quality 3D models and poses. Utilizing low-quality assets can lead to wasted time and effort. Proficiency in basic posing, anatomy, and composition is also beneficial, as it allows you to better direct and refine the 3D elements.
Clip Studio Paint offers a diverse range of 3D models through its asset store, including human and non-human characters, as well as various props and scenery. While these store-bought assets are often preferred, Clip Studio Paint does include basic 3D models within the software itself, which can serve as a starting point or for quick studies.
It is important to understand that 3D models and poses are often downloaded separately. This means you'll need the character model first, and then apply the desired pose to it. If you attempt to import only a pose without a corresponding model, CSP will default to a basic male model, which can lead to humorous and unintended results if the pose was intended for a female character.
Advanced Techniques and Workflow Integration
When manipulating character 3D models, the tool properties panel offers granular control. You can adjust light sources by clicking and dragging on a sphere within this panel. The visibility of the 3D model can be toggled using an eye icon. On the sub-tool panel, options exist to adjust the shape, body height, and head-to-body ratio of characters. Similar manipulation methods apply to prop models, and additional props can be sourced from the CSP asset store.
When tracing 3D models, a common tip is to avoid tracing everything rigidly. Instead, aim to alter the body and stance to prevent a stiff appearance. Starting with the simple body shape and then refining as you trace can lead to more dynamic results. During the tracing process, carefully inspect parts where the 3D model might appear unnatural and make adjustments. Leveraging AI-generated images as a reference while tracing can significantly aid in understanding the perspective and nuances of a character's pose.
3D models can be integrated into the artwork creation process in several ways. They serve as excellent tools for refining composition and character posture. They provide a foundational understanding of an object's overall shape and perspective, crucial for accurate drawing. When depicting characters in complex environments, tracing 3D models of buildings or using them as a base for background drawings is highly effective. The combination of 3D models and AI can generate a wide range of character designs and postures. For instance, an artist might paint over a 3D model in Clip Studio Paint and then upload the image to an AI tool like NovelAI, utilizing its image-to-image function.
Ultimately, 3D models are an exceptional resource for artists. They assist in designing backgrounds, characters, and provide essential drawing guidelines. They can also be used to generate reference images with AI. Furthermore, their utility as a basic drawing foundation significantly reduces workload and working time. This insight into the practical application of 3D models offers a behind-the-scenes look at how artists can enhance their efficiency and creative output.