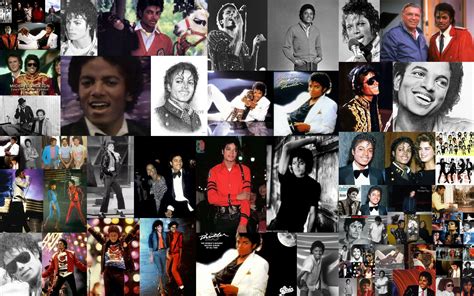
Michael Jackson, the undisputed "King of Pop," remains an enduring icon, celebrated for his unparalleled artistry, electrifying performances, and profound impact on music and culture. His unique style and personality have inspired countless artists across generations. With a legacy boasting 13 Grammy Awards, an astonishing 750 million records sold worldwide, and significant philanthropic efforts through his foundation, particularly for children's causes, Jackson's influence extends far beyond the realm of entertainment. This tutorial delves into the creative process of crafting a digital collage in Photoshop, using Michael Jackson as the central theme, inspired by his iconic imagery and the magic of his music.
Laying the Foundation: The Base Image and Background
The genesis of any compelling digital artwork lies in establishing a strong foundation. For this tribute, we begin by selecting a primary image that will serve as the canvas for our creative endeavors. This initial step involves navigating to "File" in Photoshop and choosing the "Place" option. This allows us to import the chosen image directly into our working document, setting the stage for subsequent layers and effects.
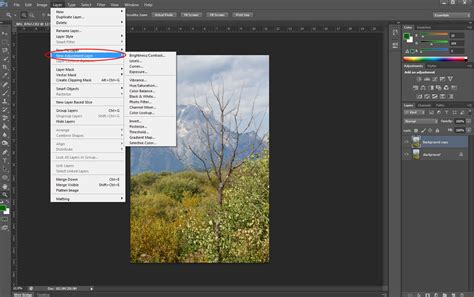
Following this, we'll prepare the background to complement the central figure. Access the "Image" menu, then select "Adjustments," and finally, click on "Desaturate." This action will convert the background image into grayscale tones, providing a neutral yet visually interesting backdrop that allows the vibrant elements to come forward.
To further enhance the background's depth and atmosphere, we'll apply a Layer Style. Right-click on the background layer and select "Blending Options." Within the Layer Style dialog box, choose "Gradient Overlay." For the "Style," select "Radial," and for the "Colors," input the hexadecimal values #101213 and #253239. This creates a subtle, radial gradient that draws the viewer's eye towards the center of the composition.
Incorporating Iconic Imagery: Thriller and Beyond
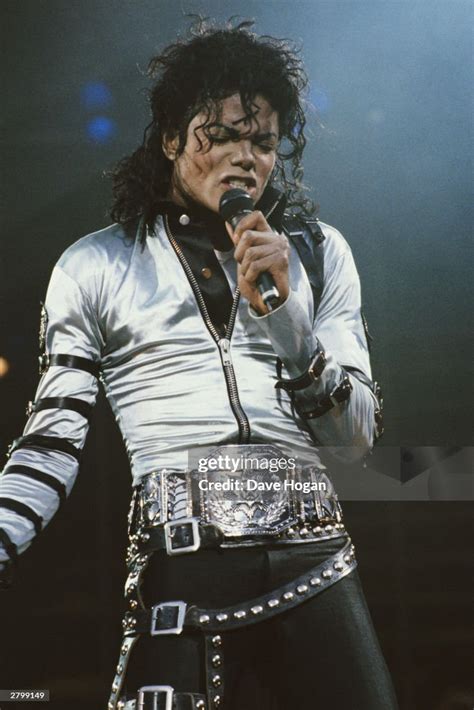
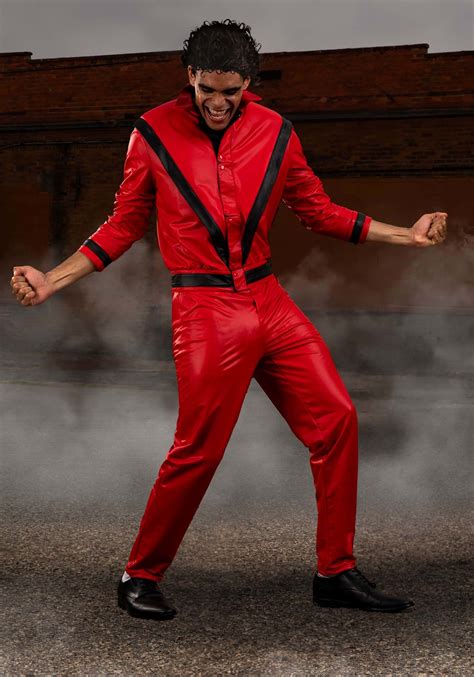
Michael Jackson's visual legacy is as powerful as his music, with iconic imagery from his music videos deeply etched in popular culture. To weave these elements into our collage, we'll introduce individual images, starting with a compelling shot from the "Thriller" era.
Create a new layer and place your chosen "Thriller" image onto it. Next, select the "Spot" layer (this refers to a previously prepared element, likely a texture or graphic intended to be a focal point) and in the blending mode options, click on "Overlay." This blending mode will interact with the underlying layers, creating a dynamic and integrated effect.
The process of isolating and integrating these iconic images often involves converting them into a Portable Network Graphics (PNG) format, which supports transparency. Using the Eraser Tool (E), carefully erase any excess background or unwanted elements from the image, ensuring a clean cut-out. Once refined, save the image as a PNG.
Now, place this PNG into your main image composition. Repeat this procedure with other significant visuals that represent Michael Jackson's career, such as imagery associated with his legendary "Super Bowl" performance, the global anthem "We Are the World," and the electrifying "Billie Jean" era. Each imported PNG should be carefully positioned and scaled to create a cohesive and visually rich collage.
Illuminating the King of Pop: Light Effects and Spotlights
To truly capture the electrifying presence of Michael Jackson, we will employ a series of lighting effects to create a dynamic and almost ethereal atmosphere. Begin by positioning your main image of Michael Jackson in the center of your document.
To create a soft glow around the central figure, go to Filter > Blur > Gaussian Blur. Apply a subtle blur to create a sense of depth and focus. Following this, navigate to Image > Adjustments > Hue and Saturation. Reduce the Saturation to -100. This desaturates the image, allowing for more controlled color application later and enhancing the impact of the light effects.
Next, we'll introduce a spotlight effect. Using the Ellipse Tool (U), create an ellipse shape. Apply a Filter > Blur > Gaussian Blur with a Radius of 90 pixels. This will create a soft, diffused light source. Duplicate this ellipse and apply another Gaussian Blur, this time with a Radius of 20 pixels. This layering of blurs creates a more nuanced and realistic light fall-off.
The spotlight's intensity can be further refined. Using the Pen Tool (P), create a triangular shape that mimics the direction of a spotlight. Apply a Filter > Blur > Gaussian Blur with a Radius of 80 pixels. Change the Blend Mode of this layer to "Overlay." Duplicate this layer twice to intensify the spotlight's glow.
To add a brighter, more focused beam of light towards the top and middle of the composition, create another triangle using the Pen Tool (P). Apply a Filter > Blur > Gaussian Blur with a Radius of 80 pixels.
For an ambient light effect, add a new layer. Select the Brush Tool (B) and choose a large, round brush with white as the color. Paint a broad spot of light at the top of your composition.
To add a touch of magic and energy, we'll incorporate sparks. Add another layer within a group (if you've organized your layers) and set its Blend Mode to "Color Dodge." Using a fine brush, paint small, bright sparks to simulate a dazzling effect.
A dramatic cloud effect can further enhance the atmosphere. Add another layer on top of all the others and go to Filter > Render > Clouds. Ensure that your foreground and background colors are set to black and white, respectively. Change the Blend Mode of this layer to "Color Dodge." This will create wispy, illuminated clouds that add depth and mystique.
Shadow and Illumination: Refining the MJ Layer
To ground the figure of Michael Jackson and enhance the interplay of light and shadow, we will refine his layer. Select the MJ layer and change its Blend Mode to "Color Dodge." This will make the light effects interact more dramatically with his image.
To create a shadow, use the Pen Tool (P) to draw a black triangle behind Michael Jackson, extending from his feet. Employ the Eraser Tool (E) with a very soft brush to gradually fade the end of the shadow, creating a naturalistic effect.
To achieve the iconic "moonwalk" silhouette or to isolate specific elements like his feet for further effects, duplicate the MJ layer. Change the Blend Mode of this duplicated layer to "Normal." Then, carefully delete the rest of the layer, leaving only the desired elements, such as his feet, visible. This allows for targeted adjustments and creative layering.
Harmonizing the Composition: Merging and Blurring
With all the individual elements and effects in place, the final steps involve harmonizing the composition. Select all the layers in your document and duplicate them. Then, go to Layer > Merge Layers. This combines all your work into a single layer, simplifying further adjustments.
Apply a final Filter > Blur > Gaussian Blur to this merged layer, using a Radius of 15 pixels. Change the Blend Mode of this layer to "Screen." This final blurring and blending step unifies the disparate elements, creating a cohesive and luminous final image.
The result is a digital tribute to the King of Pop, infused with the light effects and magic that characterized his music and performances. This tutorial offers a framework, and the true artistry lies in experimenting with the tools, exploring different blending modes, and ultimately, creating your own unique interpretation of Michael Jackson's enduring legacy. Now, it's all about playing with the tools and creating your own version! Follow the instructions on the template and good luck.