Achieving a synthetic depth of field effect in Photoshop is a powerful technique for enhancing the focus and impact of an image. The Field Blur filter, a component of Photoshop's Blur Gallery, offers unparalleled control over selectively blurring parts of a photograph, thereby drawing the viewer's eye to the intended subject. This tutorial will guide you through the process, from understanding the fundamentals of Field Blur to advanced applications, ensuring you can transform ordinary images into visually compelling compositions.
The Power of Selective Blurring: Understanding Field Blur
At its core, the Field Blur filter allows you to introduce a blurred background effect by strategically placing "pins" on your image. Unlike traditional blur filters that apply a uniform blur across the entire canvas, Field Blur provides a dynamic way to create gradients of blur, isolating areas of sharpness and softening others. This is particularly useful when you need to simulate the shallow depth of field often achieved with a wide aperture on a camera, but which may not have been possible during the initial shoot.
The process begins by opening your desired image in Photoshop. A crucial first step for maintaining editability and flexibility is to convert your background layer into a Smart Object. This can be achieved by right-clicking on the layer in the Layers panel and selecting "Convert to Smart Object," or by using the keyboard shortcut Ctrl+Comma (Windows) or Command+Comma (Mac). This action ensures that any filters applied will be non-destructive, allowing for future adjustments.
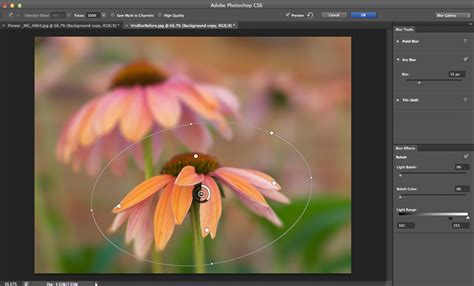
Once converted to a Smart Object, navigate to the Filter menu, select "Blur Gallery," and then choose "Field Blur." This action will open the Blur Gallery interface, which takes over the entire screen, providing access to all five filters within the gallery: Field Blur, Iris Blur, Tilt-Shift, Path Blur, and Spin Blur.
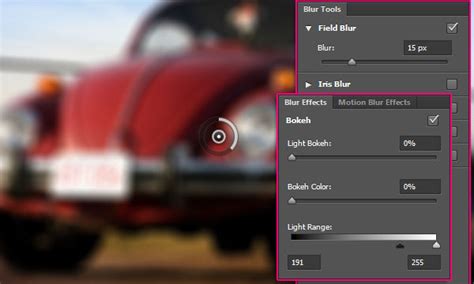
Upon entering the Field Blur interface, you'll notice an initial pin automatically placed in the center of your image. This pin controls the overall blur intensity. You can adjust this intensity by either dragging the outer ring of the pin (acting like a volume dial) clockwise to increase blur or counterclockwise to decrease it. Alternatively, you can use the Blur slider located in the Blur Tools panel on the right side of the screen. These two controls are synchronized, so adjusting one will automatically update the other.
Strategic Pin Placement for Gradient Blurs
The true power of Field Blur lies in its ability to place multiple pins, each with its own blur setting, to create a nuanced blur effect. To add a new pin, simply move your cursor over the desired area of the image. Your cursor will transform into a pin icon with a plus sign, indicating that you are about to add a new control point. Click once, and a new pin appears.
You can then reposition this new pin by clicking and dragging its center. To control the blur intensity for this specific pin, drag its outer ring or use the Blur slider. This allows for precise control, enabling you to, for example, set a pin on your main subject and reduce its blur value to 0, ensuring it remains in sharp focus, while other pins placed further into the background can have significantly higher blur values.
The Blur Gallery intelligently assesses the space between each pin, creating a smooth transition and gradient of blur across the image. This means you can create a subtle fade from sharp foreground elements to a softly blurred background, mimicking the natural bokeh effect of a camera lens. Experimentation is key; some images may require more pins than others to achieve the desired outcome.
Advanced Techniques and Customization
Beyond basic pin placement, Field Blur offers several advanced features to refine your blur effect.
- Deleting Pins: To remove an unwanted pin, simply click on it to make it active and then press the Backspace key (Windows) or Delete key (Mac). To remove all pins at once, click on the looping icon in the Blur Gallery.
- Duplicating Pins: To quickly replicate a pin with its existing blur setting, press and hold Ctrl+Alt (Windows) or Command+Option (Mac) and drag the pin to a new location.
- Hiding Widgets: To get a clearer view of your image without the clutter of pins and their controls, press and hold the H key (for "Hide"). The pins will temporarily disappear and reappear when you release the key. For a more permanent hide, use Ctrl+H (Windows) or Command+H (Mac).
- Previewing: You can toggle the preview of the blur effect on and off by clicking the checkbox in the top right corner of the Blur Gallery window or by pressing the P key. This allows you to compare your blurred image with the original unblurred version.
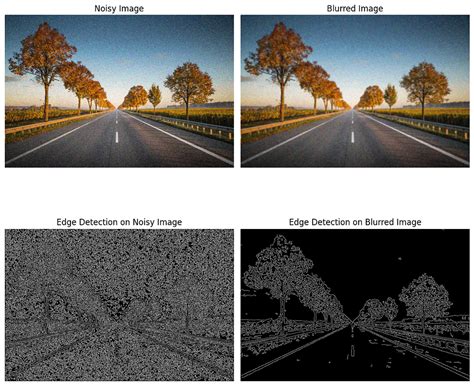
- Adding Noise: Sometimes, an overly smooth background can look synthetic after blurring. The Blur Effects panel, accessible within the Blur Gallery, offers a Noise tab. Here, you can add subtle noise to the blurred areas, matching the natural grain of the photograph and making the effect appear more realistic. You can control the Amount, Roughness, and Color of the noise.
How to use the Blur Gallery in Photoshop: Tilt shift, field and iris blur
Integrating Field Blur with Other Blur Gallery Filters
While Field Blur is incredibly versatile, it can be further enhanced by understanding its relationship with other filters in the Blur Gallery.
- Iris Blur: This filter simulates a shallow depth of field with more circular control. You can place an elliptical mask, and areas outside this ellipse will be blurred. It's particularly useful for portraits where you want to isolate the subject's face.
- Tilt-Shift Blur: This effect mimics the unique perspective of a tilt-shift lens, creating a miniature world effect. It defines a sharp area and then blurs outwards in a linear fashion.
- Path Blur: Ideal for creating motion blurs, Path Blur allows you to draw a path along which the blur will be applied. You can control the shape, direction, and intensity of the motion.
- Spin Blur: This filter creates radial blurs, simulating rotation or circular motion. It's useful for effects like capturing the streaks of a spinning light.
It's worth noting that any of these Blur Gallery filters can be applied as Smart Filters, meaning you can re-edit them at any time by double-clicking the filter in the Layers panel.
When to Use Background Blur
Blurring the background in Photoshop is a strategic choice that significantly impacts the viewer's perception. It's most effective in images that already possess a strong subject and a clear distinction between foreground and background elements. By reducing the visual noise in the background, you guide the viewer's attention directly to your main point of interest. This technique is also excellent for cleaning up cluttered backgrounds or for situations where the original photograph lacked sufficient in-camera depth of field.
For instance, consider a photograph of a deinonychus dinosaur against a bright, distracting background. By applying Field Blur to the background layer, you can soften the distracting elements, making the dinosaur appear more prominent and integrated into the scene. You can achieve a dramatic transformation, turning a potentially "fakey-looking" subject into a more compelling and "terrifying" presence, as described in one of the provided examples.
Practical Applications and Tips
When working with Field Blur, remember these key points:
- Start with a Smart Object: This is fundamental for non-destructive editing.
- Use multiple pins: Don't rely on a single pin for complex blur effects.
- Zero out blur for sharp areas: Place pins on your subject and set their blur to 0 to ensure they remain in focus.
- Leverage the H key: Temporarily hide pins for a cleaner workspace.
- Add noise for realism: Use the Noise options in the Blur Effects panel to prevent a synthetic look.
- Combine with other filters: Explore how Iris Blur, Tilt-Shift, Path Blur, and Spin Blur can complement Field Blur for advanced creative outcomes.
The Field Blur filter, as part of Photoshop's powerful Blur Gallery, is an indispensable tool for any photographer or digital artist looking to enhance their images through sophisticated depth of field effects. By understanding its capabilities and practicing strategic placement of pins, you can elevate your compositions and create truly captivating visuals.