Adobe Photoshop CS5, while a powerful tool for image manipulation, can sometimes lead to confusion when it comes to managing files, especially those that are no longer needed or were created unintentionally. This guide aims to provide a clear and structured approach to deleting files within and related to your Photoshop workflow, addressing common user queries and offering practical solutions. We will explore how to identify and remove unwanted files, even when they seem to vanish from standard file directories, and how to reclaim names for new projects.
Understanding File Management in Photoshop CS5
When you open a new file in Photoshop CS5, it's crucial to understand how the application handles your work. A "solid fill" instead of the desired picture typically indicates that a new document was created, but no image data was imported or created within it. This can happen if you accidentally create a new document and save it without adding content, or if there was an issue during the import process. The challenge then becomes locating and deleting this unintended file, especially if it's not readily apparent in your usual file browsing locations.
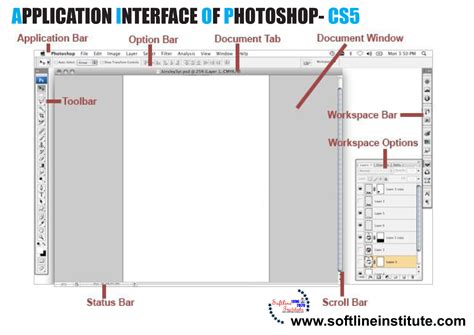
The core of the issue lies in differentiating between a Photoshop document that is open in the application and the actual file stored on your computer's hard drive. When you're working within Photoshop, unsaved changes are held in your computer's RAM. However, once you save a file, it becomes a distinct entity on your storage. The problem described-a solid fill file occupying a desired name-suggests that a file has indeed been saved, even if it's not what you intended.
Locating Stubborn Files on macOS
For users operating on a Mac, finding files that don't appear in standard directories can be a common point of frustration. The operating system provides powerful search tools designed to overcome this.
Utilizing Spotlight Search
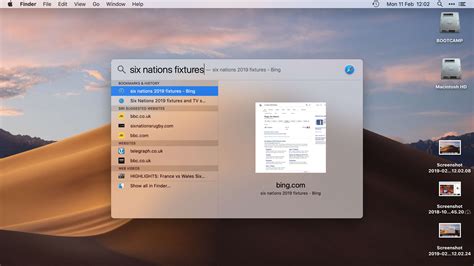
One of the most effective methods for locating any file on a Mac, regardless of its perceived location, is through Spotlight. Spotlight is the built-in search functionality of macOS.
Accessing Spotlight: You can access Spotlight in a couple of ways:
- Clicking the magnifying glass icon, typically located in the upper-right corner of your screen.
- Using the keyboard shortcut Command + Spacebar. This is often the quickest method.
Performing a Search: Once the Spotlight search bar appears, simply type the name of the file you are looking for. As you type, Spotlight will begin to display matching results, including documents, applications, and other system items.
Identifying the File Path: If the solid fill file, or any other unwanted file, is listed in the Spotlight results, you can hover your mouse cursor over the filename. A tooltip or a preview window will often appear, displaying the full path to that file on your hard drive. This path is essential for navigating to and deleting the file.
Navigating with Finder
While Spotlight is excellent for finding files by name, the Finder application is your primary tool for browsing and managing files and folders on your Mac.
- Open Finder: Click on the Finder icon in your Dock (it usually looks like a blue smiley face).
- Use the Search Bar: In the Finder window, there is a search bar located in the top-right corner. Type the filename here.
- Refine Search Scope: By default, Finder might search "This Mac." If you suspect the file is within a specific folder (e.g., your Pictures folder or a dedicated Photoshop projects folder), you can narrow down the search scope to that folder to get more precise results.
- Examine Results: Browse the search results. If the file appears, you can see its location.
Deleting Files in macOS
Once you have located the unwanted file using either Spotlight or Finder, the deletion process is straightforward.
Standard Deletion Method
- Select the File: Click on the file you wish to delete to select it.
- Move to Trash: You can then:
- Drag the selected file to the Trash icon in your Dock.
- Right-click (or Control-click) on the file and select "Move to Trash."
- Press Command + Delete on your keyboard.
Emptying the Trash
After moving files to the Trash, they still occupy space on your hard drive. To permanently remove them and free up disk space, you need to empty the Trash.
- Locate the Trash Icon: Find the Trash icon in your Dock.
- Empty Trash: Right-click (or Control-click) on the Trash icon.
- Select "Empty Trash": Choose this option from the context menu. You may be prompted to confirm the action.
Caution: Once the Trash is emptied, the files are permanently deleted and cannot be recovered through standard means.
Addressing Photoshop-Specific File Issues
The scenario where a file has a specific name but appears as a solid fill, preventing you from using that name for a new, intended picture, requires a methodical approach.
Reclaiming Filenames
If you have a file named "MyPicture.psd" that is a solid fill and you want to create a new, actual image with the same name:
- Locate the "Solid Fill" File: Use Spotlight or Finder as described above to find "MyPicture.psd."
- Delete the Unwanted File: Once located, move it to the Trash and empty the Trash.
- Create Your New File: Now that the name is no longer in use, you can create a new document in Photoshop CS5, import your desired picture, and save it using the name "MyPicture.psd."
Files Not Appearing in "Documents"
The user mentioned that some Photoshop files don't appear in the "documents where all the other photoshop files are." This usually means the files were saved in a different location than where the user is currently looking.
Check Default Save Locations: When you save a file in Photoshop, it often defaults to the last location you saved to, or sometimes a default user folder. Ensure you are checking all likely folders:
- Your main "Documents" folder.
- A dedicated "Photoshop Projects" or "Graphics" folder you might have created.
- Your Desktop.
- Your Pictures folder.
Use "Recent Files" in Photoshop: Photoshop CS5 keeps a list of recently opened files.
- Open Photoshop CS5.
- Go to File > Open Recent.
- You should see a list of files you've worked on. Clicking on a file from this list will attempt to open it. If it opens, you can then use File > Save As to see its current location on your hard drive and then use Finder or Spotlight to navigate to and manage it.
How to open recent files in photoshop
System-Wide Search (Spotlight/Finder): As emphasized, Spotlight and Finder are your most reliable tools for a comprehensive search across your entire Mac. If a file exists on your drive, these tools should be able to find it, provided you know at least part of its name or a related keyword.
Advanced Considerations and Best Practices
To prevent future file management issues, consider adopting some best practices.
Organized Folder Structure
Maintain a well-organized folder structure for your projects. Create specific folders for different types of work or clients. This makes it much easier to locate and manage your files. For instance:
Documents/Photoshop Projects/ClientA/ProjectX/Documents/Photoshop Projects/Personal/Landscapes/
Consistent Naming Conventions
Use a consistent and descriptive naming convention for your files. This not only helps in searching but also in understanding the content of the file without opening it. For example, instead of "image1.psd," use "CompanyNameProductVersionDate.psd" (e.g., "AcmeCorpLogoFinal20231027.psd").
Understanding File Types
Be aware of the different file types you work with in Photoshop and how they are saved.
- .PSD (Photoshop Document): This is the native Photoshop format. It preserves layers, masks, and other editable Photoshop features. It's a "lossless" format in terms of Photoshop editing capabilities.
- .JPEG (.JPG): A common format for web and general image sharing. It uses lossy compression, meaning some image data is discarded to reduce file size. Layers are flattened.
- .PNG: Supports transparency and lossless compression. Good for web graphics, especially those requiring transparency. Layers are flattened.
- .TIFF (.TIF): Often used for print and high-quality archival. Can support layers and is typically lossless.
When you save a file, Photoshop prompts you for a location and filename. Ensure you are paying attention to these prompts to avoid saving files in unexpected places or with unintended content.
Regular File Audits
Periodically review your project folders and delete files that are no longer necessary. This keeps your storage tidy and prevents the accumulation of clutter, reducing the chances of encountering "phantom" files like the solid fill example.
By understanding the tools available on your Mac and adopting organized file management habits, you can effectively manage your Photoshop CS5 files and ensure a smoother creative workflow. The key is to be systematic in your search and deletion processes, leveraging the powerful search capabilities of your operating system when files seem elusive.