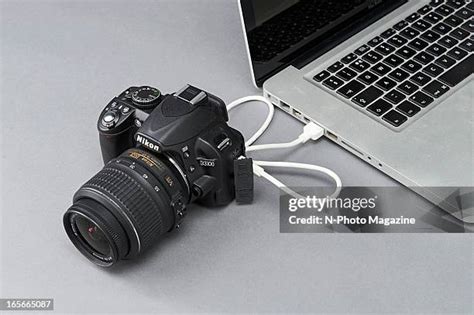
Tethering your Nikon D5200 to a computer, particularly with Adobe Lightroom, unlocks a powerful workflow for photographers, especially those engaged in studio work, product photography, or detailed product scanning. This process, which involves connecting your camera to a laptop via a USB cable, allows for immediate image review on a larger screen, real-time setting adjustments, and an overall more efficient creative process. While the concept is straightforward, users, particularly those running older software versions like Windows 8 and Lightroom 5.7, can encounter the frustrating "No camera detected" error. This guide aims to demystify the setup process, troubleshoot common issues, and highlight the significant advantages of tethered shooting with your Nikon D5200.
Understanding Tethering: More Than Just a Cable
At its core, tethering refers to the practice of connecting your camera directly to a computer, enabling you to use the computer as an extended control center and viewing platform. This is distinct from simply transferring photos after a shoot. When tethering, you can preview your shots in real-time as they are captured, control camera settings like aperture, shutter speed, and ISO directly from your laptop, and even apply develop presets as images are imported. For overhead photography and camera scanning, where precision and consistent framing are paramount, tethering proves invaluable. It allows for immediate feedback on focus, composition, and exposure, drastically reducing the need for trial-and-error and post-shoot corrections.
The "No Camera Detected" Conundrum: Troubleshooting Your Nikon D5200 Setup
The "No camera detected" error is a common hurdle for many users attempting tethered shooting. Several factors can contribute to this issue, and addressing them systematically is key to a successful setup.
Driver and Connection Verification
The most frequent culprit behind a "No camera detected" message is a missing or corrupted driver for the USB connection. MikeWadd's initial experience highlights this, as a faulty or missing driver is often the root cause.
- Double-Check Connections: Ensure the USB cable is securely plugged into both the camera and the computer. Try a different USB port on your laptop, as some ports may have issues.
- Camera Power and Settings: Verify that your Nikon D5200 is powered on and that its USB menu setting is correctly configured. For Nikon cameras, setting the USB mode to PTP (Picture Transfer Protocol) is often recommended when tethering, as indicated by users experiencing similar issues with Windows 10.
- SD Card Status: While it might seem counterintuitive, sometimes the presence or absence of an SD card can affect detection. If you're not using a card, ensure your camera is configured to allow shooting without one. Conversely, if you are using a card, ensure it’s recognized by the computer when connected independently.
- Nikon Software: Nikon typically includes software like "ViewNX2" with their cameras. While not always strictly necessary for Lightroom tethering, ensuring you have this installed can sometimes help in recognizing the camera's drivers. If JPG files are recognized but RAW (.nef) files aren't by other programs, this further points to the need for Nikon's specific drivers or software.
Lightroom and Plugin Manager
Lightroom's ability to detect and control cameras relies on its integrated plugins.
- Nikon Tether Plugin: For Lightroom to communicate with your Nikon camera, the Nikon tethering plugin needs to be enabled. BooIsMyCat's solution points to this: navigate to
File > Plug-in Managerwithin Lightroom. Locate the "Nikon tether plugin" in the list and ensure it is enabled. If it’s disabled, click to enable it. - Software Versions: Compatibility between your camera model, your operating system, and your version of Lightroom is crucial. Older versions of Lightroom, like Lightroom 5.7 mentioned by the user, might have compatibility issues with newer camera firmware or operating systems like Windows 10, as suggested by Roelof's observations. Ensure you are running the latest available updates for both Lightroom and your camera's firmware. Nikon has historically had specific OS support notes for certain camera models (e.g., Windows 7, Windows Vista, and Mac OS X 10.6 not officially supported for Nikon D3x, D90, and D5000).
The Tether Cable Itself
The physical connection, the tether cable, can also be a point of failure.
- Cable Quality: Not all USB cables are created equal. A longer cable might be convenient, but it can also introduce signal degradation or power issues. MikeWadd's experience with a longer online cable not working, while the stock cable did, underscores the importance of cable quality. For the Nikon D5200, a USB-A compatible cable that supports up to 5 Gbps transfer speed, like a replacement for Nikon's UC-E6 or UC-E21 USB Cable, is recommended.
- Try a Different Cable: If possible, test your setup with a known working, preferably shorter, USB cable to rule out cable malfunction.
Nikon's Official Stance
It's worth noting that Nikon's direct support has sometimes suggested purchasing their proprietary software for tethering. While this might be a functional solution, it's often not the most cost-effective or flexible, especially when Lightroom offers robust built-in tethering capabilities for supported models.
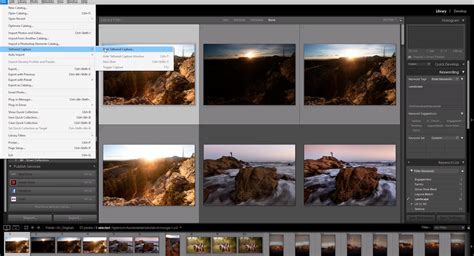
Setting Up Tethered Capture in Lightroom Classic
Once your camera is recognized, setting up the tethered capture session in Lightroom is a streamlined process, designed to integrate seamlessly into your workflow.
Initiating the Session
- Connect and Power On: Connect your Nikon D5200 to your computer via USB and turn the camera on.
- Open Lightroom: Launch Adobe Lightroom Classic and open the catalog you wish to use.
- Start Tethered Capture: Navigate to
File > Tethered Capture...or select "Start Tethered Capture…" from the File menu.
 Tethered Capture"" style="max-width: 100%;">
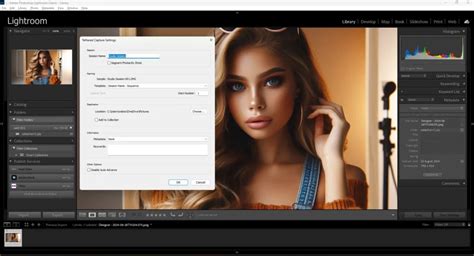
Configuring Session Settings
A "Tethered Capture Settings" window will appear, offering several options to customize your session:
- Session Name: Give your shooting session a clear and descriptive name. This will be used for organizing your imported files.
- Segment Photos By Shots: This is a powerful organizational tool. When enabled, Lightroom will create subfolders within your main session folder for each "shot" or group of images. This is incredibly useful for organizing different poses, subjects, or lighting setups within a single shoot. You can create a new shot by pressing
Ctrl+Shift+T(Windows) orCommand+Shift+T(macOS) during the capture session. - Naming Settings: Lightroom allows you to define a file naming convention for your imported images. You can choose from presets or create your own custom naming structure, incorporating elements like the session name, date, or sequential numbering.
- Destination: Specify the main folder on your computer where all captured images and their associated subfolders will be saved.
- Information Settings: This section allows you to pre-apply metadata to your imported images. You can add keywords, copyright information, or even apply a saved metadata preset. This saves significant time in post-processing.
- Develop Settings: Here, you can select a Lightroom develop preset to be applied to images as they are imported. This means you can see your images with basic adjustments (like exposure, white balance, or even a specific style) applied in real-time, providing a near-final preview.
The Tethered Capture Window
After configuring the settings and clicking "OK," a small, floating "Tethered Capture" bar will appear. This bar is your primary interface during the shooting process.
- Live View: For compatible Nikon cameras (and Canon), Lightroom Classic offers a Live View feature. This displays a real-time feed from your camera's sensor directly on your computer screen. This is invaluable for precise focusing and composition, especially in studio settings.
- Camera Controls: The tether bar provides access to various camera controls, allowing you to adjust settings like aperture, shutter speed, ISO, and white balance directly from Lightroom.
- Focus Control: When Live View is active, you can use the tether bar's focus control buttons to fine-tune sharpness directly on your computer screen. Ensure your lens is set to Auto Focus mode for these controls to be available.
- Shutter Release: You can trigger the camera's shutter directly from the tether bar. However, be aware that if you use the tether bar's capture button, the image must finish downloading to the computer before another exposure can be made. Using the camera's physical shutter button may bypass this limitation.
- Auto Advance: By default, Lightroom will automatically display the most recently captured image. If you prefer to manually select which image is displayed, you can disable this feature in the tethering options.
- Hiding/Showing the Bar: The tether bar can be hidden or shown using the shortcut
Ctrl+T(Windows) orCommand+T(macOS), helping to maximize your screen real estate. - Ending the Session: To conclude your tethered capture session, you can either close the floating tether bar or go to
File > Tethered Capture > Stop Tethered Capture.
Advanced Techniques and Considerations for Tethering
Tethering extends beyond basic capture; it can be integrated into specialized workflows.
Overhead Photography and Camera Scanning
For tasks like overhead photography or camera scanning of objects, tethering is essential. The ability to control the camera remotely from a computer screen ensures consistent positioning and allows for precise adjustments.
- Stable Setup: Mount your camera on a stable tripod or overhead rig, ensuring it's securely fastened and directly above your subject.
- Precise Focusing: Use Lightroom's Live View and focus controls for pinpoint accuracy.
- Automated Workflows: For repetitive tasks like scanning multiple objects, consider integrating foot pedal remotes. These allow for hands-free operation, triggering the shutter while you adjust the subject or environment.
- Auto Import: Lightroom's "Auto Import" feature can be configured to monitor a specific folder, automatically importing any new images that appear. This is particularly useful for camera scanning workflows where images are saved to a watched folder.
Create Adobe Lightroom Classic Presets for Tethered Shooting | Mark Wallace | Exploring Photography
Live View and Focus Control
The Live View functionality in Lightroom tethering is a significant advantage. It allows photographers to:
- See Exactly What You Are Shooting: Preview your composition in real-time on your computer monitor.
- Hone Sharpness: Utilize the focus control buttons on the tether bar to precisely adjust focus, ensuring critical sharpness on your subject.
- Manual Focus Preset: If Auto Focus controls are problematic or unavailable, switching your camera or lens to Manual Focus mode and pre-setting the desired focus is a reliable alternative. This is particularly helpful if you're using the AE-L/AF-L button for autofocus and want to avoid accidental focus shifts.
Power Management and Continuous Shooting
- External Power: For extended tethering sessions, consider using an AC adapter for your Nikon D5200. While tethering, some camera models might limit data functionality when using an OEM continuous power supply, so it's wise to test this beforehand.
- Shooting Without a Card: If you intend to shoot without an SD card inserted, ensure your camera is configured to allow this. Some cameras require a card to be present for tethering to function correctly.
- Nikon Specifics: Remember that when using the shutter trigger button within the Lightroom tethered capture environment with a Nikon camera, the captured image must finish downloading to the computer before the next exposure can be made. This limitation is not present when using the camera's physical shutter button.
Troubleshooting Beyond the Basics
If you continue to experience issues, consider these advanced troubleshooting steps:
- Camera RC / Third-Party Software: If Lightroom's native tethering fails, try a dedicated third-party tethering application like "Camera Control Pro" (Nikon's own paid software), "DigiCamControl" (a free and open-source option), or "qDSLR" (which was useful for tablet control but may have issues). If these programs successfully detect and control your camera, it strongly suggests the problem lies within Lightroom's configuration or plugin. DigiCamControl is frequently recommended as an innovative and easy-to-use solution for complex camera control when native Lightroom tethering falters.
- Windows 10 Specifics: Users on Windows 10 have reported "No Camera Detected" issues with various Nikon models, even when Windows itself recognizes the camera. While some users found workarounds, there isn't a universal fix, suggesting potential bugs in Lightroom versions or driver conflicts.
- Firmware Updates: Always ensure your camera's firmware is up to date. Manufacturers frequently release updates to improve performance and compatibility.
- Cable Length and Quality: Reiterate the importance of a high-quality, appropriately rated USB cable. Long or poorly shielded cables are common causes of intermittent connection issues.
- Check for Mechanical Failure: If you suspect a hardware issue with your camera or any connected accessories like foot pedals, reaching out to the manufacturer or a repair service is advisable.
Conclusion: Unlocking Creative Potential
Tethering your Nikon D5200 with Lightroom, while sometimes requiring initial troubleshooting, offers a significant boost in efficiency and creative control. The ability to see your images instantly on a larger screen, make immediate adjustments, and streamline your workflow makes it an indispensable tool for many photographic disciplines. By understanding the potential pitfalls and systematically addressing them, you can unlock the full potential of tethered shooting and elevate your photography. The learning curve is well worth the reward of a more controlled and fluid shooting experience.