Lightroom presets are a cornerstone of efficient and consistent photo editing. For professional photographers and filmmakers like Nick, a full-time traveler who navigates tens of thousands of images annually, mastering the creation and application of presets is not just a convenience but a necessity. This article delves into the art and science of creating Lightroom presets that elevate your workflow, refine your aesthetic, and save invaluable time, moving beyond the simplistic notion of a "one-click fix" to a more nuanced and powerful approach.
The Power of Presets: Efficiency and Consistency
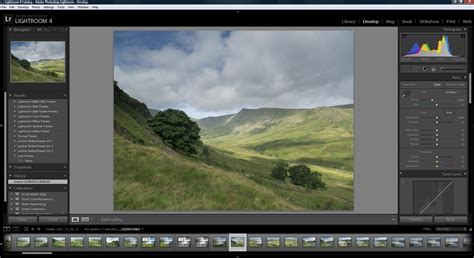
At its core, a Lightroom develop preset is a collection of adjustments that can be applied to an image simultaneously. This feature is particularly transformative for photographers who process a high volume of images. Instead of manually applying the same fundamental edits-such as adjusting exposure, contrast, or color temperature-to each photograph, a preset automates these steps, providing a consistent starting point. This allows photographers to dedicate more time to the finer details of retouching and creative expression, rather than being bogged down in repetitive tasks.
The journey to creating truly effective presets is often a long one, involving years of practice and experimentation to cultivate a distinct visual style. While basic exposure adjustments are fundamental, most photographers aspire to more, seeking to imbue their images with a unique "look and feel." This is where the true value of custom presets lies: in their ability to capture and replicate a desired aesthetic across a diverse range of photographic scenarios.
Should You Buy or Create Lightroom Presets?
The decision to purchase Lightroom presets or to invest the time in creating your own is a common one. While commercially available presets can offer a shortcut, especially for those new to editing or struggling with Lightroom's complexities, they also come with caveats.
Reasons to Consider Buying Presets:
- Learning Curve: For beginners, presets can demystify the editing process and provide a foundation for understanding how adjustments affect an image.
- Emulating a Style: If you admire a particular photographer's aesthetic, buying their presets can offer insight and a way to achieve a similar look.
- Inspiration: Presets can serve as a catalyst for new creative ideas and editing approaches.
- Supporting Creators: Purchasing presets from artists you admire is a way to support their work and gain access to their curated styles.
Reasons to Be Wary of Buying Presets:
- Scams and Low Quality: The market is saturated with presets that overpromise and underdeliver. Be cautious of any preset marketed as a "magic bullet" or a "one-click solution."
- Cost: High-quality preset packs can be expensive. Given that presets often require significant tweaking to suit individual images, shelling out substantial amounts of money may not always be justifiable.
- Lack of Universality: A preset that looks stunning on one image might be entirely unsuitable for another, even if taken moments apart, due to variations in lighting, color, and subject matter.
Lightroom itself comes with a variety of built-in presets. While they may not align with every photographer's vision, experimenting with them is a worthwhile endeavor before considering external purchases.
The Art of Crafting Your Own Lightroom Presets
Creating effective Lightroom presets is an ongoing process that demands patience and a willingness to embrace trial and error. It's not a quick afternoon project but rather a journey of refining your editing workflow.
Avoiding Common Pitfalls
Before diving into creation, it's crucial to understand common mistakes that can undermine the effectiveness of presets:
- Overly Aggressive Adjustments: Major edits, such as heavy color grading or drastic changes to exposure, are rarely universally applicable. A preset that drastically alters an image in one context may look jarring or incorrect in another. The goal should be to create presets that make minor, consistent adjustments, like tweaking temperature or exposure slightly, that work across a broad range of images.
- Including Lens and Optics Adjustments: While lens corrections and chromatic aberration removal are important, they are often specific to the lens used and the particular image's characteristics. Including these in a general-purpose preset can lead to unintended consequences.
The Step-by-Step Process of Preset Creation
The creation of a custom Lightroom preset involves a methodical approach, focusing on building a foundation of consistent edits and then layering on creative stylistic elements.
Step 1: Selecting a Base Image
Begin by choosing an image that is well-lit and relatively straightforward. Avoid images with extreme lighting conditions, dramatic sunsets, or complex color casts. A clean, well-exposed image with good lighting provides a neutral canvas for developing your preset.
Step 2: Making Universal Adjustments
Identify the adjustments you consistently make to the majority of your photographs. These are the foundational edits that form the basis of your preset. For instance, you might consistently increase exposure by a small margin, add a touch of warmth, or slightly boost the whites. The key is to make only the adjustments that you intend to apply to over 80% of your images. Avoid major exposure shifts, as these will necessitate starting over on subsequent photos.
The provided example of a "Quick Fix" preset includes specific settings:
- Basic: Contrast +5, Highlights -5, Shadows +5, Whites +15, Blacks -10, Clarity +3, Vibrance +5, Saturation -5.
- Tone Curve: Highlights +7, Lights +10, Darks -5, Shadows -7.
- Camera Calibration: Red Primary Saturation +5, Green Primary Saturation +10, Blue Primary Saturation +20 (note: these are not critical and can vary by camera model).
These adjustments serve as a starting point, aiming to refine the image's tonal range and overall feel without fundamentally altering its core characteristics.
Step 3: Developing a Unique "Look"
This is where the creative and artistic aspect of preset creation truly shines. While the exact process is highly personal and tied to your artistic vision, the general methodology involves:
- Curating a Set of Images: Select a group of images from the same location or with a similar color palette and lighting. This consistency is crucial for developing a look that will translate well across similar conditions.
- Utilizing Color Grading Tools: Work extensively with the Color Mixer, Color Grading (formerly Split Toning), and Effects modules. This is where you'll define the mood and character of your preset. For example, a photographer inspired by film and cinematography might lean towards developing a "cinematic look," intentionally seeking out photos that lend themselves to this aesthetic.
COLOR GRADE in Lightroom Like a PRO // Cinematic Color Grading
Step 4: Rigorous Trial and Error
Once you've established a set of edits that achieve your desired look on your initial set of images, the next critical step is to test this preset across a wider variety of photographs. Copy your edit settings and apply them to different images, noting how they perform. Continuously fine-tune the settings until the preset consistently brings your images closer to your target aesthetic, even with variations in lighting and color.
Step 5: Strategic Organization and Naming
As you create presets, developing a clear and intuitive naming convention is paramount. Name your presets based on the location, lighting conditions, or the specific purpose they serve. This will help you quickly identify which preset is most suitable for a given image or shooting scenario. For instance, naming a preset "Streets of Tokyo - Golden Hour" provides immediate context.
Step 6: Iterative Refinement and Expansion
Your first preset is just the beginning. To build a comprehensive library, you need to iterate. Take your existing preset and apply it to a new set of photos that feature slightly different lighting or a new location. Adjust the preset to suit these new conditions, and then save it as a new, distinct preset. Continue this process, creating specialized presets for various scenarios you frequently encounter in your photography. The ultimate goal is to have a collection of presets that can cohesively unify your images, regardless of the prevailing lighting or color environment.
The example of a "matte/cinematic look" being applied across different lighting situations illustrates the power of this iterative approach.
Expanding Your Preset Workflow
Beyond the fundamental creation process, several advanced techniques can further enhance your use of Lightroom presets.
Applying Presets Upon Import
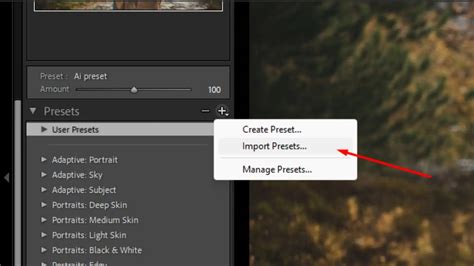
Lightroom allows you to automatically apply a develop preset to images as they are imported. This is an excellent way to ensure a consistent baseline edit for all your newly acquired photos. In the import dialog, you can select a saved preset to be applied. This is particularly useful for applying foundational adjustments like lens corrections, basic tonal refinements, or even a specific color profile.
To remove a preset applied on import, simply revert the setting to "Default Settings."
Modifying Existing Presets
Presets are not set in stone. If you find a preset that's close to what you need but requires minor adjustments, you can easily modify it. The process is similar to creating a preset:
- Apply the preset to an image.
- Make the desired changes to the image's settings.
- In the Presets panel, right-click on the preset you wish to update and select "Update With Current Settings."
- In the "Update Develop Preset" dialog, carefully select which settings you want to include in the updated preset. It's crucial to check all the settings you intend to modify, not just those that have changed.
Creating a Comprehensive Preset Library
As your experience grows, so too will your collection of presets. Developing a structured system for organizing these presets is key to maintaining efficiency. One effective method is to name presets sequentially, reflecting the order in which you apply them during your editing workflow.
For example, a workflow might involve:
- 1 Quick Fix: For initial tonal and color balance.
- 2 Curve Adjustments: For refining the tone curve.
- 3 Split Toning: For adding color to highlights and shadows.
- 4 HSL Adjustments: For fine-tuning hues, saturations, and luminances, particularly for skin tones.
This numbered system ensures that presets are applied in a logical sequence, preventing conflicts and making it easy to track the editing process. Numbering also helps overcome Lightroom's default alphabetical sorting, which may not align with your workflow.
It's also valuable to create highly specialized presets for unique situations. For instance, a wedding photographer might create a preset for the specific challenging lighting conditions found within a particular venue, saving that complex edit for future use. The possibilities are virtually limitless, ranging from presets for black and white conversions to specific graduated filter applications.
The Synergy of Multiple Presets
A powerful aspect of Lightroom presets is the ability to "stack" them. By creating presets that affect only specific sets of adjustments (as recommended in the "Other Considerations" section), you can apply multiple presets to a single image without overwriting previous edits. For instance, you might apply a "Quick Fix" preset, followed by a "Curve Adjustment" preset, then a "Split Toning" preset, and finally an "HSL Adjustment" preset. Each subsequent preset modifies only its designated settings, building upon the previous edits.
The provided examples clearly demonstrate this:
- Applying "1 Quick Fix Normal Light" affects Basic and Tone Curve.
- Adding "2 Curve Light Fade" modifies the Tone Curve, overriding the previous curve setting but leaving others intact.
- Incorporating "3 Split Shade Fix" adjusts only the Split Toning.
- Finally, applying "4 HSL 1" targets Hue, Saturation, and Luminance without disturbing earlier edits.
This layered approach allows for sophisticated and nuanced editing, where each preset contributes a specific element to the final image.
Conclusion: Presets as a Starting Point, Not a Solution
Lightroom develop presets are indispensable tools for photographers seeking efficiency and consistency. They are not intended as one-click solutions that magically perfect an image. Instead, they serve as powerful starting points, automating foundational edits and accelerating the creative process.
Key Takeaways for Creating Effective Presets:
- Specificity is Key: When creating a preset, only include the settings you intend to adjust. Avoid checking "All" unless you are creating a very basic, universal preset. This prevents unintended modifications to settings you've already refined.
- Meaningful Naming: Develop a naming convention that clearly indicates the preset's purpose and application. If you don't understand what a preset does or where it fits in your workflow, you're unlikely to use it.
- Embrace Creativity: Don't limit yourself to conventional presets. If you find yourself making a particular set of adjustments repeatedly, consider saving it as a preset. The possibilities are vast, from simple exposure tweaks to complex color grading.
- Iterate and Refine: Building a robust preset library is an ongoing process. Continuously test, refine, and create new presets to cover a wide range of photographic scenarios.
Ultimately, the goal is to create presets that, when applied, bring your images closer to your desired aesthetic, allowing you to focus on the fine-tuning that truly defines your unique photographic style. While presets can significantly streamline your workflow, remember that the final artistic decisions and manual adjustments are what elevate an edited image to a polished final product.