Every digital photograph, no matter how perfectly captured, undergoes a subtle degradation of sharpness on its journey from your camera to the viewer's screen or printed page. This inevitable loss is a consequence of various stages, including sensor capture, in-camera processing (especially for JPEGs), and crucially, the export and printing processes. Output sharpening is the essential final step that rectifies this loss, ensuring that the fine details and overall clarity you painstakingly achieved during editing are preserved. Without it, even the most meticulously crafted images can appear noticeably softer than intended, with fine textures becoming indistinct and details losing their crispness. Think of output sharpening as the crucial safety net that guarantees your final image aligns with your creative vision.
The Fundamental Distinction: Capture vs. Output Sharpening
Understanding the difference between capture sharpening and output sharpening is foundational to mastering image clarity. Capture sharpening addresses the inherent limitations of digital sensors and lenses, aiming to recover detail that was lost during the initial image capture. This is typically done during your RAW processing in software like Lightroom.
Output sharpening, on the other hand, is specifically designed to counteract the softening that occurs during the export or printing process. This includes the loss of detail introduced by resizing an image for web display or the inherent softening that happens when ink meets paper. While capture sharpening is about restoring what the camera missed, output sharpening is about preserving detail through the subsequent stages of image delivery. For instance, fine details like insect wings require careful sharpening at every stage. Capture sharpening recovers what the sensor lost, and output sharpening preserves it through export, ensuring that these delicate textures remain visible and defined.
Lightroom Classic: Effortless Web Output Sharpening
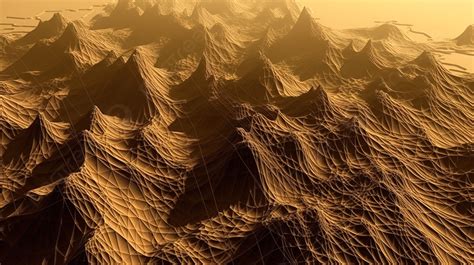
Lightroom Classic excels at making the process of output sharpening for web display remarkably straightforward. Detailed landscapes, such as those featuring intricate mountain textures, demand careful output sharpening for web presentation. Insufficient sharpening can lead to muddy details, while excessive sharpening can introduce undesirable "crunchy" artifacts and halos.
When exporting for the web, Lightroom's built-in sharpening tools, applied during the export process, are often sufficient. The key is to apply this sharpening after any resizing has occurred, as resizing itself can diminish sharpness. If you sharpen an image and then resize it, the resizing operation will undo much of the sharpening you’ve applied. Lightroom handles this automatically when you utilize its Export dialog for web output.
Sharpening for Print: Lightroom's Dual Approach
Lightroom offers two primary methods for sharpening images destined for print: through the Export dialog or via the dedicated Print module. Both methods allow you to tailor the sharpening to your specific output needs.
Sharpening via the Export Dialog for Print
When exporting images for print directly from Lightroom, you can access output sharpening settings within the Export dialog. Here, you'll find options to specify sharpening for different paper types.
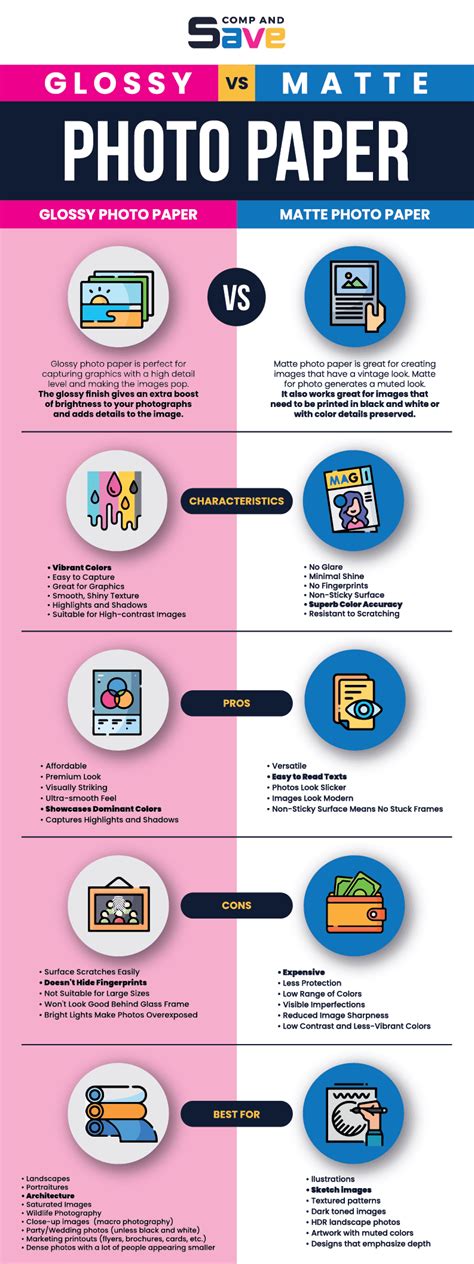
- Matte Paper: This setting is designed for textured papers such as fine art, watercolor, and canvas. These surfaces tend to absorb more ink, requiring a more robust sharpening approach to maintain detail.
- Glossy Paper: This option is tailored for smoother papers like lustre, metallic, and traditional glossy finishes. These surfaces reflect more light and generally require less aggressive sharpening.
It's recommended to start with a "Standard" amount of sharpening and then conduct a test print to evaluate the results. Architectural details and night cityscapes, for example, can look stunning in print, but only if the sharpening is appropriately adjusted for the chosen paper type. Matte papers, due to their absorbent nature, typically require more sharpening than glossy papers to achieve a comparable level of perceived sharpness.
Sharpening via the Print Module
The Print module offers a more integrated workflow for photographers who frequently print at home and prefer to fine-tune sharpening through quick test prints. Within the Print module, you'll find the "Print Job" panel, usually located at the bottom right of the interface. Here, a "Print Sharpening" checkbox allows you to enable sharpening specifically for your print output.
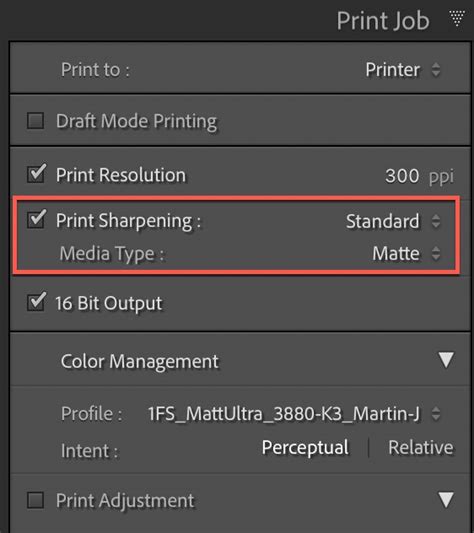
When this option is ticked, you can select from two key settings:
- Sharpening Level: Options typically include Low, Medium, and High. For images with abundant fine detail, such as close-ups of nature or intricate patterns, a "High" setting might be beneficial.
- Media Type: This dropdown menu allows you to choose between "Matte" and "Glossy" paper types, applying specific sharpening profiles tailored to each.
This method is particularly valuable when you need granular control and want to iterate on sharpening settings by printing small test batches.
The Power and Complexity of Photoshop Sharpening
While Lightroom offers user-friendly output sharpening, Adobe Photoshop provides significantly finer control over the sharpening process. This enhanced control, however, comes with increased complexity. For photographers who demand the utmost precision, Photoshop's advanced sharpening techniques are invaluable.
The Importance of a Calibrated Editing Workspace
Achieving accurate sharpening results, especially for print, hinges on having a proper editing workspace with a calibrated monitor. What you see on your screen must accurately reflect the final output. A calibrated monitor ensures that the brightness, contrast, and color you perceive are true, making it much easier to judge sharpening levels accurately and avoid common pitfalls.
The Non-Destructive High Pass Method
A highly recommended technique in Photoshop for sharpening is the High Pass method. This approach is non-destructive, meaning it doesn't permanently alter your image pixels. You can easily toggle the sharpening layer on and off to compare the sharpened image with the original, and adjust the opacity of the sharpening layer at any time to fine-tune the effect. This flexibility is crucial for achieving the perfect balance of sharpness without introducing artifacts.
How to Sharpen Images with a High Pass Filter in Photoshop
Common Sharpening Mistakes to Avoid
Even experienced photographers can fall into common traps when it comes to sharpening. Being aware of these errors is the first step to circumventing them.
1. The Pervasive Problem of Oversharpening
The most common mistake by far is oversharpening. This occurs when too much sharpening is applied, leading to several undesirable artifacts:
- Visible Halos: Bright, unnatural outlines appear along high-contrast edges, creating a harsh and artificial look.
- Amplified Noise: Existing noise in the image, especially in smooth areas like skies or skin tones, is exaggerated, making the image appear grainy.
- "Crunchy" Appearance: The image takes on an unnatural, overly textured, or "crunchy" appearance, detracting from its photographic quality.
How to Check for Oversharpening: Zoom in to 100% view on your image and carefully examine high-contrast edges. Look for those telltale bright halos. A crucial step is to toggle your sharpening on and off (or compare before and after versions) to clearly see the impact of your sharpening settings.
2. Incorrect Sharpening Order: A Workflow Killer
Output sharpening should always be the very last step in your image editing and export workflow. If you sharpen an image and then resize it for web or print, the resizing operation will inevitably undo a significant portion of your carefully applied sharpening work. This renders the sharpening effort largely ineffective. In Lightroom, this is handled automatically when using the Export or Print modules, but it's a critical consideration if you're using external tools or a different workflow.
3. Tailoring Sharpening to Image Content and Output
A one-size-fits-all approach to sharpening simply doesn't work. A landscape photograph brimming with fine foliage detail requires a different sharpening strategy than a portrait with smooth skin tones. Similarly, the requirements for web output and print output are fundamentally different. Web images primarily lose sharpness due to resizing, which is a relatively minor loss. Print images, however, face additional softening due to ink absorption by the paper, which can be more pronounced on certain paper types.
4. The Misconception that Capture Sharpening is Enough
A persistent misconception is that capture sharpening alone is sufficient. This is not the case. While capture sharpening is vital for addressing sensor softness, it does not compensate for the additional softness introduced during the export or printing process. Output sharpening is a distinct and necessary step to ensure your final image retains its intended clarity.
Understanding the Sharpening Sliders in Lightroom's Detail Panel
Lightroom's Develop module features a "Detail" panel that houses powerful sharpening and noise reduction tools. The sharpening tool, in particular, offers four key sliders that allow for precise control.
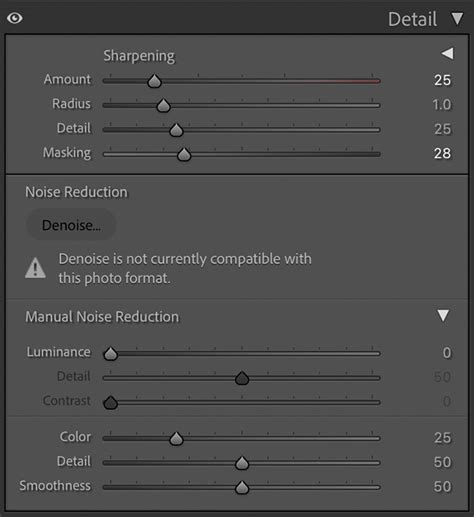
The Sharpening Sliders Explained:
Amount: This slider controls the overall intensity of the sharpening effect. A value of zero means no sharpening is applied. Increasing the value intensifies the sharpening. Be cautious, as excessive "Amount" can significantly increase noise. A common starting point is around 50, but this should be adjusted based on the image and its noise levels.
Radius: This setting determines the width of the area around edges that Lightroom will sharpen. A default value of 1.0 means sharpening is applied over 1 pixel around an edge. Increasing the radius (e.g., to 3.0) spreads the sharpening over more pixels, potentially resulting in thicker, more pronounced edges and shadows. For most images, keeping the radius at or below 1.5 is recommended.
Detail: As the name suggests, this slider controls how much sharpening is applied to the finer details and edges within the image. A low value (e.g., 0) will primarily sharpen larger edges, while a high value (e.g., 100) will sharpen even the smallest textures. Be mindful that higher "Detail" values can considerably increase noise, especially in areas with subtle gradients. Staying below 50 is often a good practice.
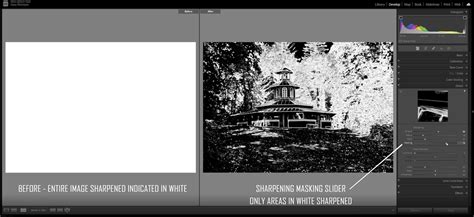
Masking: This is arguably the most powerful and versatile slider in the sharpening tool. The Masking slider allows you to protect smooth areas of your image from sharpening, thereby preventing noise amplification. When you hold down the Option (Mac) or Alt (PC) key while moving the Masking slider, the image will display in black and white. White areas indicate where sharpening will be applied (edges), and black areas indicate where sharpening will be masked out (smooth areas). By increasing the Masking value, you reveal more black, effectively telling Lightroom to sharpen only the most defined edges and protect smoother regions like skies or skin. This is particularly useful for images where you want to selectively sharpen a subject against a softer background.
Harnessing the Option/Alt Key for Precision
The Option/Alt key is an indispensable tool when working with Lightroom's sharpening sliders. By holding this key while adjusting sliders like Radius, Detail, and Amount, you can visualize the precise impact of your changes. For example, adjusting the Radius with the Option/Alt key held down will show you exactly how the sharpened edges will appear, highlighting potential over-sharpening or undesirable artifacts.
When using the Masking slider with the Option/Alt key, the image transforms into a black and white representation. White areas signify regions that will be sharpened, while black areas are protected. This visual feedback allows you to precisely control where sharpening is applied, ensuring that smooth gradients remain free of noise while edges are crisply defined.
Sharpening for Specific Output Scenarios
The approach to sharpening must adapt to the intended destination of your image.
Web Output Considerations
For web images, the primary concern is sharpness loss due to resizing. Lightroom's "Screen" output sharpening preset in the Export dialog is generally well-calibrated for typical web displays. It provides a moderate level of sharpening designed to counteract the softening introduced by resizing without overdoing it. Remember, web images are viewed on backlit screens, which can sometimes make sharpening appear more pronounced than it will on a print.
Print Output Nuances
Printing is a more complex process involving the physical interaction of ink and paper. This interaction inherently softens the image.
- Paper Type Matters: Textured papers like matte, fine art, and canvas absorb ink more readily, leading to a greater loss of sharpness. These papers generally require more aggressive output sharpening compared to smoother, glossier surfaces.
- Viewing Distance and Print Size: Larger prints are typically viewed from further away. This means that a slightly higher level of output sharpening might be necessary to maintain perceived sharpness at a typical viewing distance. Conversely, smaller prints or those viewed very closely might require less.
- Printer Resolution: Lower resolution printers may be less precise in their ink application, potentially leading to a softer print. This can necessitate increased output sharpening.
Advanced Sharpening Techniques and Tools
While Lightroom provides excellent output sharpening capabilities, other tools offer even greater control for specific needs.
Nik Sharpener Pro: A Specialized Solution
For photographers seeking highly specialized sharpening for print, the Nik Collection's Nik Sharpener Pro is a powerful option. This software offers dedicated modules for both capture sharpening and output sharpening. When used as a Photoshop plugin, it allows you to apply output sharpening as a separate layer after your image is fully edited and soft-proofed for print.
Nik Sharpener Pro features controls for:
- Output Type: Selecting "Inkjet" or other print-specific profiles.
- Viewing Distance: An "Auto" option that calculates optimal sharpening based on print size.
- Paper Surface: Tailoring sharpening to different paper textures.
- Printer Resolution: Adjusting sharpening based on the printer's capabilities.
If you choose to use Nik Sharpener Pro for print sharpening, it's crucial to disable Lightroom's built-in print sharpening in the Print module to avoid applying sharpening twice.
Photoshop's High Pass Method for Print
The High Pass method in Photoshop, when used judiciously, can also be a very effective tool for print sharpening. By creating a duplicate layer, applying the High Pass filter, and then setting the layer's blend mode to "Overlay" or "Soft Light," you can achieve controlled sharpening. Adjusting the layer's opacity then allows for fine-tuning. This method offers excellent control and is non-destructive.
The Final Word on Output Sharpening
Output sharpening is not an optional aesthetic choice; it's a necessary technical step to ensure your images look their best across different mediums. By understanding the distinction between capture and output sharpening, mastering the tools within Lightroom and Photoshop, and being mindful of common errors, you can elevate the final presentation of your photographs. Whether destined for the web or a gallery wall, proper output sharpening is the key to preserving the clarity and impact of your creative vision. Skip it, and your images will invariably appear softer than you saw them on your editing screen, a disservice to the effort you invested. Output sharpening is the final polish that ensures your images truly shine.
tags: #output #sharpening #lightroom