Photoshop, a program renowned for its powerful raster image editing capabilities, can also be utilized to create and export vector graphics, albeit with a nuanced understanding of its limitations and strengths. While Adobe Illustrator is the primary tool for vector-based design, Photoshop offers methods to convert pixel-based imagery into scalable vector formats, most notably SVG (Scalable Vector Graphics). This process is particularly useful for elements like logos, icons, and graphics that need to maintain sharp quality across various sizes and resolutions, essential for web design and other applications where scalability is paramount.
Understanding Vector and Raster Graphics
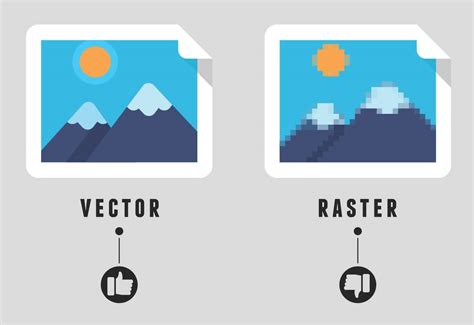
At their core, digital images exist in two fundamental formats: raster and vector. Raster images, often referred to as bitmap images, are composed of a fixed grid of pixels. Each pixel has a specific color, and when you enlarge a raster image beyond its original dimensions, these pixels become discernible, leading to a loss of quality, resulting in a blurry or pixelated appearance. Photographs and detailed digital paintings are typically raster graphics.
In contrast, vector graphics are constructed from mathematical equations that define geometric primitives such as points, lines, and curves. These mathematical descriptions allow vector images to be scaled infinitely in any direction without any degradation in quality. The edges of vector graphics remain crisp and clean regardless of the zoom level. This inherent scalability makes vectors an ideal choice for elements that require resizing, such as logos, icons, and illustrations intended for diverse applications, from business cards to large-format banners. Vector files are often characterized by smaller file sizes compared to their raster counterparts for similar complexity.
Photoshop's Role in Vector Creation
While Photoshop is fundamentally a raster-based editor, it possesses tools that enable the creation and manipulation of vector shapes. These are typically created using the Pen tool or the Shape tools. These native Photoshop vectors can then be exported in a vector format. However, it's crucial to understand that vectors placed or pasted into Photoshop as Vector Smart Objects cannot be properly exported as SVG. This means that the most common methods of incorporating vector elements into Photoshop may not yield a directly exportable SVG.
Adobe Photoshop always saves files as a bitmap or raster by default, which produces very low-quality images compared to vector artwork. However, Photoshop does offer a way to vectorize an image, although it is not explicitly designed to work with vector graphics as Adobe Illustrator is. Manually redesigning an image to vectorize it is a long job and requires experience and a few manual skills with the tools. Unfortunately, resorting to an automatic conversion does not always pay off.
Saving as SVG: The Illustrator Bridge
Photoshop itself cannot directly save files in a vector format like SVG. The primary method to achieve this involves leveraging Adobe Illustrator. If you have native Photoshop vectors, such as those created with the Pen or Shape tools, you can export them to a format that Illustrator can open and then save as an SVG.
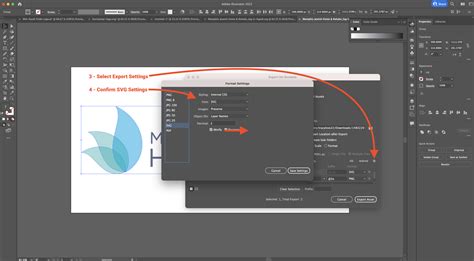
A common workflow involves saving a Photoshop file in a format that preserves vector information, or more directly, opening Photoshop vector layers in Illustrator. For instance, if you have created shapes or paths in Photoshop, you can select them, copy them, and paste them into an Illustrator document. Once in Illustrator, you can then use the "File > Export > Export As" option (or the older "File > Save As" method) to save your artwork as an SVG file.
Preparing Your Artwork for SVG Export
Before exporting, it's important to consider the intended size of the vector graphic. While SVGs are scalable, it's beneficial for the SVG to initially be created at a size that closely matches its intended use in a webpage or other application. This can save web developers an extra step of coding a specific size. In Illustrator, when you open or paste your Photoshop vectors, you can adjust the artboard size to match your desired dimensions. The "Properties" panel in Illustrator will display the dimensions, such as Width and Height, which can be adjusted.
It is important to note that if you accidentally save changes to a logo that was placed as a Smart Object in Photoshop back from Illustrator, the logo might shrink in Photoshop due to transformations.
Vectorizing Images in Photoshop: A Step-by-Step Approach
While Photoshop is not ideal for creating vector artwork from scratch, it offers a process to convert raster images into vector-like forms that can then be exported. This method is best suited for simpler images like logos, icons, and shapes, rather than complex photographs.
Step 1: Image Preparation and Background Removal
The first crucial step is to prepare your image for vectorization. This often involves separating the subject you want to vectorize from its background.
- Isolate the Subject: Use Photoshop's selection tools (e.g., Rectangular Marquee, Magic Wand, Lasso tool, or Pen tool) to accurately select the part of the image you intend to convert into a vector.
- Create a New Layer: Once you have a selection, it's advisable to copy the selected area to a new layer. This isolates your subject and makes further editing easier.
- Remove the Background: If you have selected your subject, you can create a clipping mask or perform an inverse selection and delete the unwanted background. To create a mask, with the selection active, click the "Add Mask" symbol at the bottom of the Layers panel. Alternatively, go to "Select > Inverse" and then press the Delete key.
Step 2: Enhancing and Simplifying the Image
To convert a raster image into a vector, you need to simplify it into distinct shapes and colors. This usually means reducing the image to a limited color palette, often black and white, to define clear outlines.
- Increase Sharpness: Enhance the image's sharpness to make details more pronounced.
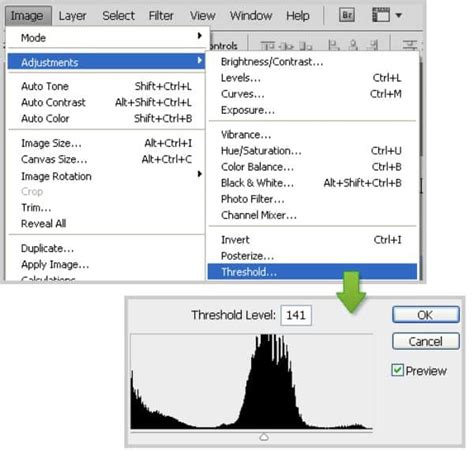
- Threshold Adjustment: Create a "New Adjustment Layer" and select "Threshold." Adjust the slider in the panel that appears to establish a threshold point suitable for your image. The goal is to retain key details without making the image overly dense. This step effectively converts the image into a black and white representation.
- Solid Color Background: Create a "New Layer > Solid Color" and set it to white. This helps to better visualize the outlines of your subject.
Step 3: Creating Paths and Vector Shapes
With the image simplified and ready, you can now begin the process of creating vector paths.
- Make a Selection: With your simplified image active, ensure you have a clear selection of the areas you want to vectorize.
- Create Work Path: Go to the Toolbar on the left and select a Selection Tool (e.g., Rectangle Marquee). Go back to your image, right-click, and choose "Make Work Path." A tolerance value determines how closely the path adheres to the contours of your selection.
- Create a Solid Color Layer: In the Layers panel, create a "New Fill Layer or Adjustment Layer" and choose "Solid Color." This new layer will define the shape of your vector element on top of the simplified image. Doing so will create a new layer with your drawing in vector format.
- Vector Mask: Alternatively, with the selection active, you can create a "Vector Mask" by going to "Layer > Vector Mask > Current Selection" or by clicking the appropriate icon in the Layers panel.
Step 4: Cleaning and Refining Vector Elements
After the initial conversion, you might need to clean up and refine the resulting vector shapes.
- Brush Tool: If parts of the image didn't result in a clean outline during the previous steps, you can use the Brush tool to fill in small gaps or correct imperfections.
- Editing Vector Shapes: If you've created shape layers in Photoshop, you can edit them using vector editing tools. You can also use the Direct Selection tool (shortcut 'A') to manipulate anchor points and paths.
Step 5: Exporting as SVG
Once your vector elements are finalized in Photoshop, you can export them.
- Export As SVG: Right-click on the layer containing your vector shape and select "Export As." Choose "SVG file" from the export options.
- Saving as EPS: Another option is to go to "File > Save As" and select "Photoshop EPS file format" from the "Save as Type" menu. EPS files can often be opened and further processed in vector editing software.
It's important to remember that Photoshop Express and Photoshop on the iPad do not currently support vectorizing images.
Alternative Methods and Considerations
Photoshop Actions for Vectorization
For those seeking a more automated approach, Photoshop actions can be used to convert images into vector art. These pre-recorded sequences of commands can automate much of the manual work involved in vectorization, including simplifying images, creating paths, and applying basic color fills. Several actions are available that can transform images into vector art with a single click, often utilizing similar underlying techniques to manual vectorization.
PDF Format
While not a true vector format for web use, Photoshop can save files in PDF format. To do this, go to "File > Save As," then select "Photoshop PDF" and click "Save." This method works with various file types, including .jpg, .gif, .png, .tif, .bmp, and .psd.
Why Vectorize? The Benefits for Designers
Vectorizing images offers significant advantages for designers:
- Scalability: Vectors can be resized infinitely without losing quality, ensuring crisp visuals across all platforms and sizes.
- Editability: Vector graphics, especially those created with shape layers in Photoshop or in Illustrator, are easily editable. Colors, shapes, and paths can be modified without pixelation.
- Smaller File Sizes: For graphics with flat colors and defined shapes, vector files are often more compact than high-resolution raster images.
- Web Design Integration: SVG is a standard format for web graphics, allowing for interactive elements, animation, and excellent performance.
BEST WAY TO CONVERT LOW RESOLUTION TO HIGH RESOLUTION in PHOTOSHOP !!
While Photoshop is primarily a raster editor, understanding these methods allows designers to leverage its capabilities for creating and exporting vector assets, bridging the gap between pixel-based editing and the scalable world of vector graphics. The key lies in utilizing Photoshop's vector tools effectively and, when necessary, employing Illustrator as the final step for SVG export.