Adobe Lightroom is a powerful tool for photographers, offering a robust suite of features to enhance and organize digital images. While many users delve into its advanced capabilities, a solid understanding of the fundamental editing panels is crucial for achieving professional-looking results. This guide, drawing heavily on the insights of renowned photography educator Scott Kelby, explores the essential steps and workflows for editing photos in Lightroom, with a particular focus on the foundational "Basic" panel and effective image organization through Collections.
The Cornerstone of Editing: The "Basic" Panel
Adobe has aptly named the "Basic" panel, but its significance extends far beyond mere fundamentals. Scott Kelby aptly suggests it should be called the "Essentials" panel, as it's the primary area where most photographers will spend the majority of their editing time. Understanding the order and purpose of the sliders within this panel is key to a consistent and effective editing process.
1. Selecting the Right RAW Profile
The journey begins with choosing a RAW profile. While the default "Adobe Color" profile is a serviceable starting point, Kelby often opts for "Adobe Landscape" or "Adobe Vivid" to establish a more impactful visual foundation for his edits. This initial choice can subtly influence the color rendition and overall feel of the image, setting the tone for subsequent adjustments.

2. Precision White Balance Adjustment
Accurate color is paramount; an image with incorrect white balance is fundamentally flawed. Kelby emphasizes the utility of the White Balance Selector tool, a digital eyedropper, as his primary method for achieving accurate color. This tool allows for precise sampling of neutral tones within the image, ensuring that colors are rendered naturally and realistically.
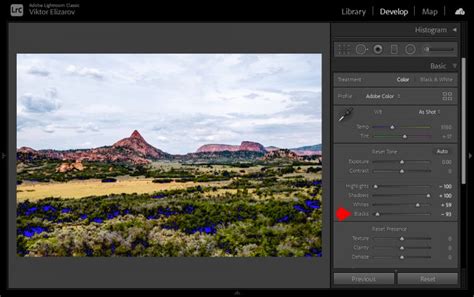
3. Setting White and Black Points for Optimal Tonal Range
To maximize the dynamic range of an image, Kelby employs a technique of "Shift-double-clicking" on the "Whites" and then the "Blacks" sliders. This action prompts Lightroom to automatically set the white and black points, effectively expanding the tonal range and preventing crucial detail from being lost in pure white or pure black areas. This step is fundamental to creating images with depth and dimension.
4. Fine-Tuning Overall Brightness with Exposure
Once the white and black points are established, the overall brightness of the image is assessed. If the photo appears too dark or too bright, the Exposure slider is adjusted until the desired luminosity is achieved. This slider acts as a global control for the image's brightness, ensuring a balanced exposure before delving into more nuanced adjustments.
5. Infusing Images with Contrast
A "flat-looking" image is often a sign of insufficient contrast. Kelby advocates for adding a "pretty good amount of contrast," often more than the average user might employ. Contrast is the difference between light and dark areas, and its judicious application can dramatically enhance the perceived depth, impact, and visual interest of a photograph.
Lightroom: Understanding the Histogram
6. Addressing Specific Image Imperfections
This stage is dedicated to rectifying any specific issues that may be present in the photograph. If an image is backlit and appears too dark in the shadows, the "Shadows" slider is used to open them up. Conversely, if highlights are "clipped" (losing detail), the "Highlights" slider is pulled back. For images suffering from a hazy appearance, the "Dehaze" slider is employed to cut through the atmospheric obscurity.
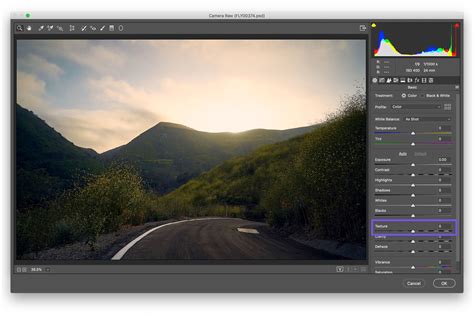
7. Enhancing Detail with Texture and Clarity
To bring out the inherent detail in a photograph, Kelby utilizes the "Texture" and "Clarity" sliders. He generally applies a significant amount of "Texture" and approximately half that amount of "Clarity." Texture enhances the fine details and surface qualities, while Clarity increases mid-tone contrast, making details appear sharper and more pronounced. It's important to use these sliders judiciously to avoid an overly processed or artificial look.
8. Boosting Colors for Vibrancy
By this stage, the colors in the image often appear pleasingly "poppin'." However, if further enhancement is desired, the "Vibrance" slider is increased. Vibrance selectively boosts the intensity of muted colors while leaving already saturated colors relatively untouched, preventing an unnatural or over-saturated appearance.
Streamlining Your Workflow: The Power of Collections
Beyond the immediate adjustments within the Basic panel, effective organization is a critical component of a photographer's workflow. Scott Kelby advocates strongly for the use of Collections in Lightroom over traditional folder structures, a philosophy that has resonated with many users seeking a more efficient way to manage their image library.
The Collection Set: A Digital Folder
Kelby's organizational strategy begins immediately after importing photos. He creates a "Collection Set," which he likens to a master folder within Lightroom. This Collection Set serves as a container for related collections, keeping projects or shoots neatly organized. For instance, a trip to Tuscany might be designated as a "Tuscany" Collection Set.
Initial Culling: Eliminating Obvious Mistakes
Before diving deep into editing, Kelby performs a rapid initial culling. He quickly scrolls through imported images, deleting any that are clearly unusable - out-of-focus shots, completely black or white frames, or accidental captures like a photo of his foot. This immediate cleanup saves time and mental clutter later in the process.
Creating a "Full Shoot" Collection
Following the initial purge, Kelby selects all remaining images and creates a "Full Shoot" Collection. This collection contains all the photos from the import, minus the obvious mistakes. This serves as a comprehensive repository of the entire shoot before any further refinement.
Identifying Winners and Losers: The Double Cull
A critical step in Kelby's workflow is the "double cull." He enlarges an image, hides all panels by pressing Shift-Tab, and then presses the "L" key twice to enter full-screen mode with a black background. This immersive view minimizes distractions, allowing for a focused evaluation of each image. During this pass, he identifies two categories: images that are still too bad to keep and, more importantly, the genuinely good shots that have the potential to be client-worthy.
Separating the Best Shots into a "Picks" Collection
Once the initial assessment is complete, Kelby filters the view to show only the images marked as "really good." He then selects all of these and places them into a new collection named "Picks." Within his "Tuscany" Collection Set, he now has two collections: "Full Shoot" (minus the truly bad ones) and "Picks" (the keepers that might be presented to a client).
Narrowing Down to the "Selects"
Kelby prefers to deliver a highly curated selection of images rather than overwhelming clients with numerous options. He aims for a maximum of 15-20 top-tier images, or even fewer. To achieve this, he revisits the "Picks" collection and identifies the absolute best shots, marking them as such.
The Final Tiers: "Full Shoot," "Picks," and "Selects"
By filtering again to show only these "best of the best" images, Kelby creates a third collection, often named "Selects." Within his Collection Set, he now has three distinct tiers:
- Full Shoot: All usable images from the import.
- Picks: The good shots, the keepers.
- Selects: The very best images, ready for editing and potential delivery.
This tiered system allows for quick access to all images from a shoot ("Full Shoot"), a broader selection of good images ("Picks"), or a highly refined set for focused editing ("Selects").
Adapting for More Complex Shoots
For more complex assignments like events (weddings, sporting events), Kelby expands this system by creating more Collections within the main Collection Set. While these sub-collections could be further organized into their own Collection Sets, he often relies on Lightroom's alphabetizing feature to keep related collections grouped together. This flexibility allows the organizational structure to scale with the complexity of the photographic task.

Beyond the Basics: Additional Insights and Resources
The principles outlined by Scott Kelby provide a robust framework for tackling photo editing and organization in Lightroom. His emphasis on a systematic approach to the Basic panel and a structured use of Collections aims for efficiency and superior results.
The Value of Descriptive Naming and Folder Structures
While Collections offer a powerful way to group images, the underlying file management also plays a role. Some photographers, inspired by discussions around Kelby's methods, consider adopting more descriptive naming conventions for files and folders. Instead of a purely chronological structure like 2023/Portugal, a more thematic approach like Travel/Portugal/2023 can be beneficial, especially for returning to locations or managing recurring themes. This approach facilitates easier browsing and searching, particularly when dealing with extensive archives.
Keyword Utilization for Enhanced Searchability
Keywords are an indispensable tool for photographers using Lightroom. They allow for detailed tagging of images, enabling users to search for specific subjects, locations, or concepts across their entire library. While folder structures and naming conventions provide a hierarchical organization, keywords offer a more flexible and powerful means of retrieval.
The Power of Collections: Avoiding Duplication
A key advantage of Lightroom Collections is their ability to group images without creating duplicate files. An image can reside in multiple Collections (e.g., a landscape shot could be in a "Travel" collection and a "Sunset" collection) without consuming additional disk space. This is a significant benefit compared to traditional file management, where duplicating files to organize them in different folders would lead to redundancy.
Lightroom: Understanding the Histogram
Learning from Experts: Workshops and Online Resources
The pursuit of photographic excellence often involves continuous learning. Resources like the KelbyOne Lightroom Conference, online tutorials from LightroomKillerTips.com, and educational series like "The Grid" and Adobe's own Lightroom Classic 101 Crash Course offer invaluable insights. These platforms provide opportunities to learn advanced techniques, discover new workflows, and stay abreast of the latest developments in photo editing software. For instance, Terry White's structured approach in his Lightroom Classic 101 course has been noted for its ability to transform disorganized Lightroom libraries.
The "How Would I Edit Your Photo?" Approach
Scott Kelby's "How Would I Edit Your Photo?" sessions, often featured on "The Grid," offer a practical demonstration of his editing philosophy. These live editing sessions, where viewer-submitted photos are transformed from raw files to polished images, showcase the application of Lightroom and Photoshop techniques in real-world scenarios. This approach provides a valuable case study for aspiring photographers looking to understand the practical application of editing principles.
By embracing the foundational principles of the Basic panel and leveraging the organizational power of Collections, photographers can significantly enhance their editing efficiency and the quality of their final images. Continuous learning and adaptation of workflows, drawing from the expertise of professionals like Scott Kelby, are essential for growth in the dynamic field of digital photography.