Adobe InDesign's Paragraph Styles are a powerful, yet often underutilized, feature that can dramatically streamline your design workflow. While they might appear intimidating at first glance, understanding their logic and application can transform how you work with text, saving you significant time and ensuring professional consistency. This tutorial aims to demystify Paragraph Styles, guiding you from basic creation to advanced techniques used by professionals, helping you to not only master this feature but also to appreciate the underlying structure of InDesign itself.
InDesign Paragraph Styles: What They Are, Why You Should Use Them, and Their Advantages
At their core, Paragraph Styles are a collection of formatting rules that dictate how your text appears and behaves. They encompass both character-level formatting, such as font, color, and scaling, and paragraph-level formatting, including indents, alignment, and hyphenation. The primary benefits of utilizing Paragraph Styles are manifold: they save you time, simplify complex projects, ensure consistent and professional formatting across your document, and greatly simplify the process of handling last-minute edits.
Furthermore, many advanced InDesign features are intrinsically linked to the use of Paragraph Styles. The most prominent example is the automated creation of a Table of Contents, which relies heavily on your defined text styles.
Is it Mandatory to Use Paragraph Styles?
While InDesign does not strictly mandate the use of Paragraph Styles, their adoption is highly recommended for any text within your document. The experience of working with styles often leads to a realization that you "won't stop" using them once you've experienced their benefits. They will dramatically improve the quality of your work and significantly reduce the occurrence of formatting errors. Once your styles are established, you can format an entire document with just a few clicks, fostering a genuine appreciation for this powerful feature.
The Distinction Between Paragraph Styles and Character Styles
A common point of confusion for new users is the difference between Paragraph Styles and Character Styles. An excellent analogy found in the Adobe Forums effectively illustrates this distinction:
Imagine walking a dog. Paragraph Styles define the overall structure of your walk: the route you take, your pace, and when you decide to take breaks. Character Styles, on the other hand, are for the more granular, immediate actions during the walk, like picking up after your dog or tightening the leash if you spot another dog or a distracting shiny car.
It's crucial not to confuse these two. If you find yourself needing to apply a Character Style to an entire sentence, it's a strong indicator that you should consider creating a new Paragraph Style instead. Character Styles are intended for applying formatting to individual characters or a few words, not for extensive portions of text beyond a single sentence.
How to Create a Paragraph Style in InDesign
InDesign offers two primary methods for creating Paragraph Styles: directly through the Paragraph Styles Panel or by deriving a style from already formatted text.
Creating a Paragraph Style from the Paragraph Styles Panel
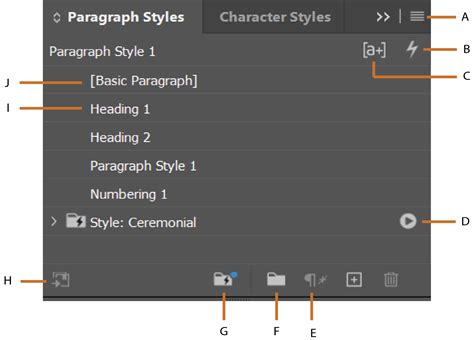
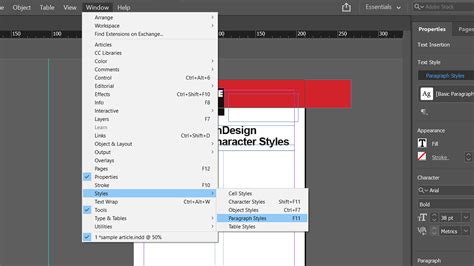
- Open the Panel: Ensure the Paragraph Styles Panel is visible. If not, navigate to
Window > Styles > Paragraph Styles. - Create New Style: With no text selected, click the "Create new style" icon at the bottom of the Paragraph Styles Panel.
- Access Options: Double-click the newly created "Paragraph Style 1" to open the Paragraph Style Options window.
- Tip: You can streamline this process by holding down the
Alt(Windows) orOption(macOS) key while clicking the "Create new style" icon. This will create the style and immediately open the Paragraph Style Options window.
- Tip: You can streamline this process by holding down the
Within the Paragraph Style Options window, you'll find numerous settings. While a detailed explanation of every single option would be extensive, key fields include:
- Style Name: A descriptive name for your style.
- Location: Indicates if the style is organized within a folder.
- Based on: Allows you to link this new style to an existing one, inheriting its properties. This feature will be explored further later in the tutorial.
- Next Style: Specifies which paragraph style will be applied automatically when you press
EnterorReturnafter a paragraph formatted with the current style. - Style Settings: A summary of the applied formatting rules for the new style.
A crucial first step before even naming your style is to examine the "Style Settings" summary. If it displays any "dirty" information (unexpected formatting), it's advisable to click "Reset to Base" before proceeding to create your paragraph style.
Creating a Paragraph Style from Formatted Text
You can also generate a new Paragraph Style directly from existing formatted text.
- Select Text: Select a line or block of text that has already been formatted to your desired appearance.
- Create New Style: Click the "Create new style" icon in the Paragraph Styles Panel.
InDesign will automatically generate a new Paragraph Style based on the formatting of your selected text. You can then double-click its name in the panel to edit and refine it further.
Quickly Modify a Paragraph Style
One of the most significant advantages of Paragraph Styles is the ease with which you can update formatting across your entire document. Imagine you've applied a style to all your headings, and then decide to change the color of the main title. Instead of manually reformatting each instance, you can update the style itself.
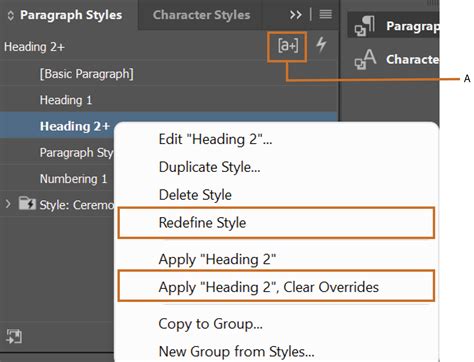
- Select Example Text: Select a portion of text that has the style you wish to modify applied.
- Redefine Style: In the Paragraph Styles Panel, locate and click the "Style Override Highlighter" icon (often a small circle with a plus sign). Then, select "Redefine Style" from the menu.
Instantly, all paragraphs formatted with that specific Paragraph Style will reflect the updated formatting, as if by magic.
Based On Styles (Linked Styles)
The "Based on" feature is among the most powerful functionalities of InDesign Paragraph Styles. It allows you to create a new paragraph style that inherits all the properties of an existing style. Any subsequent changes made to the "base" style will automatically propagate to all styles linked to it.
This feature is invaluable for:
- Rapid Document Appearance Changes: By adjusting the base style, you can quickly alter the overall look and feel of a document, experimenting with different font combinations or color schemes.
- Multilingual Projects: It simplifies managing documents with text in multiple languages. You can set up a base style with common attributes and then create language-specific styles that inherit from it, only adjusting language-dependent properties like hyphenation or character scaling.
To utilize this, select the desired main style from the "Based on" drop-down menu within the Paragraph Style Options window.
Fight Overrides (aka Don't Use Local/Inline Styles)
Local or "inline" styling-manually applying formatting to text without using styles-is a practice that should be avoided. It leads to a loss of control over your layout, makes collaboration more difficult, and significantly increases the risk of introducing errors and style inconsistencies.
You should always prioritize using Paragraph and Character Styles. The concern about having "too many" styles is often unfounded. Professional InDesign documents, especially those created by experienced consultants, frequently feature a vast number of styles, reflecting a well-organized and manageable workflow. Styles are, indeed, an InDesign user's greatest asset.
Finding Overrides with a Click
InDesign provides a tool to quickly identify text that has been locally formatted, deviating from its applied style. Click the "Style Override Highlighter" icon in the Paragraph Styles Panel. Text with local overrides will be highlighted, typically in blue.
Clearing Overrides with a Click
To remove local formatting, select the text in question, click the "Style Override Highlighter" icon, and then choose "Clear overrides in selection." Note that any applied Character Styles will need to be removed manually.
Download the Style Sheet: Building a Reusable Boilerplate
As a designer, the initial vision of the job often involves creative layout design and client interaction. However, complex projects can become bogged down by the time-consuming task of fixing layout and style issues, detracting from the more enjoyable aspects of the work. Precious time, best spent creating value, can be consumed by repetitive tasks.
To combat this, many designers develop a "boilerplate" - a standardized template with pre-defined styles and organizational structures that can be reused across projects. This significantly saves time and ensures a consistent starting point. Before sharing such a boilerplate, it's essential to understand some fundamental rules and tips for organizing styles.
1. Group Styles with Empty Paragraph Styles
A clever trick, popularized by designers like Kai Rübsamen, involves using "empty" Paragraph Styles to act as folders for grouping other styles. Instead of relying solely on InDesign's folder structure, these empty styles, often named with descriptive titles, create a clear visual hierarchy. The use of asterisks (*) after the names of certain styles can indicate that other styles are based on them, providing a quick overview of the style hierarchy.
When you import styles from another document, they will appear outside these designated "folders," making it easy to identify and manage them.
2. Naming and Structuring Your Styles: Adopting a Convention
Establishing a consistent naming convention is an art form that significantly improves document management. The following rules are a good starting point:
- Group Styles: Place all styles within a designated folder or use empty paragraph styles as group indicators.
- Start with "p_": Prefix paragraph style names with "p_" for clarity and consistency.
- Use Asterisks for Base Styles: Indicate primary styles, upon which others are based, with asterisks.
- Avoid Starting with Numbers: Style names should not begin with numbers, especially if you anticipate exporting to EPUB or HTML, as CSS styles have restrictions on starting with numerals.
The p_base_language style is a prime example of a foundational style. It might contain only essential text language and horizontal scale settings (typically 100%). This allows for quick control over hyphenation and spell-checking. The horizontal scale can also be used to estimate the space a new language might occupy in your layout. For instance, German text often requires about 140% of the space English text needs. By adjusting the horizontal scale of the base language text, you can visually adapt your layout (enlarging text boxes, inserting column breaks) before setting the text back to 100% and applying the correct language style.
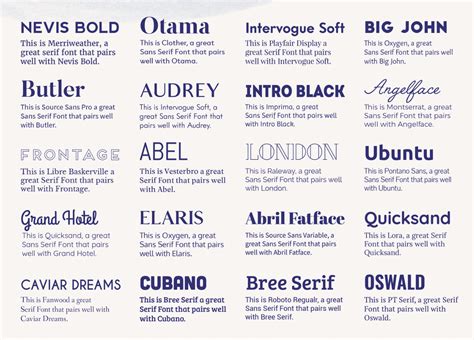
A common practice is to use one font family for headers and another for body text, a simple tip that enhances visual appeal. All header styles can be linked to a p_H1 style, and body text styles to a p_body style. This linkage allows for rapid experimentation with different font pairings to improve the overall layout.
Other Useful Styles Features
Next Style
The "Next Style" option within Paragraph Style Options is incredibly useful when typing text directly within InDesign. It allows you to define which paragraph style should be automatically applied when the user presses Enter or Return, creating a seamless flow between different types of text.
Drop Caps and Nested Styles
These two powerful features enable the automatic creation of sophisticated typographic effects. Drop caps, where the first letter of a paragraph is enlarged and descends into the text, and nested styles, which allow you to apply character formatting to specific words or phrases within a paragraph based on defined rules, can significantly enhance visual interest and readability.
How to add drop caps and 'nested' styles in Adobe InDesign CC
How Do I Copy Paragraph Styles in InDesign to Another Document?
Transferring paragraph styles between InDesign documents is a straightforward process:
- Open Paragraph Styles Panel: Access the Paragraph Styles Panel (
Window > Styles > Paragraph Styles). - Load Styles: Click the flyout menu icon (top-right corner) and select either "Load Paragraph Styles…" or "Load All Text Styles…" (which includes both paragraph and character styles).
- Choose Source Document: Navigate to and select the InDesign file from which you wish to copy the styles, then click "OK."
Importing Word Documents with Styles into InDesign
InDesign offers robust capabilities for importing text from Microsoft Word while preserving its associated text styles. This integration can save considerable time when migrating content. For detailed instructions on how to import and link Word files, refer to specific InDesign tutorials dedicated to this workflow.
Scripts for Paragraph Styles
The InDesign community has developed numerous scripts that can further enhance the management and application of styles. Exploring lists of top InDesign scripts often reveals sections dedicated to style-related utilities, which can automate complex tasks and offer advanced control over your style sheets.
By embracing Paragraph Styles, you unlock a more efficient, consistent, and professional approach to document design in InDesign. Their power lies not just in their immediate benefits but in how they encourage a structured and scalable workflow.