Krita, a powerful and widely-used open-source painting program, offers artists a versatile and affordable suite of tools. Among its many functionalities, rotating an image is a straightforward yet essential process. Whether you're looking to refine a composition, correct an orientation, or create specific visual effects, understanding how to rotate in Krita opens up new creative possibilities. This guide will delve into the various methods available, from rotating the entire canvas to transforming specific selections, ensuring you can achieve precise results for any project.
Preparing Your Workspace in Krita
Before you can begin rotating your image, you need to have it open within the Krita environment. If you are starting a new project from scratch, the process begins by launching Krita and navigating to the "File" menu on the main toolbar. From there, select "New" to open the "Create new document" window. This window allows you to customize your canvas dimensions, resolution, color space, and other essential parameters according to your project's requirements.
For those working with an existing image, the procedure is equally simple. Go to the "File" menu and choose "Open" to launch a previously saved file. Once your canvas is ready, either new or existing, you are prepared to explore the rotation tools.
Rotating the Entire Image: Precise Angle Control
Krita provides a direct method for rotating the entire image with predefined or custom angles. This is ideal for situations where the entire canvas needs to be reoriented.
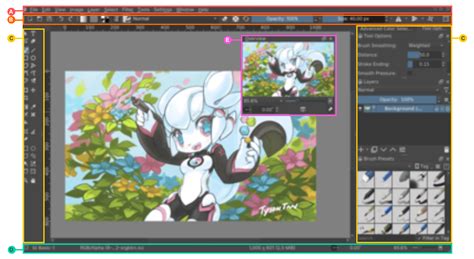
Accessing the Rotation Options: With your image open, locate the "Image" menu on the main toolbar. Click on it, then select "Rotate." A sub-menu will appear, offering "Rotate Image" as the primary option.
The Rotate Image Window: Selecting "Rotate Image" will bring up a dedicated window. Here, you'll find options to define the rotation orientation and angle. The "orientation" refers to the direction of the rotation.
Choosing the Rotation Angle: Krita offers several predefined rotation angles for convenience:
- 90 degrees: Rotates the image a quarter turn clockwise.
- 180 degrees: Flips the image upside down.
- 270 degrees: Rotates the image three-quarters of a turn clockwise (or a quarter turn counter-clockwise).
For more specific adjustments, the "Custom" option allows you to input any angle between 0 and 360 degrees. This provides granular control, enabling you to achieve precise orientations that fall outside the standard increments.
Confirming the Rotation: After inputting your desired angle, click "OK" to apply the transformation to your image. The entire canvas will then be rotated accordingly.
Interactive Canvas Rotation: Freehand and Incremental Adjustments
Beyond precise angle inputs, Krita also offers more dynamic and interactive ways to rotate your canvas, allowing for a more fluid workflow.
Freehand Rotation with Keyboard Shortcuts: For a freeform rotation, you can utilize a combination of keyboard shortcuts and mouse actions. Press and hold the
Shift + Spacekeys simultaneously. While holding these keys, click and drag your mouse on the canvas. This will allow you to rotate the image interactively in any direction you choose, offering an intuitive way to dial in the perfect orientation.Incremental Rotation with Number Keys: Krita also provides keyboard shortcuts for incremental canvas rotation, which are particularly useful for quick, minor adjustments.
- Pressing the
"4"key will rotate the canvas 15 degrees counter-clockwise. - Pressing the
"6"key will rotate the canvas 15 degrees clockwise.
- Pressing the
These incremental rotations are applied to the canvas view, not the image data itself, meaning they are non-destructive and easily reversible.
How To Rotate Canvas In Krita
Saving Your Rotated Artwork
Once you are satisfied with the rotation of your image, it's crucial to save your work. Krita offers flexibility in how you save your transformed file.
Accessing Save Options: Navigate to the "File" menu on the main toolbar and select "Save As."
Choosing Save Method:
- Overwrite Existing File: If you wish to replace the original image with the rotated version, use the existing file name. This action will overwrite the previous version.
- Save as New File: To preserve the original image and save the rotated version as a new file, simply change the file name before saving.
Selecting File Format: In the "Save As" dialog, you can also specify the desired file format for your artwork (e.g., PNG, JPG, KRA for Krita's native format).
By following these steps, you can effectively rotate your images in Krita and save your creations with confidence.
Transforming Specific Selections: Precision on a Smaller Scale
Krita's selection tools offer a powerful way to manipulate specific areas of your artwork without affecting the rest of the canvas. This is invaluable for editing individual elements within a complex composition. You can use this method to rotate a specific area or duplicate a selection and then turn it to mirror the area. This method can be used on any layer to selectively rotate objects.
Imagine a scenario where you have multiple mountain shapes on the same layer, and you need to rotate just one of them. Rotating the entire layer would affect all the mountains, which is not the desired outcome. This is where selection-based transformations shine.
Steps for Transforming a Selection:
Activate a Selection Tool: The first step is to activate one of Krita's selection tools. The choice of tool depends on the shape and nature of the area you wish to select. Krita offers a variety of selection tools, including:
- Rectangular Selection Tool: For creating perfect squares and rectangles.
- Elliptical Selection Tool: For selecting circles, ovals, and ellipses.
- Polygonal Selection Tool: For creating selections with straight edges by clicking to define vertices.
- Freehand Selection Tool (Lasso): For drawing a freehand selection outline.
- Contiguous Selection Tool (Magic Wand): For selecting areas of similar color.
- Select by Color Tool: Similar to the Magic Wand but selects all occurrences of a color across the entire image or layer.
Create Your Selection: Once you have activated the appropriate selection tool, carefully create your selection on the canvas by clicking and dragging or by defining points. The method for creating the selection will differ slightly depending on which tool you choose. Ensure you are happy with the selection. It's important to remember that everything inside the selection will be affected by the transformation, and if you deselect, the transformed area will be moved from the background.
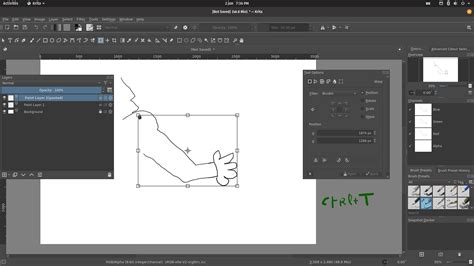
Activate the Transform Tool: With your selection in place, right-click (or Control + click on Mac) inside the selected area. A context menu will appear. Navigate to "Transform" and then select "Transform Tool." Alternatively, you can use the shortcut
Ctrl + T(Windows) orCmd + T(Mac).Transforming the Selection: Activating the Transform Tool will change the appearance of your selection. It will be enclosed by a transform box, often with handles around its perimeter. This may seem like the selection has disappeared, but it hasn't; it has simply been converted into an active transformable object. You will see a transform icon appear.
- Rotation: To rotate the selection, hover your mouse cursor slightly outside one of the corner handles of the transform box. The cursor will change into a curved arrow, indicating that rotation is possible. Click and drag to rotate the selection anti-clockwise or clockwise. You can drag up to rotate anti-clockwise or drag down to rotate clockwise.
The Transform Tool also allows for other manipulations like moving, scaling, and skewing the selection, providing a comprehensive suite of editing capabilities for targeted areas.
Committing the Transformation: Once you are satisfied with the rotated selection, you need to commit the transformation. This is typically done by pressing
Enteror by clicking the "Transform" button in the Tool Options docker if it's visible.Deselecting: After committing the transformation, you will likely want to remove the transform box and the selection outline. You can deselect the area by pressing
Shift + Ctrl + A(Windows) orShift + Command + A(Mac). This will return your canvas to its normal state, with the selected area now permanently transformed.
This method of transforming selections is incredibly powerful for making precise edits, correcting individual elements, or creating unique artistic effects within a larger piece of artwork. It allows for non-destructive editing of specific components, maintaining the integrity of the rest of your canvas.