Editing an image is an important part of the photography process, but if you are anything like me, you really don't have a lot of time to spend at your computer playing with your photos. Although using Lightroom is relatively quick and easy, there is a way you can save even MORE time by using helpers such as presets. A preset is simply an edit that has been "recorded" so that you can apply the same steps to any image you wish, with just one click of your mouse. This can save you a lot of time processing your images, as all you need to do is click on the preset and leave Lightroom to do the rest of the work, moving all the sliders for you. Sound good? It is! That's why this guide will go over everything you need to know about presets so you can put these to work for you and try to claw a little bit of time back into your life. This post will show you how to: use a Lightroom Preset, tweak a Lightroom Preset to get it to look the way you want it to, create your own time-saving Lightroom Presets, and install purchased or free Lightroom Presets.
Understanding Adobe Lightroom and Presets
Before diving into the specifics of presets, it's crucial to understand the software they operate within: Adobe Lightroom. Adobe Lightroom (LR) is a powerful image organization and editing software developed by Adobe, the same company behind Photoshop and Premiere Pro. It functions as an all-in-one solution for photographers, allowing them to import, organize, edit, and share digital images in various formats, including RAW, JPEG, and TIFF. Professionals widely use Lightroom to achieve the sophisticated edits seen in professional photography.
The core strength of Lightroom lies in its comprehensive editing functions. These capabilities enable manipulation of key image aspects such as exposure, white balance, HSL (Hue, Saturation, Luminance) colors, color grading, tone curve, presence/detail, and lens corrections. It even offers basic Photoshop-like editing features, including spot removal and filter/tone adjustments. A significant advantage of Lightroom is its ability to manage the entire workflow - from importing and organizing to editing and exporting - within a single system, promoting speed and consistency. Furthermore, Lightroom's editing process is non-destructive, meaning edits are automatically saved in the Lightroom catalog with their history, eliminating the need for constant manual saving.
Adobe offers two primary versions of Lightroom:
- Lightroom Classic CC: This is the more feature-rich, desktop-based version designed for professionals and serious enthusiasts. Its extensive capabilities require a powerful processor to function optimally. It includes advanced editing tools and customization options that cater to professional needs. Many prefer Lightroom Classic for its superior editing control and efficient file management, especially when dealing with large image libraries.
- Lightroom CC: This is a newer, cloud-based version with a simplified and intuitive interface, making it ideal for beginners or those who prioritize ease of use and cross-device syncing. Lightroom CC synchronizes seamlessly with Lightroom Mobile, offering a streamlined experience for editing on the go.
For users who primarily shoot and edit on their smartphones or travel frequently, Adobe Photoshop Lightroom Mobile is an excellent choice. This app is free and offers a robust set of editing tools comparable to its desktop counterparts, including sliders, filters, and more advanced features like shooting and editing RAW photos, color correction, gradient filters, and healing brushes. The main draw of Lightroom Mobile is its seamless integration with Lightroom Presets.
What Exactly Are Lightroom Presets?
Lightroom presets are essentially pre-recorded sets of editing instructions. Think of them as custom filters that apply a specific look or style to your photos with a single click. When you apply a preset, Lightroom executes a series of adjustments - like changes to exposure, contrast, saturation, color balance, and more - exactly as they were saved. This allows users to achieve professional-looking edits quickly and efficiently, often mimicking the distinctive styles of popular photographers and influencers.
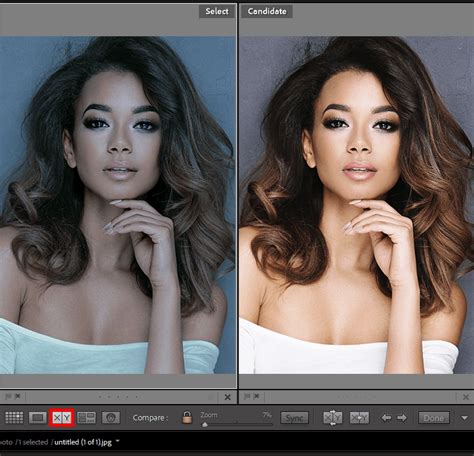
The appeal of presets has grown significantly as aspiring creators and everyday smartphone photographers seek to replicate the polished aesthetics they admire online. Whether you desire the vibrant blues of a Mediterranean landscape, the dramatic tones of a sunset, or the rich colors of a food photograph, presets can help you achieve these looks with minimal effort.
One of the most significant benefits of using Lightroom presets is their ability to create a consistent visual style across your entire portfolio or social media feed. By purchasing presets from creators whose style you admire or by developing your own, you can ensure a cohesive and professional presentation without needing to master complex editing techniques. Presets also dramatically speed up the batch editing process, allowing you to apply a consistent look to hundreds of photos in minutes.
Why You Need to Use Lightroom Presets
The advantages of incorporating Lightroom presets into your workflow are numerous, catering to both novice and experienced photographers.
Speed Up Your Workflow
Time is a valuable commodity in photography, and presets are a powerful tool for reclaiming it. Instead of painstakingly adjusting individual sliders for each photo, you can apply a preset with a single click. While minor tweaks to exposure, contrast, or color might still be necessary depending on the specific image and preset, the bulk of the editing work is done instantaneously. This is particularly beneficial when you have a large volume of photos to process, such as from a wedding, event, or extensive travel shoot. For instance, after selecting all the photos you wish to edit, you can use the "Sync" feature in Lightroom Classic to apply the same adjustments across them, drastically reducing editing time.
Create Consistency
Achieving a consistent visual style is crucial for building a recognizable brand or aesthetic, whether for a personal blog, Instagram feed, or professional portfolio. Presets provide a foolproof method for maintaining this consistency. By using the same preset or a curated set of presets across your images, you ensure that your entire body of work has a unified look and feel. This consistency makes your photos more appealing and professional, helping them stand out.
Achieve Professional Results
For beginners, learning the intricacies of photo editing can be daunting. Lightroom presets offer a shortcut to professional-quality results. They are often developed by experienced photographers who have honed their skills over years, encapsulating their unique editing styles. By using these presets, you can achieve polished, true-to-life color tones and balanced lighting that might otherwise require extensive training and practice.
Enhance Creativity and Experimentation
Presets aren't just about saving time; they also encourage creativity. They allow you to experiment with different moods and styles effortlessly. You can try out various presets to see how they transform an image, helping you discover new aesthetic directions for your photography. This experimentation can lead to unexpected and exciting creative outcomes.
How to Use a Lightroom Preset
Using a Lightroom preset is remarkably straightforward, designed for speed and ease of application.
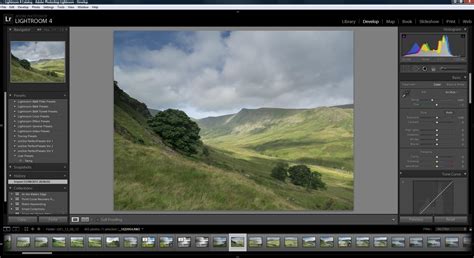
- Navigate to the Develop Module: Open Adobe Lightroom and select the image you wish to edit. Then, switch to the "Develop" module.
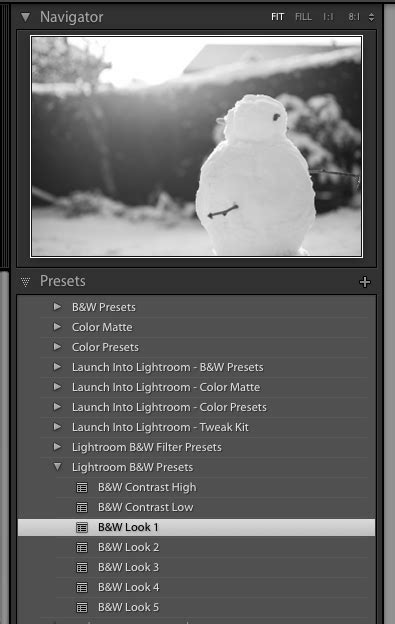
- Locate the Presets Panel: On the right-hand side of the Develop module, you'll find the "Navigator" panel. Click the small triangle next to "Presets" to expand it if it's not already open.
- Explore Preset Folders: Within the Presets panel, you'll see various preset folders, including those that come built-in with Lightroom. Click the triangle next to any folder to reveal the individual presets within it.
- Apply a Preset: Ensure your desired image is selected and visible in the central editing area. Then, simply click on any preset that catches your eye. Lightroom will immediately apply the recorded editing adjustments to your image.
- Preview Effects: A convenient feature is the ability to preview the effect of a preset without fully applying it. As you hover over a preset in the Navigator panel, a small preview of how it will look on your selected image will appear at the top of the Navigator panel. This allows you to browse through different looks and choose your preferred one.
Pro Tip: For optimal results with most "one-click" presets, it's advisable to start with images that have their white balance and exposure already corrected. While some presets are designed to adjust these parameters, many will work best when these fundamental settings are accurate, as they are unique to each image.
Tweak a Lightroom Preset to Perfection
While presets can deliver stunning results instantly, not every preset will be a perfect fit for every image. Sometimes, a preset might make your photo look worse, or it might be close but not quite what you envision. This is where tweaking comes in.
- Assess the Preset's Effect: After applying a preset, critically evaluate its impact. Does it enhance the image, or does it detract from it? If it's not quite right, don't be discouraged.
- Try Other Presets: Before diving into manual adjustments, cycle through other presets. Sometimes, a different preset might be a better starting point for your particular image.
- Make Minor Adjustments: If a preset is nearly perfect but needs a little something extra, or if you wish for a specific change, you can easily tweak it. For example, if you like a black and white conversion but desire more contrast, simply navigate to the "Basic" panel and adjust the contrast slider or deepen the blacks.
- Explore and Learn: If you're unsure about what a preset has done or how to adjust it, experiment! Go through all the editing panels on the right-hand side and observe the changes the preset has made. Try altering different sliders to see how they affect the image. This is an excellent way to learn what the preset is doing and simultaneously improve your understanding of Lightroom's editing tools.
Lightroom Workflow 2023: What Do These Sliders Do?
Tip: If you find a preset has negatively impacted your image and you want to revert to the original, unedited state, you can easily do so. Scroll to the bottom of the editing panels and click the "Reset" button.
Create Your Own Time-Saving Lightroom Presets
If you find yourself performing the same set of editing steps repeatedly, or if you've achieved a look you particularly love, consider creating your own custom Lightroom preset. This will allow you to apply that specific edit to other images with a single click.
- Start with an Unedited Image: Select a "straight out of camera" (SOOC) image that is unedited.
- Apply Your Desired Edits: Use the sliders and tools in the Develop Module to achieve the look you want. You can adjust all panels, including the Basic Panel, Tone Curve, Detail, and Lens Corrections.
- Save as a Preset: Once you're satisfied with the edits, navigate back to the Presets section in the Navigator panel on the left.
- "New Develop Preset" Dialog: Click the "+" icon and select "Create Preset." A dialog box titled "New Develop Preset" will appear, listing all the settings that can be saved.
- Select Settings to Save: You can choose which specific adjustments to include in your preset by checking or unchecking the boxes next to each setting. For instance, you might want to exclude "White Balance" and "Exposure" if you prefer to set those manually for each image.
- Name Your Preset: Give your preset a descriptive name so you can easily identify its purpose later.
- Choose a Folder: Select the folder where you want to save your preset. "User Presets" is the default and a good place for your custom creations.
- Create: Click "Create" to finalize your new preset. It will now appear in the "User Presets" folder within your Presets panel, ready to be applied to other images.
Installing Purchased or Free Lightroom Presets
While creating your own presets is rewarding, you might also want to use presets purchased online or those offered as free downloads. The installation process is generally straightforward.
For Desktop Lightroom (Lightroom Classic CC)
- Download Presets: Obtain your presets, which typically come as
.xmp,.dng, or.lrtemplatefiles. If they are in a.zipfile, extract them first. - Open Lightroom Classic: Launch Adobe Lightroom Classic.
- Access Presets Panel: Go to the Develop module and find the Presets panel in the Navigator.
- Import Presets: Click the "+" icon at the top right of the Presets panel and select "Import Presets."
- Locate and Select Files: A dialog box will appear. Navigate to where you saved your downloaded preset files, select them, and click "Import."
- Find Your Presets: Your newly installed presets will now appear in the Presets panel, usually under a folder named after the creator or the preset pack.
For Mobile Lightroom (Lightroom CC Mobile App)
Installing presets on the mobile app requires a slightly different approach, often involving importing them as DNG files.
- Download Presets to Your Phone: Ensure the preset files (often DNGs) are downloaded to your mobile device.
- Open Lightroom Mobile App: Launch the Lightroom app.
- Select an Image: Open any image in the app.
- Access Presets: Tap the Presets icon at the bottom of the screen.
- Import Presets: Tap the three vertical dots in the top right corner of the Presets screen and select "Import Presets."
- Locate DNG Files: Navigate through your phone's file system to find the downloaded DNG preset files. Select them.
- Confirm Import: Lightroom will import these DNG files as presets. They will then be available under the "Yours" tab in the Presets section. Repeat this process for each preset or collection you've downloaded.
Lightroom Workflow 2023: What Do These Sliders Do?
Note on DNG Presets: Some preset creators provide DNG files specifically for mobile use. When you open a DNG file in Lightroom Mobile, it functions as a photo with the preset's edits applied. You can then save these edits as a new preset.
Using Presets with Video
A common question is whether Lightroom presets can be used on video. The short answer is yes! While Lightroom is primarily an image editor, its presets can be applied to video clips, allowing you to create a cohesive visual style for both your photos and videos.
- Import Video into Lightroom: You can import video clips into Lightroom (both Classic and CC versions).
- Apply Presets: Navigate to the Develop module (or the editing section in Lightroom Mobile) and apply your desired presets to the video clips.
- Adjust as Needed: Similar to photos, you may need to make minor adjustments to exposure, color, or other parameters to fine-tune the look on the video.
- Export Video: Once edited, export the video clip.
A Quick Note on Phone Videos: If you're editing portrait-oriented phone videos (9x16 aspect ratio) in Lightroom, you'll need to rotate them to landscape (16x9) before importing them into Lightroom for editing, as the software typically handles landscape video more effectively.
Some users have reported occasional crashes or performance issues when applying presets to certain types of video clips (like iPhone cinematic video) on specific hardware. It's always worth trying, but be aware that compatibility can sometimes vary.
Key Considerations and Best Practices
- Shoot in RAW (for Desktop): For the most flexibility and highest quality when editing with presets on Lightroom Classic, shooting in RAW format is highly recommended. RAW files capture all the data from your camera's sensor, allowing for greater manipulation of exposure, highlights, and shadows without significant quality degradation. For mobile photography, where JPEGs are standard, presets might sometimes over-accentuate colors or contrast, but these can usually be fine-tuned.
- Understand Color Theory: While not essential, a basic understanding of color theory can elevate your editing. Knowing how complementary colors interact can help you choose presets or make adjustments that create visually appealing and harmonious images.
- Check Compatibility: Presets are typically designed for specific versions of Lightroom (Classic vs. CC) and work best with certain file types (RAW vs. JPEG). Ensure the presets you are using are compatible with your software and workflow. Some presets might be partially compatible, meaning not all settings can be applied to a particular photo.
- Batch Editing: When using presets for batch editing in Lightroom Classic, select all the photos you want to apply the preset to, then use the "Sync" feature. In Lightroom Mobile, you can edit one photo, then use the "Copy Settings" option to apply them to others.
- Manual Adjustments are Key: Presets are a starting point, not an endpoint. Always review the applied preset and make manual adjustments as needed to ensure the best possible result for each individual image. This includes fine-tuning exposure, white balance, contrast, and color.
- Selective Edits: For advanced control, consider using selective editing tools like gradient filters, radial filters, or the brush tool to make targeted adjustments to specific areas of your image after applying a preset. This allows you to enhance details, correct exposure in certain zones, or draw attention to your subject.
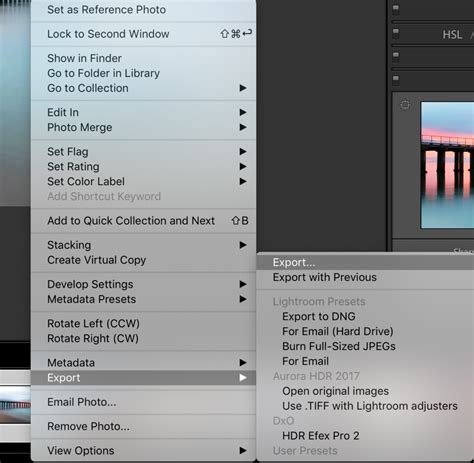
- Export Settings: When exporting your final images, consider the intended use. For platforms like Instagram, certain aspect ratios (e.g., 4:5) are optimal for maximizing visibility. Lightroom offers built-in export presets for common platforms.
By understanding and effectively utilizing Lightroom presets, you can significantly enhance your editing efficiency, achieve a consistent and professional aesthetic, and unlock new creative possibilities in your photography.