Creating a professional and visually impactful business card is a crucial step for any individual or company looking to make a strong first impression. Beyond the aesthetic design, understanding the technical requirements for printing and the art of presenting that design effectively through mockups are equally vital. This tutorial will guide you through the process of setting up your business card files for print-ready output in Adobe Photoshop, and then delve into the techniques for creating compelling business card mockups that showcase your work.
Setting Up Your Business Card for Print
The journey to a print-ready business card begins with meticulously setting up your document in Photoshop. This involves defining the correct dimensions, incorporating essential bleed and margin areas, and ensuring accurate color and resolution settings.
Creating a New Artboard and Defining Dimensions
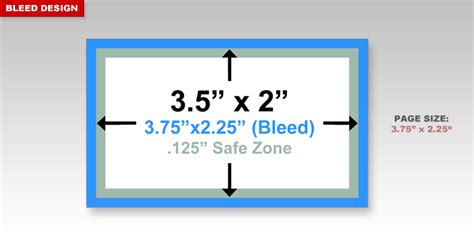
To initiate the process, navigate to File -> New from the menu at the top of your Photoshop interface. The dimensions for a standard business card, including the necessary bleed, should be set to 3.75 inches by 2.25 inches. This measurement is critical as it encompasses the 1/8 inch bleed on each edge, which is the area that will be trimmed off during the printing process.
Understanding Bleed and Critical Margins
The bleed area is the extended portion of your design that goes beyond the final trim line. It's an insurance policy against any slight inaccuracies in the cutting process, ensuring that no crucial elements of your design are inadvertently cropped. For business cards, a 1/8 inch bleed on each edge is standard.
Equally important is the critical margin, often referred to as the safe zone. This area is set 1/8 inch inward from the trim line. All vital information, such as text, logos, and other key design elements, must be kept within this critical margin. Failing to adhere to these parameters can result in important images or logos being cut off, compromising the integrity of your design.
Setting Resolution and Color Mode
For professional printing, it is imperative to ensure your document's resolution is set to 300 DPI (dots per inch). This high resolution guarantees that your design will appear sharp and clear when printed, avoiding pixelation or blurriness. Furthermore, the color mode should be set to CMYK. CMYK (Cyan, Magenta, Yellow, and Key/Black) is the color model used by most commercial printing presses, ensuring that the colors you see on your screen will translate accurately to the printed output. Working in RGB, which is standard for digital displays, can lead to significant color shifts when printed.
Establishing Guides for Precision
To effectively manage your bleed and critical margin areas, it's highly recommended to create guides within your Photoshop document. To create a new guide, click on the ruler area at the edge of your Photoshop artboard and drag a guide into the document. Repeat this process to establish guides for all four edges, marking your trim lines and critical margins precisely. Once the guides are all set, you are ready to start the design, remembering the parameters explained above to avoid any important image or logo being cut off.
Designing Your Business Card
With your print-ready canvas established, you can now focus on the creative aspects of your business card design. The goal is to create a design that is not only visually appealing but also effectively communicates your brand identity and essential contact information.
The Importance of a High-Quality Design
Preparing the design is an essential step in creating a professional-looking business card mockup. A high-quality design is crucial in creating an effective business card mockup. It’s essential to ensure that the design is visually appealing, easy to read, and represents the brand or company accurately. Keep it simple and clean. A cluttered design can overwhelm the viewer and dilute your message. Prioritize clarity and impact, ensuring that your brand's core message is immediately apparent.
Elements of an Effective Business Card Design
- Brand Consistency: Your business card should align with your overall brand identity, using consistent colors, fonts, and logos.
- Legibility: Choose fonts that are easy to read at a small size. Avoid overly decorative or thin fonts for essential text.
- Hierarchy: Guide the viewer's eye by establishing a clear hierarchy of information. Your name and company name should be prominent, followed by contact details.
- White Space: Don't be afraid of empty space. It helps to define and emphasize important elements, preventing the design from feeling cramped.
- Call to Action (Optional): Depending on your goals, you might include a subtle call to action, such as your website address or social media handle.
Saving Your Files for Print and Mockups
Once your design is complete, the next critical step is to save your file in the appropriate formats for both printing and creating mockups.
Saving Your Editable Photoshop File
Remember to save your file often while working to avoid losing your work unexpectedly. To save your work in an editable format, just click File -> Save As and select the .PSD extension from the dropdown menu. This is your Photoshop document file, which preserves all your layers, allowing you to easily modify your document or send it to a designer in case you ever need to make changes to your artwork.
Preparing Your File for Printing
Once you are happy with your design and have saved your editable PSD file, you can get the file ready for print. Click File -> Save As and this time, select the .TIF (Tagged Image File Format) extension from the dropdown menu. We recommend adding the word “PRINT” to the filename to distinguish it from your editable file. TIF is a widely accepted format for professional printing as it can preserve layers and is lossless, meaning no image quality is lost during compression. And there you go, we’ve got our business card files all set up and ready for print.
Creating Business Card Mockups
Business card mockups are an invaluable tool for designers and businesses alike. They provide a realistic preview of how a design will look in a physical context, aiding in client presentations, portfolio showcases, and even in visualizing the final product before printing.
Understanding Mockup Templates
A business card mockup essentially uses a pre-designed template, often a photograph of a business card in a specific setting, and allows you to replace the placeholder design with your own artwork. There are various ways to achieve this, from using dedicated mockup generator websites to creating your own mockups from scratch in Photoshop.
Using Online Mockup Generators
For a quick and often free solution, online mockup generators are an excellent choice.
- Visit a Mockup Website: To make a business card mockup, go to a platform like Mockey.ai or similar services. Sign up if required.
- Select a Template and Upload Your Design: Choose from a wide range of business card templates that suit your desired aesthetic and context. Upload your print-ready business card design file.
- Customize the Mockup: Most platforms allow you to customize the mockup further by changing the background color or image, adjusting the lighting, or even resizing your design within the template to ensure a perfect fit.
Creating Mockups in Photoshop Using Smart Objects
Photoshop offers a powerful and flexible way to create custom business card mockups, especially when using Smart Objects.
Method 1: Using a Pre-made Photoshop Mockup Template
Many designers offer free or premium Photoshop mockup templates that are specifically designed for business cards.
- Download a Mockup Template: Find and download a business card mockup PSD file. These often come with organized layers, including a layer specifically for placing your design.
- Open the Mockup File: Open the downloaded PSD file in Photoshop.
- Locate the Smart Object Layer: Within the Layers panel, you will typically find a layer group or a specific layer labeled something like "Your Design Here" or "Place Your Artwork." This is a Smart Object.
- Edit the Smart Object: Double-click on the "Smart Object Thumbnail" option on the right side of that layer. A new window or tab will pop up, showing the contents of the Smart Object. This is where you will place your business card design.
- Place Your Design: Drag and drop your business card design file into this Smart Object window. Resize and position your design as needed to fill the card area.
- Save the Smart Object: Click on the
Fileoption again and click on theSaveoption within the Smart Object's window. - Return to the Main Mockup: Now go back to your previous template by closing the Smart Object window or by navigating to it in the tab bar. You will be able to see that the image of the card has been converted into your design.
- Repeat for Double-Sided Cards: If your mockup is for a double-sided business card, follow the same process for the second card's Smart Object layer.
Method 2: Creating Your Own Mockup from Scratch
This method offers the most control and customization.
- Take Your Own Photos: First, you'll have to take a couple of pictures. Using a tripod, take a photo of an existing business card, or even just a piece of paper, from your desired angle. This will serve as your base layer. Without moving the camera, remove the business card and take another photograph of the surface or background. This second image will be used to create depth and context.
- Set Up Your Background: Open your background photograph in Photoshop. You can also use a solid color background or a texture.
- Add Your Business Card Layer: Place your business card design as a new layer on top of your background.
- Use Transform Tools: Use Photoshop's transform tools (Edit > Transform) to warp and distort your business card design to match the perspective and angle of your photograph. This is crucial for making the mockup look realistic.
- Apply Blending Modes and Adjustments: Experiment with blending modes (e.g., Multiply, Overlay) and adjustment layers (e.g., Curves, Brightness/Contrast) to integrate your design seamlessly with the background image.
- Add Depth and Realism: To enhance realism, you can add subtle shadows and highlights. Select your background desk top layer, and using the blur tool at a strength of about 50% with a soft brush, blur the top right and bottom left corners to simulate depth of field. You can also add subtle textures or noise to match the photographic quality.
How To Create Realistic Business Card Mockup In Photoshop
Customizing and Exporting Your Mockup
Once your design is placed within the mockup template, you can often further customize the overall presentation. This might involve adjusting the lighting, adding shadows, changing the background, or even adding other complementary design elements to create a more dynamic scene.
When you are satisfied with your mockup, it's important to save the file in a format that preserves the quality and intended use. For web use, exporting as a JPEG or PNG is common. For further editing or if you want to retain layers within the mockup file itself, save it as a PSD. To use your business card mockup in different contexts, you may need to export the file in various formats.
Conclusion: The Power of Professional Presentation
Mastering the creation of print-ready files and effective business card mockups in Photoshop empowers you to present your designs with professionalism and confidence. By meticulously setting up your documents with the correct bleed, margins, resolution, and color mode, you ensure that your physical business cards will be produced accurately. Subsequently, by leveraging the power of Photoshop's Smart Objects or utilizing online mockup generators, you can create compelling visual representations of your work that impress clients and elevate your brand's image. Business card mockups are designed to be user-friendly and easy to customize, even for beginners, making them an accessible tool for showcasing design skills to clients or for creating compelling visuals for marketing materials. Yes, you can use business card mockups for commercial purposes. Many designers use mockups to showcase their design skills to clients or to create physical business cards for their companies. With the various tools and techniques available in Photoshop, you can create a unique and customized mockup that stands out from the rest.