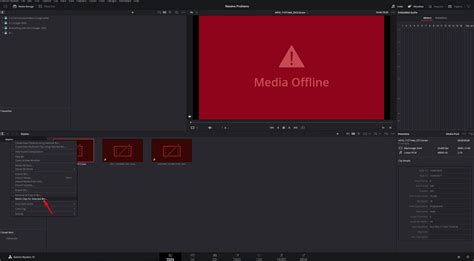
The "media offline" error in DaVinci Resolve is a common hurdle that can halt your editing workflow. This message signifies that DaVinci Resolve has lost its connection to the source media files required for your project. When this occurs, the affected clips will typically appear with a red bar and a question mark overlay in the timeline and preview window, preventing playback and editing. Understanding the underlying causes and implementing effective solutions is crucial for a smooth post-production experience.
Understanding the "Media Offline" Phenomenon
At its core, "media offline" means DaVinci Resolve cannot locate the original video and audio files that your project references. Unlike some other software that might create embedded copies, DaVinci Resolve maintains a direct link to the files on your storage. When this link is broken, the software cannot access the necessary data to display or play the media. This can manifest as black screens, silent audio, or simply a persistent "media offline" warning. The error is not indicative of a catastrophic system failure but rather a disconnect in file path referencing.
Common Causes and Their Solutions
The reasons behind the "media offline" error are varied, but many are rooted in file management and system configurations. Fortunately, most of these issues can be resolved with straightforward troubleshooting steps.
1. Moved, Renamed, or Deleted Source Files
The most frequent culprit behind "media offline" is a disruption in the file path DaVinci Resolve relies on. When you import media into your project, Resolve stores the exact location and name of each file. If these files are subsequently moved, renamed, or accidentally deleted from their original location on your computer or external drive, DaVinci Resolve will be unable to find them, leading to the offline status.
Solution:
The primary method to resolve this is by relinking the media.
- Open DaVinci Resolve and navigate to the Media Pool.
- Identify the offline clips. These will typically be marked with a red indicator.
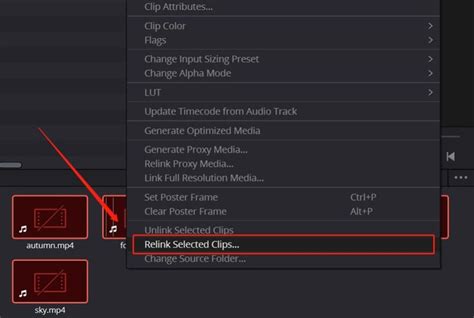
- Right-click on the offline media (or select multiple offline clips).
- Choose "Relink Selected Clips" from the context menu.
- A dialogue box will appear, prompting you to locate the new or correct location of your source files.
- Navigate to the folder where the media files are now stored, or where they were originally located if they were moved.
- Select the appropriate files and click "OK" to re-establish the connection.
- If you have a complex folder structure, DaVinci Resolve may prompt you to perform an advanced search to find other missing clips across multiple folders.
- Ensure all affected files are relinked and then check playback to confirm the issue is resolved.
To prevent this in the future, it is highly recommended to establish your project's folder structure and organize your media before importing it into DaVinci Resolve. Avoid moving, renaming, or deleting source files once they are part of your project. If you must rename a file, use the "Replace Video Clip" option within Resolve to manually relink it with its new name.
2. Unsupported File Formats and Codecs (Especially H.265/HEVC)
DaVinci Resolve, particularly the free version, can sometimes struggle with certain video codecs, most notably H.265 (also known as HEVC). Modern cameras and devices like the Fuji XT3, Fuji XT4, GoPro, and DJI Mavic often record in this highly compressed format to save space while maintaining high resolution and frame rates. When DaVinci Resolve cannot properly decode these files, they may appear offline, or playback might be erratic with flickering frames or missing visuals, even if the audio plays correctly. This issue is often more pronounced on Windows systems.
Solution for H.265/HEVC:
- Install the HEVC Video Extensions: For Windows users, the most common solution is to purchase and install the "HEVC Video Extensions" from the Microsoft Store. This is typically a low-cost purchase ($0.99).
- Restart your computer after installation.
- Open DaVinci Resolve and import your H.265 footage. The software should now be able to decode it correctly.
For DaVinci Resolve Studio users experiencing flickering frames or missing frames with H.265 footage, especially at higher frame rates (like 60 FPS from iPhones), the issue might be related to GPU acceleration.
Solution for Studio Version GPU Issues:
- Ensure you have the latest version of DaVinci Resolve Studio installed.
- Go to DaVinci Resolve > Preferences > System.
- Navigate to the "Memory and GPU" section.
- Under "GPU processing mode," try setting it to "Auto" instead of explicitly selecting CUDA or OpenCL. This allows Resolve to manage GPU resources more dynamically.
- In the "Preferences" menu, go to "Decode Options."
- Uncheck the option for "Decode H.264/H.265 using hardware acceleration." This forces Resolve to use CPU decoding, which can sometimes be more stable for problematic H.265 files.

3. Variable Frame Rate (VFR) Footage
Video editors, including DaVinci Resolve, generally perform best with Constant Frame Rate (CFR) footage. Variable Frame Rate (VFR) means the number of frames per second fluctuates throughout the video, often used by smartphones or screen recording software like OBS and NVIDIA ShadowPlay to save data. This inconsistency can lead to audio sync issues, stuttering playback, and sometimes "media offline" errors because Resolve struggles to maintain a stable timeline.
Solution for VFR Footage:
- Check the Frame Rate: Download and install a utility like "MediaInfo." Open your video file in MediaInfo to determine if it's using a Constant Frame Rate (CFR) or Variable Frame Rate (VFR) by looking for the "Frame rate mode" option.
- Transcode to CFR: If your footage is VFR, you will need to re-encode it into a CFR format.
- Download and install Handbrake, a free video transcoder.
- Open your VFR video file in Handbrake.
- Select a target Constant Frame Rate (e.g., 29.97 FPS for videos shot around 30 FPS, or 59.94 FPS for 60 FPS footage).
- Choose an appropriate output format (like MP4 with H.264 codec).
- Start the encoding process.
- Verify and Import: After re-encoding, use MediaInfo again to confirm the new file is indeed CFR. Some videos might still show slight variations, so you may need to experiment with slightly adjusted target frame rates. Once confirmed as CFR, import this new file into DaVinci Resolve.
4. Missing Clips After Deletion or Upload Errors
Occasionally, clips might disappear from your project simply because they were accidentally deleted from the media pool, or perhaps a full upload from an external source was not completed. This can happen if you mistakenly remove a folder collection or if a file was not fully transferred.
Solution:
- Identify the missing clip in your timeline.
- Right-click on the missing clip and select "Find in Media Pool." If Resolve does nothing, the clip might have been deleted from the Media Pool itself.
- If the clip is still in the Media Pool but offline, right-click and select "Relink Selected Clips" (as described in section 1).
- If the clip was deleted from the Media Pool, you will need to re-import the original file into DaVinci Resolve. Once re-imported, it should automatically reconnect to the timeline.
5. Database Corruption and Disk Permissions
While less common, issues with DaVinci Resolve's project database or incorrect disk permissions can also contribute to media going offline. A corrupted database might lead to various errors, including lost media references. Incorrect permissions can prevent DaVinci Resolve from reading or writing necessary files.
Solution:
- Database Management: DaVinci Resolve includes tools for managing its project database. Regularly backing up your projects is essential. You can also explore the database management utilities within Resolve to attempt repairs if corruption is suspected.
- Disk Permissions: Ensure that your media storage drives and working directories have the correct read and write permissions set for your user account. Incorrect permissions can hinder DaVinci Resolve's ability to access files, slowing down performance and potentially causing offline media errors.
6. Network Drives and Latency
Working with media stored on network drives can introduce latency and performance issues. The constant communication required over a network can lead to delays in accessing files, which DaVinci Resolve might interpret as the media being offline.
Solution:
For optimal performance and to minimize "media offline" errors, it is strongly recommended to store your active projects and media on local drives (internal SSDs or fast external drives connected directly via USB-C or Thunderbolt). If you must use network storage, ensure a robust and fast network connection.
7. GPU Issues and Driver Incompatibility
DaVinci Resolve is heavily reliant on the Graphics Processing Unit (GPU) for rendering and playback. Outdated or incompatible GPU drivers can lead to decoding errors and playback inconsistencies, sometimes manifesting as offline media.
Solution:
- Update GPU Drivers: Always ensure your GPU drivers are up to date. Visit the manufacturer's website (NVIDIA, AMD, Intel) to download the latest drivers for your specific graphics card.
- Hardware Acceleration Settings: As mentioned in the H.265 section, adjusting the "GPU processing mode" in DaVinci Resolve's preferences can sometimes resolve GPU-related playback issues.
Advanced Troubleshooting and Preventative Measures
When the standard solutions don't resolve the "media offline" error, or to proactively prevent it, consider these approaches:
Transcoding to Editing-Friendly Formats
Transcoding your media into formats optimized for editing can significantly improve performance and stability, thereby reducing the likelihood of offline errors.
- Highly Compressed (but demanding): Formats like H.264 or MPEG-4 offer good compression but require substantial computational power for decoding.
- Editing-Friendly (more space, better performance): For smoother editing and color grading, consider intermediate codecs like DNxHD (popular on Windows) or ProRes (standard on Mac). These codecs use more storage space but are designed for efficient playback and manipulation. Tools like FFmpeg can be used for command-line transcoding, while Handbrake can also export to these formats.

Using Proxies or Optimized Media
DaVinci Resolve offers features to create lower-resolution stand-ins for your high-resolution footage. These are known as Proxy Media or Optimized Media.
- How it works: When you generate proxies or optimized media, DaVinci Resolve creates smaller, easier-to-handle versions of your clips. During editing, Resolve automatically uses these proxies for smoother playback, especially on less powerful machines or with demanding 4K/8K footage.
- Exporting: When you render your final project, DaVinci Resolve automatically switches back to using the original high-resolution files, ensuring the final output quality is not compromised.
- Caution: If you are using proxies or optimized media, ensure these proxy files are also accessible. If the original files are offline, and you haven't generated proxies, you'll see the "media offline" error. If you have generated proxies, the timeline might appear fine, but your final render will be blank if the original media is not relinked.
Media Management Best Practices
The most effective way to combat "media offline" errors is through meticulous media management:
- Consistent File Naming: Use clear, descriptive, and consistent file names. Avoid special characters and spaces, which can sometimes cause issues.
- Organized Folder Structure: Create a logical and well-defined folder structure for your projects before you start importing media. Keep all related assets (video, audio, graphics) within this structure.
- Dedicated Drives: Use dedicated drives for your media and projects. For critical work, consider using fast SSDs or NVMe drives. Ensure external drives are properly formatted and reliably connected.
- Regular Backups: Implement a robust backup strategy. Use automated backup software to regularly copy your project files and media to separate storage locations.
Alternatives and Further Considerations
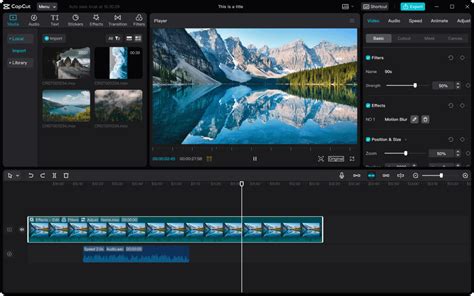
If you find yourself consistently struggling with DaVinci Resolve's media management, or if you're looking for a more streamlined offline editing solution, consider exploring other video editing software. Tools like the CapCut desktop video editor offer advanced AI capabilities and a user-friendly interface designed for efficient offline editing. CapCut provides a comprehensive suite of tools for editing, customization, and exporting, making it accessible for beginners while offering robust features for experienced editors.
In summary, the "media offline" error in DaVinci Resolve is primarily a linking issue. By understanding its common causesâsuch as moved files, unsupported codecs, VFR footage, or system configuration problemsâand applying the appropriate relinking, transcoding, or preference adjustments, you can effectively resolve this common editing obstacle and maintain a fluid workflow. Proactive media management remains the most powerful tool in preventing these disruptions altogether.