The persistent yellow cast in old photographs can be a frustrating obstacle, obscuring details and diminishing the vibrancy of cherished memories. Fortunately, Photoshop offers a powerful suite of tools to combat this common issue, enabling users to transform faded, yellowed images into bright, clear, and true-to-life representations. This tutorial delves into various Photoshop techniques, from fundamental adjustments to more advanced color manipulation, to guide you through the process of achieving a pristine white balance and restoring the original character of your images.
Understanding Color Casts and White Balance
Before diving into the practical application, it's essential to grasp the concept of color casts and their relationship to white balance. A color cast is an unwanted tint that overlays an entire image, making it appear to have too much of one color and not enough of another. This often occurs due to the lighting conditions under which the photograph was taken. For instance, tungsten lights, commonly found indoors, emit a warmer light, appearing more yellow than natural daylight. Conversely, fluorescent or LED lights can sometimes introduce a cooler, bluer tone.

Cameras have white balance settings (e.g., Daylight, Cloudy, Flash) designed to compensate for these varying light conditions. However, if these settings aren't precisely dialed in, or if the camera struggles to accurately interpret the light, the resulting photograph will exhibit a color cast, appearing warmer (more yellow) or cooler (more blue) than intended. Even if you don't have a RAW file, Photoshop's tools can still be remarkably effective in correcting these imbalances.
Foundational Color Correction Techniques in Photoshop
Photoshop provides several user-friendly tools for initial color correction, laying the groundwork for more intricate adjustments. These methods are excellent for quickly addressing general color casts and improving overall image tonality.
Levels Adjustment
The Levels tool is a cornerstone of tonal and color correction. It allows you to precisely adjust the shadows, highlights, and midtones of an image.
To access Levels, navigate to Image > Adjustments > Levels. You'll be presented with a histogram and three sliders: one for black (shadows), one for white (highlights), and one for gray (midtones). By dragging these sliders, you can deepen shadows, brighten highlights, and fine-tune the overall brightness and contrast. Crucially, Levels also offers eyedropper tools that enable you to set specific black, gray, and white points within your image. Clicking on an area that should be pure white or a neutral gray with the respective eyedropper can effectively neutralize a color cast.
Auto Color Correction
For a quick, one-click solution, Photoshop's Auto Color feature can be a lifesaver. Found under Image > Adjustments > Auto Color, this function automatically analyzes your photo and attempts to correct white balance and exposure issues, while also removing unwanted color tones. While it often produces a decent result, the automatic adjustments can sometimes be too aggressive. In such cases, you can reduce the impact of the auto-correction by lowering the opacity of the adjustment layer until the colors appear more natural.
Color Balance Tool
The Color Balance tool offers more granular control, allowing you to target specific color adjustments within the shadows, midtones, and highlights of your image. Access it via Image > Adjustments > Color Balance. You'll find sliders for Cyan/Red, Magenta/Green, and Yellow/Blue. By moving a slider towards a color, you add that color to the image; moving it away subtracts it. The values displayed above the sliders indicate the changes in the red, green, and blue channels, ranging from -100 to +100. This tool is particularly useful for subtly warming up or cooling down specific tonal ranges. For instance, if your image has a yellow cast, you might shift the Yellow/Blue slider towards Blue to counteract it.
Advanced Techniques for Precise Color Correction
When foundational tools aren't enough to eliminate a stubborn yellow cast, Photoshop's more advanced features offer the precision needed for professional-level results. These methods often involve working with individual color channels or using targeted sampling.
Curves Adjustment
The Curves tool provides even greater control over tonal and color adjustments than Levels. Accessible through Image > Adjustments > Curves, it presents a graph where the horizontal axis represents the input tones (from black to white) and the vertical axis represents the output tones. You can click on the line to create anchor points and drag them to precisely alter the brightness and contrast of specific tonal ranges.
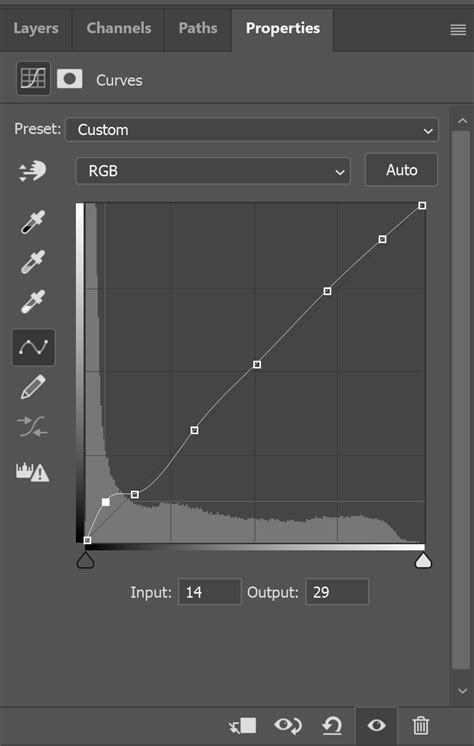
The real power of Curves for color correction lies in its ability to adjust individual color channels - Red, Green, and Blue (RGB). By selecting a specific channel from the dropdown menu, you can manipulate that color independently. For example, to remove a yellow cast, which is a combination of red and green, you might decrease the red channel or increase the blue channel in the relevant tonal areas.
Using Color Samplers and the Info Palette
A highly effective method for color correction, especially for old, yellowed photographs, involves using color samplers and the Info palette. This technique relies on identifying areas in the image that should be neutral (white, black, or gray) and then using Photoshop to bring their RGB values into alignment.
- Open the Info Palette: Go to
Window > Infoto display the Info palette. - Select the Color Sampler Tool: This tool shares a toolbar position with the Eyedropper. Choose the
3 x 3 Average Sampleoption for more stable readings. - Sample Neutral Points: Locate an area in your image that should be white or a light neutral gray. Click on it with the Color Sampler tool; a marker (e.g., "1") will appear. Repeat this process for another point that should be white, black, or a neutral gray, creating a second marker. You can add up to four markers.
- Analyze RGB Values: Observe the RGB values displayed in the Info palette for each sampled point. For a true white, the R, G, and B values should be very close, ideally around 245. For a true black, they should be near 15. For neutral grays, the values should be consistent across all three channels. If your image has a color cast, you'll notice significant discrepancies between the R, G, and B values at these points.
- Adjust Curves: Now, go to
Layer > New Adjustment Layer > Curvesand click OK. In the Curves dialog, select the Red channel from the dropdown. Ctrl + Click (or Cmd + Click on Mac) on the first point you marked in your image. This will place a point on the Curves graph corresponding to that sampled location. Identify whether you need to increase or decrease the Red value to bring it closer to the Green and Blue values (or vice versa, depending on the cast). Drag the point upwards to increase the value or downwards to decrease it. Repeat this process for the Green and Blue channels, and for your other sampled points, until the RGB values at each point are closely aligned.
This method provides a quantitative approach to color correction, removing guesswork and ensuring a more accurate restoration.
Selective Color Adjustment
The Selective Color tool is designed for fine-tuning specific color ranges within an image. You can access it via Layer > New Adjustment Layer > Selective Color. From the "Colors" dropdown menu, choose the color you wish to adjust (e.g., Yellows, Whites, Neutrals). Then, use the Cyan, Magenta, Yellow, and Black sliders to add or subtract these components from the selected color range. For instance, to reduce a yellow cast in the "Yellows" or "Neutrals" range, you would move the Yellow slider towards Cyan (subtracting yellow). The "Absolute" option adjusts colors based on their proximity to the selected color option, while the default "Relative" mode adjusts based on the percentage of the color.
Camera Raw Filter
Even if you're working with JPEG files, the Camera Raw filter (Filter > Camera Raw Filter) offers a comprehensive set of controls that rival those available for RAW files. In the "Basic" tab, you'll find sliders for white balance (Temperature and Tint) that are highly effective for removing color casts. The "HSL/Grayscale" tab allows for individual adjustments to the Hue, Saturation, and Luminance of specific color ranges, offering immense control over the image's color palette.
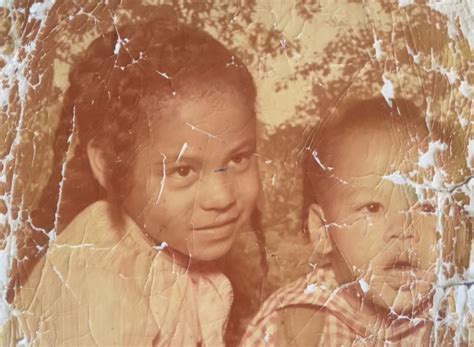
Addressing Severe Yellowing in Old Photographs
Old photographs often suffer from severe yellowing and fading due to the degradation of the photographic materials over time. While Photoshop can make significant improvements, extremely damaged images may require a multi-faceted approach.
One common strategy is to look for elements within the image that should have a known color or be neutral. For example, if a girl in an old photo is wearing white socks, you can use these as a reference point.
- Isolate the Area: Select the area of the white sock.
- Desaturate: Use the Hue/Saturation adjustment (
Image > Adjustments > Hue/Saturation) and drag the saturation slider all the way down to convert the color to a neutral shade of gray. - Set White Point: Now, with the white balance tools (such as the eyedroppers in Levels or Curves, or the Neutralize button in Camera Raw), click on the brightest pixel of what should be the white sock. This tells Photoshop that this point should be pure white.
- Refine: You may need to repeat this process for other neutral areas or use the color correction tools discussed earlier to further refine the image.
This method leverages known neutral points to guide the color correction process, making it easier to combat severe color casts.
Color Grading: Adding Artistic Flair Beyond Correction
While color correction focuses on restoring accurate, true-to-life colors, color grading is an artistic process that involves using color to evoke a specific mood, style, or emotion. It's about adding personality and a unique aesthetic to your images.
Photo Filter Adjustment
The Photo Filter adjustment layer (Layer > New Adjustment Layer > Photo Filter) mimics the effect of physical color filters used in traditional photography. It allows you to apply a hue adjustment to your image, simulating filters like Warming, Cooling, or Sepia. You can choose from presets or select a custom color. The "Density" slider controls the intensity of the filter, and the "Preserve Luminosity" option prevents changes to the image's brightness values while adjusting color.
Gradient Map
The Gradient Map adjustment layer (Layer > New Adjustment Layer > Gradient Map) is a powerful tool for creative recoloring. It maps the tones of your image to colors in a gradient. You can choose from presets or create your own custom gradients. By experimenting with different blending modes and opacities, you can achieve unique and artistic color effects.
Split Toning
Split toning involves applying different color tones to the highlights and shadows of an image, adding depth and stylistic flair. This can be achieved using the Color Balance tool by adjusting the sliders separately for shadows and highlights, or within the Camera Raw filter's "Color Grading" section.
Best Practices for Color Correction and Grading
To ensure the most effective and non-destructive workflow in Photoshop, several best practices should be followed:
- Always Use Adjustment Layers: Adjustment layers (
Layer > New Adjustment Layer) are non-destructive, meaning they don't permanently alter your original image data. This allows you to easily tweak, disable, or remove adjustments at any time without degrading the image quality. - Utilize Layer Masks: Layer masks allow you to selectively apply adjustments to specific areas of your image. This is invaluable for making localized color corrections or for blending different color grades seamlessly.
- Calibrate Your Monitor: For accurate color work, it's crucial to have your monitor calibrated. This ensures that the colors you see on your screen are representative of the actual colors and will appear consistently across different devices and in print.
- Maintain Consistency: When working on a series of photos, strive for a consistent color grade across all images. Tools like presets and saved LUTs (Look-Up Tables) are extremely helpful for achieving this uniformity.
Fix Yellow Skin Tone to Cool White in Photoshop (Step-by-Step Tutorial)
Mastering color correction and grading in Photoshop is a journey that combines technical skill with artistic vision. By understanding the underlying principles of color and light, and by becoming proficient with the diverse tools Photoshop offers, you can effectively restore faded images, remove unwanted color casts, and imbue your photographs with a desired mood and aesthetic. Experimentation is key; the more you practice and explore the capabilities of these tools, the more confidently you will be able to transform your images.