In the realm of photography and graphic design, the perfect shot is often a delicate balance of composition, subject, and background. However, reality doesn't always align with our creative vision. You might find yourself with a fantastic image where the backdrop is just a touch too small, or the composition could benefit from a little more breathing room. Fortunately, Adobe Photoshop CC offers a powerful suite of tools to seamlessly extend backgrounds, transforming potentially problematic shots into polished masterpieces. This comprehensive guide will delve into various techniques, from simple canvas stretching to sophisticated AI-powered fills, ensuring you can tackle any background extension challenge with confidence.
The "Why" Behind Background Extension
Before diving into the "how," it's crucial to understand the fundamental reasons why one might need to extend a background in Photoshop. These situations arise frequently in both professional and personal image editing workflows:
Altering Composition: Sometimes, the original framing of a photograph doesn't allow for optimal placement of the subject or the inclusion of additional elements. Extending the background provides the necessary space to reposition your subject, add new objects, or simply create a more visually appealing layout. This is particularly relevant when preparing images for specific design layouts, such as advertisements where a subject might need to be placed off-center.
Adjusting Aspect Ratios: Modern digital media demands flexibility in image dimensions. Whether it's for a social media post, a website banner, or a printed brochure, you often need to fit an image into a predefined format. Extending a background allows you to adapt your image to these specific aspect ratios without resorting to destructive cropping that might remove essential parts of the original photograph.
Rectifying Imperfections and Enhancing Cleanliness: Accidents happen. You might have unintentionally cropped out a portion of the background during capture or editing. Background extension can help recover these lost areas. Furthermore, it's an excellent method for removing distracting elements that creep into the edges of your frame, leading to a cleaner, more focused composition.
Method 1: The Canvas Size Adjustment - A Foundational Approach
One of the most straightforward methods for extending a background involves simply increasing the canvas size. This technique is particularly effective for images with relatively simple or uniform backgrounds, such as clear blue skies, solid color backdrops, or subtle gradients.
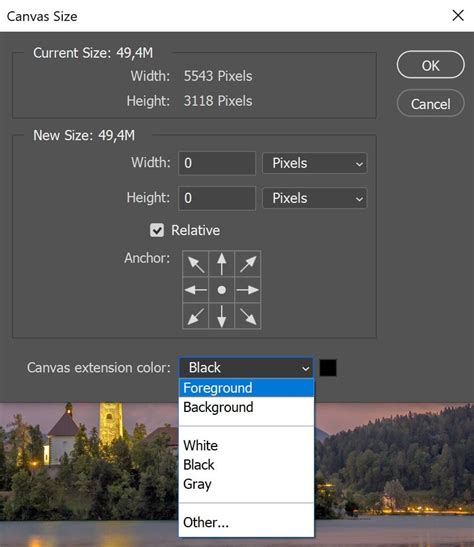
To begin, open your image file in Photoshop. The first step is to increase the canvas width (or height, depending on your needs). This can be achieved by navigating to Image > Canvas Size... in the top menu bar. Here, you can input the desired new dimensions for your canvas. For instance, if you need to add 1000 pixels to the width, you would enter this value. Crucially, ensure that the "Relative" option is unchecked if you are entering absolute values. When you increase the canvas size, you'll notice transparent areas appearing around your original image.
Once the canvas is extended, you'll need to fill these new transparent areas. For simple backgrounds, Photoshop can often do this automatically. If you've extended the canvas using the Image > Canvas Size... option, the newly added areas will be transparent. You can then use tools like the Content-Aware Fill or simply Edit > Fill with a color sampled from the existing background.
Alternatively, a more direct approach using the Crop Tool (shortcut C) can be employed. Select the Crop Tool, and then drag the handles on the bounding box outward to extend the canvas beyond the current background of the image. Crucially, ensure that "Delete Cropped Pixels" is unchecked in the options bar. After extending the canvas, Photoshop's Content-Aware feature, when selected in the Crop Tool's options, will intelligently analyze the surrounding pixels and attempt to fill the newly created space. Pressing Enter or clicking the checkmark confirms the crop and applies the content-aware fill.
Method 2: Content-Aware Scale - Intelligent Stretching
The Content-Aware Scale tool offers a more sophisticated way to extend backgrounds, particularly when you need to preserve the integrity of your subject while intelligently expanding the surrounding areas. This tool analyzes the content of your image and attempts to stretch or compress it in a way that minimizes distortion to important elements.
To utilize Content-Aware Scale:
- Open your image in Photoshop.
- Duplicate your layer (
Ctrl+JorCmd+Jon Mac) to preserve the original. - Select the
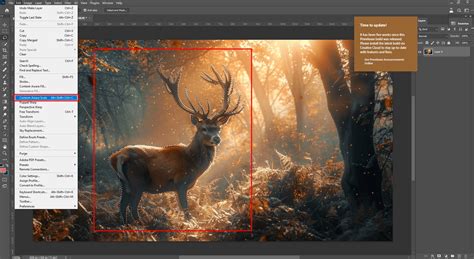
Crop Tool(C) and drag the handles outward to expand your canvas to the desired size. - Go to
Edit > Transform > Scale. Alternatively, you can activate theContent-Aware Scaledirectly viaEdit > Content-Aware Scale. - When using
Content-Aware Scale, you'll notice a "Protect" option in the toolbar above. This allows you to select specific areas, like your subject, that you want Photoshop to preserve from scaling. For instance, you can use theQuick Selection ToolorLasso Toolto select your subject, then go toSelect > Save Selectionto create a mask. Then, in theContent-Aware Scaleoptions, set the "Protect" dropdown to your saved selection. - With the
Content-Aware Scaleactive, you can now click and drag the handles of the bounding box to extend the canvas. Photoshop will intelligently fill the new space by stretching existing content. HoldingShift + Altwhile dragging a corner handle will extend the canvas proportionally from both sides. - Click the checkmark to apply the changes.
This method is especially effective for landscape images where elements like water, grass, or skies can be stretched more naturally. However, it's generally not recommended for images with busy backgrounds or portraits where significant distortion can occur.
Method 3: Content-Aware Fill - Precise Patching
The Content-Aware Fill feature is a powerful tool for intelligently filling selected areas based on the surrounding pixels. It's ideal when you've extended your canvas and need a more controlled way to fill the new space, especially when dealing with more complex backgrounds than a simple gradient.
Here's how to use Content-Aware Fill for background extension:
- Open your image and duplicate the layer.
- Use the
Crop Tool(C) to extend your canvas to the desired dimensions, creating transparent areas. - Select the
Rectangular Marquee Tool(M) orLasso Tool(L). - Draw a selection around the transparent area you want to fill. It's often beneficial to slightly overlap the selection with the existing image content to ensure a seamless blend.
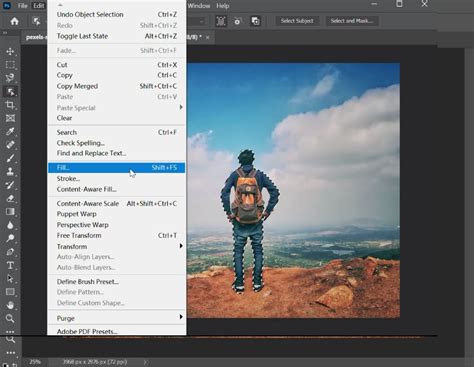
- Navigate to
Edit > Content-Aware Fill.... This will open a dedicated workspace. - On the left side of the
Content-Aware Fillworkspace, you'll see a preview of how Photoshop intends to fill the selected area. You can use the brush tool within this workspace to refine the sampling area, telling Photoshop which parts of the original image it should use for filling. For example, if the tool is sampling from an area that includes your subject's hair, you can "paint out" that area from the sampling region. - On the right side, you'll find
Output Settings. Choose where you want the filled content to be placed - either on a new layer (recommended for non-destructive editing) or directly onto the current layer. - Click
OKto apply theContent-Aware Fill.
This method provides a high degree of control, allowing you to guide Photoshop's AI to fill the extended background with elements that are consistent with the original image.
Method 4: The Clone Stamp Tool - Manual Precision
For situations requiring ultimate control or when automated tools produce unsatisfactory results, the Clone Stamp Tool (shortcut S) remains a reliable workhorse. This tool allows you to manually sample pixels from one part of an image and paint them onto another, effectively extending textures and patterns.
To extend a background using the Clone Stamp Tool:
- Open your image and duplicate the layer.
- Extend your canvas using the
Crop Tool(C) orImage > Canvas Size.... - Select the
Clone Stamp Tool(S). - Set the source point: Hold down the
Altkey (Windows) orOptionkey (Mac) and click on a clean area of the background that you want to replicate. This area will become your source. - Paint and clone: Release the
Alt/Optionkey and begin painting over the transparent or newly created area. As you paint, Photoshop will copy the pixels from your chosen source point. - Continuously resample: It's crucial to repeatedly set new source points as you paint to avoid creating obvious repeating patterns. Sample from different areas to ensure a natural and varied extension.
- Adjust the brush size, hardness, and opacity of the
Clone Stamp Toolto achieve a seamless blend with the existing background. A softer brush and lower opacity can help create smoother transitions.
While more time-consuming, the Clone Stamp Tool offers unparalleled precision, making it ideal for complex textures or when you need to meticulously match the lighting and color of the extended area.
Method 5: Generative Fill and Generative Expand - The AI Revolution
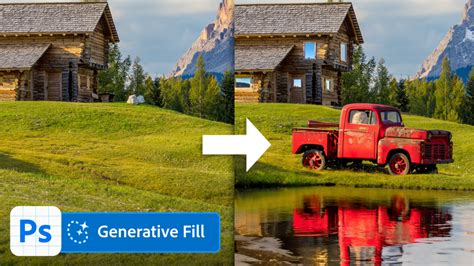
Adobe's introduction of AI-powered features like Generative Fill and Generative Expand has revolutionized background extension in Photoshop. These tools leverage artificial intelligence to create entirely new content based on your prompts or the surrounding image data, offering incredibly powerful and often stunning results, especially for complex backgrounds.
Using Generative Expand:
- Open your image in Photoshop.
- Activate the
Crop Tool(C). - Drag the handles of the crop bounding box outward to extend the canvas beyond your original image borders.
- In the options bar at the top, ensure that "Generative Expand" is selected. If you don't see this option, ensure you are using a recent version of Photoshop CC.
- You can optionally enter a text prompt in the
Contextual Task Barthat appears, describing the type of content you want to generate for the extended background (e.g., "grassy field," "cloudy sky," "urban cityscape"). If you leave the prompt box empty, Photoshop will analyze the existing image and generate content that it deems a natural extension. - Click the checkmark or press
Enterto initiate the generation process. Photoshop will then create new content in the expanded areas. - The results will appear in a new "Generative Layer" in your Layers panel, and you'll have several variations to choose from in the
Propertiespanel.
Using Generative Fill (for more targeted extension):
- Open your image and extend the canvas using the
Crop Tool(C). - Use a selection tool (like the
Rectangular Marquee Tool) to select the newly created transparent area. It's good practice to overlap the selection slightly with the existing image. - The
Contextual Task Barshould appear. Click onGenerative Fill. - Enter a text prompt describing the background you want to generate, or leave it blank for Photoshop to infer from the image.
- Click
Generate.
These AI tools are particularly adept at handling complex backgrounds with intricate details, multiple elements, and varied textures, often producing results that are difficult to achieve with traditional methods. They offer a significant advantage for portrait photography where a simple background extension might look unnatural.
Method 6: The Patch Tool - Targeted Texture Replacement
The Patch Tool (shortcut J), often found grouped with the Healing Brush Tool, is excellent for replacing textures while preserving color and tonality. It's a valuable tool for refining areas where automated methods might have introduced unwanted artifacts or when you need to blend a stretched section more naturally.
To use the Patch Tool for background extension refinement:
- Open your image and ensure you have a layer with your extended background.
- Select the
Patch Tool(J). - In the options bar, ensure "Content-Aware" is selected for the patch mode (this offers a more intelligent blend than "Normal").
- Draw a selection around the problematic area of the extended background that needs fixing. This could be a stretched texture, an artifact from a previous operation, or an area where the blend isn't quite right.
- Drag the selection to a clean, desirable area of the background that you want to use as a source for the patch.
- Release the mouse button. Photoshop will sample the texture from the source area and blend it into the selected area.
The Patch Tool is particularly useful for smoothing out repetitive patterns or replacing areas where the automated fill hasn't matched the original texture effectively.
Retouching and Refining Your Extended Background
After employing any of these background extension techniques, it's common to need some final retouching to ensure a seamless and professional look. The extended area might not perfectly match the color, brightness, contrast, or texture of the original background.
Blend Modes and Adjustment Layers
Inconsistencies in color, brightness, or contrast can often be corrected using adjustment layers.
- Levels and Curves: These adjustment layers allow you to precisely control the tonal range and contrast of the extended background. By applying them to the extended layer or a group containing it, you can match the overall brightness and contrast to the original image.
- Hue/Saturation: If the colors of the extended background are slightly off, a
Hue/Saturationadjustment layer can be used to fine-tune the color balance. - Blend Modes: Experiment with different blend modes for layers containing cloned or generated content. Modes like
Overlay,Soft Light, orColorcan help integrate the new pixels more harmoniously with the original image.
Brush Tools for Fine-Tuning
Photoshop offers a variety of brush tools that are invaluable for detailed retouching:
- Spot Healing Brush Tool (J): Excellent for quickly removing small blemishes, dust spots, or minor artifacts in the extended area. It automatically samples surrounding pixels for a seamless repair.
- Healing Brush Tool (J): Similar to the Spot Healing Brush, but requires you to manually set a source point (
Alt/Option+ click). This gives you more control over the texture, color, and lighting used for the repair, ensuring a perfect match. - Clone Stamp Tool (S): As discussed earlier, this tool is crucial for manually painting over inconsistencies, replicating textures, and blending edges where automated tools have fallen short.
- Soft Round Brush (B): Sometimes, a simple soft brush with a low opacity, using a color sampled from the original background, can be used to gently paint over edges or transitions to soften them and create a more natural blend.
Alternative Methods and Tools
While Photoshop's built-in tools are incredibly powerful, other options exist for background extension, particularly for those seeking simpler or faster solutions:
Third-Party Plugins
Add-ons like "Image Extend" can offer specialized functionality for extending images. These plugins often analyze the existing image content and intelligently fill the gaps with matching elements, sometimes with unique algorithms designed to minimize quality loss or blurring. Such plugins typically require installation and are accessed through Photoshop's Windows > Extensions menu.
Online AI Image Extenders
For users who are new to background extension or prefer not to delve into complex Photoshop techniques, numerous free online AI image extenders are available. Tools like Picsart, Fotor, and YouCam Online Editor offer user-friendly interfaces where you can upload an image, specify the desired extension, and have the AI generate the new content. These tools are often a great starting point for quick edits or for those who need to resize images without significant editing knowledge.
Frequently Asked Questions About Background Extension
Q: Can I undo extending my image background in Photoshop?A: Yes, absolutely. Photoshop provides robust undo capabilities. You can use Ctrl+Z (Cmd+Z on Mac) to step backward through your recent actions. For more extensive undo history, open the History panel (Window > History) which allows you to revert to any previous state of your document.
Q: How do I enlarge my image with Canvas size in Photoshop?A: To enlarge your canvas, navigate to Image > Canvas Size.... In the dialog box, enter your desired new dimensions for Width and Height. You can choose to have the canvas grow from the center or from a specific anchor point. Ensure the "Relative" option is unchecked if you are entering absolute values for the new size.
Q: How do I extend both sides of my Canvas in Photoshop at the same time?A: When using the Crop Tool (C), hold down the Alt (Windows) or Option (Mac) key while dragging one of the corner handles. This will extend the canvas outwards from the center, effectively expanding all sides proportionally. Similarly, when using Image > Canvas Size..., you can set the anchor point to the center, and then enter the new dimensions to expand equally on all sides.
Q: What if the extended background has lines where the colors don't match?A: This is a common issue. You can often fix these lines using the Spot Healing Brush Tool (J) or Clone Stamp Tool (S) with a soft brush and careful sampling. For more significant color mismatches, Hue/Saturation or Color Balance adjustment layers can be applied to the extended area to better match the original.
Q: How do I use Generative Expand?A: To use Generative Expand, activate the Crop Tool (C), extend the canvas beyond the image borders, and then click the Generative Expand button in the Contextual Task Bar. You can optionally add a text prompt describing the desired content. Photoshop will then generate new content for the expanded areas.
Change & Manipulate Backgrounds in Photoshop — From Beginner to Pro Results
By mastering these diverse techniques, you can confidently tackle any background extension task in Photoshop, ensuring your images are perfectly composed and ready for their intended purpose, whether for print or digital display.
tags: #photoshop #extend #background