For those venturing into the world of video editing, the initial steps often involve grasping the fundamentals and then attempting to create promotional videos for businesses or personal channels using DaVinci Resolve. However, the reality can be more demanding than anticipated, leading to hours spent editing and still yielding results that fall short of expectations. This is precisely where a subscription to Motion Array can prove invaluable. It unlocks access to an extensive collection of resources, including titles, transitions, motion graphics, stock footage, stock photos, music, and crucially, templates specifically designed for DaVinci Resolve, alongside other prominent video editing software. These templates serve as a vital bridge, connecting the skills of a beginner to the polish of an expert. While seasoned professionals meticulously craft these templates, users are primarily tasked with integrating their own media, music, and modifying the text. The convenience of sourcing all necessary components from a single platform, the Motion Array marketplace, ensures a professional-looking final product. For instance, if you manage a YouTube channel dedicated to promoting healthy sports, offering tips, exercises, and nutritious food choices, Motion Array templates can significantly simplify your online promotion efforts.
Importing and Setting Up Your DaVinci Resolve Template
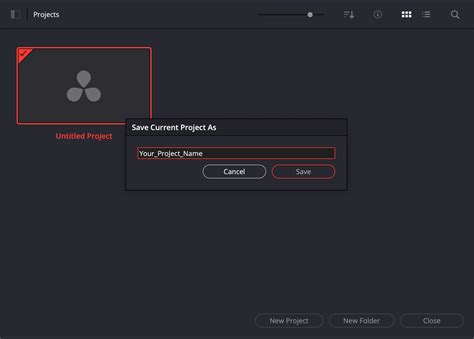
The process of utilizing a DaVinci Resolve template from Motion Array begins with a straightforward import procedure. After downloading a template, you'll typically need to extract its files and then copy the contents of the template folder to your editing drive. A crucial step often overlooked is installing any accompanying fonts, usually provided via a link within the template's files. Once these preliminary steps are completed, launch DaVinci Resolve. Navigate to the Project Manager, right-click anywhere within the interface, and select "Restore Project Archive." Browse to the template folder you extracted and select the file that ends with the .dra extension. This action will open the template as a new project within DaVinci Resolve.
Upon opening the template project, you'll find the media pool organized into several bins. These are commonly labeled as "Edit," "Final," and "Others," though the exact naming might vary depending on the specific template. The "Final" bin typically houses the complete, rendered timeline, offering a preview of the finished product. Meanwhile, the "Edit" bin contains placeholders for both media and text. Your primary task will be to replace these placeholders with your own content and adjust the text elements.
Integrating Your Media and Customizing Text
With the template project open, the next phase involves populating it with your chosen assets. Navigate to the "Media" page within DaVinci Resolve. Here, you'll import all your stock footage, music files, and any additional motion graphics clips, placing them under the "Master" bin.
The core of template customization lies in replacing the placeholder elements. Begin by opening all the timelines associated with the media placeholders. Within these timelines, you will drag and drop your stock footage or photos, arranging them in the desired sequence to match the template's flow. Once you have successfully placed your media, you can close these individual media placeholder timelines. The next step is to address the text placeholders. Open each text placeholder timeline and edit the generic text to convey your specific message.
Finally, to add an auditory dimension to your video, select a music track that complements the style and pace of your template. Import this music track into your main timeline, trim it to fit, and apply a fade-out effect at the end. For an added layer of visual sophistication, you can also incorporate additional motion graphics clips, similar to how you integrated your primary media.
Enhancing Your Promo Videos with Color Grading and Advanced Techniques
To illustrate the practical application of these templates, consider creating a promotional video for a hypothetical fashion brand named "Urban." The foundational steps of downloading, extracting, installing fonts, and restoring the project archive remain identical to the previous example. You'll again navigate through the "Edit," "Final," and "Others" bins, identifying the media and text placeholders.
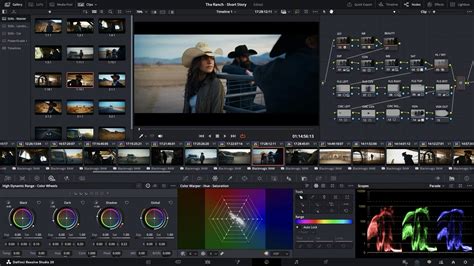
While the basic media and text replacement process is consistent, DaVinci Resolve offers powerful tools for further refinement. Color grading is one of its signature strengths, capable of imbuing your video with a cohesive and professional look. However, color grading can be a complex and time-consuming endeavor. A more accessible approach for many users is to leverage Look-Up Tables (LUTs). For this "Urban" fashion brand promo, we can utilize LUTs from a Motion Array pack, such as "Pastel Color Grades."
To apply these LUTs, you first need to install them. This involves copying the folder containing the LUTs to the appropriate directory on your computer. Within DaVinci Resolve, access the project settings and navigate to "Color Management." Click on the "Open LUT folder" button and paste the LUTs folder you copied earlier into this location. Close the window and then click "Update List" to ensure DaVinci Resolve recognizes the newly added LUTs.
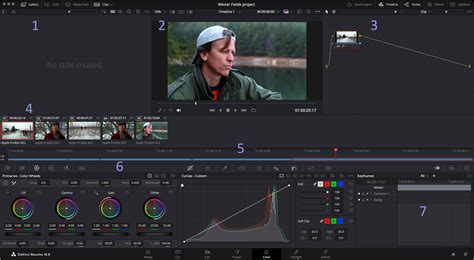
Now, reopen your media placeholder timelines. With the first media placeholder selected, switch to the "Color" page. In the LUTs panel, you will find your newly installed LUTs. Applying a LUT is as simple as dragging and dropping it onto the clip. This can dramatically alter the mood and aesthetic of your footage, providing a consistent visual style across your video.
Pro Tip: Just as LUTs offer an easy way to enhance visuals, DaVinci Resolve Macros can further streamline your workflow and add advanced effects with minimal effort.
How I Grade this Ad - MASTERCLASS (UK Broadcast PRO Colorist)
Troubleshooting Common Issues with DaVinci Resolve Templates
While Motion Array templates are designed for ease of use, encountering occasional issues is part of any software workflow. Understanding common pitfalls and their solutions can save considerable time and frustration.
One frequent concern arises when template projects have a different frame rate than your existing project. If you're attempting to import a project with a specific frame rate (e.g., 23.976 fps) into a template project with a different rate (e.g., 25 or 30 fps), the approach needs careful consideration. Directly importing a project into another project with a different frame rate can sometimes lead to complications, especially if Fusion elements are involved in the template.
A recommended method when facing frame rate discrepancies or other integration issues is to import projects in the opposite direction. If your template project has a different frame rate than your own established project, try importing your template project into your main project. This can help maintain the integrity of Fusion-integrated elements. When importing, pasting assets into a new timeline within your main project can help consolidate all the necessary materials into a single bin. However, if the goal is to match the template's frame rate, this method might require further adjustments.
To avoid potential conflicts and ensure a smooth editing experience, several best practices should be followed:
- Version Compatibility: DaVinci Resolve is constantly evolving, with new versions introducing features and sometimes making older ones redundant or incompatible. It is paramount to verify that the template you are using is designed for the specific version of DaVinci Resolve you have installed. Motion Array often provides filters to search for templates compatible with particular Resolve versions.
- Font Installation: Always ensure that all fonts required by the template are installed on your system before you begin editing. Missing fonts will result in incorrect text rendering or placeholder text appearing where your custom text should be.
- GPU Drivers: Outdated graphics processing unit (GPU) drivers can lead to performance issues and rendering errors. It is advisable to check for and install the latest drivers for your GPU.
- System Requirements: Confirm that your computer meets at least the minimum system requirements for DaVinci Resolve, especially concerning the resolution of the footage you intend to work with. Higher resolutions demand more processing power and memory.
- Render Cache Settings: For optimal performance, ensure that the "Render cache" is set to "User." This setting allows DaVinci Resolve to cache rendered portions of your timeline, speeding up playback and reducing rendering times.
- Placeholder Completeness: Make certain that you have added media to all designated placeholders, particularly the initial ones and any specific placeholder for a logo. Incomplete placeholders can disrupt the template's intended sequence and visual flow.
- Logo Transparency: When using logos, it is essential that they have a transparent background (e.g., in PNG format). This ensures that the logo integrates seamlessly into your video without an unsightly white or colored box around it.
- Text Rendering Issues: If text placeholders do not appear correctly or display as expected, try changing the font to an alternative from your system. This can often resolve rendering issues caused by font incompatibility or corruption.
The Efficiency and Creativity of Motion Array Templates
The process of editing videos and creating professional-looking promotional content from scratch using Motion Array templates is undeniably a game-changer. These templates are meticulously crafted by skilled video editors and are specifically optimized for DaVinci Resolve. Consequently, your role is simplified to adding your media into the designated placeholders, customizing the text, and incorporating a suitable music track.
The benefits extend beyond novice users; these templates are invaluable time-savers for busy video editors who require a professional aesthetic with remarkable speed. For instance, a second promo video, as demonstrated, can be assembled in as little as 22 minutes. This level of efficiency would typically consume hours for even experienced editors working from a blank canvas. DaVinci Resolve templates, therefore, represent a significant advancement in producing high-quality content quickly and affordably.
Exploring Diverse Template Categories on Motion Array
Motion Array offers a vast and diverse library of templates catering to a wide array of video production needs. Beyond the general DaVinci Resolve templates, the platform features specialized categories designed to enhance specific types of video content.
For those focusing on social media engagement, Motion Array provides a dedicated collection of templates optimized for platforms like Instagram, TikTok, and Facebook. These templates often feature dynamic text animations, eye-catching transitions, and aspect ratios suitable for vertical or square video formats.
Social Media Template Pack: This comprehensive collection is specifically curated for social media video production. Its templates boast modern and trendy designs, ensuring your content stands out in crowded feeds.
For creating impactful intros and titles, Motion Array offers a variety of options:
Blueprints Graphics Intro: This captivating Premiere Pro template infuses a tech-savvy and futuristic essence into video intros. Utilizing dynamic blueprint-inspired animations, it provides a visually stunning method for introducing your content.
Color Bold Title: Designed to command attention and inject vibrancy into your videos, this After Effects template presents a range of striking title animations. It's perfect for making a bold statement and ensuring your message is seen.
Urban Intro: This template is engineered to deliver a dynamic and energetic introduction to your videos. With its urban-inspired aesthetic and fast-paced transitions, it's ideal for imbuing your content with a sense of excitement and movement.
Transitions are another area where Motion Array excels, offering creative and unique options to smooth the flow between scenes:
Premiere Pro Transition Template: This template introduces a distinctive artistic flair to your video edits within Premiere Pro. It provides access to a creative selection of hand-drawn transitions that seamlessly blend scenes, adding an organic and highly visual touch to your content.
After Effects Template (Playful and Whimsical): This unique template adds a playful and whimsical touch to your videos by artfully blending real-world elements with digital effects, creating a magical and engaging viewing experience.
After Effects Template (Multiple Screens): Featuring a seamless display of multiple screens, this template adds a touch of elegance and modernity to your video projects, perfect for showcasing various content simultaneously.
After Effects Template (Sleek and Polished): This sleek and polished template is perfectly suited for showcasing images, videos, or text. It incorporates stylish transitions and elegant animations, lending a professional flair to your projects.
For sophisticated text animations and logo reveals, the platform also offers specialized templates:
Premiere Pro Template (Cinematic Text Animations): With its elegant and cinematic text animations, this template is ideal for crafting impactful intros, trailers, and credits, adding a touch of Hollywood polish to your productions.
Premiere Pro Template (Elegant Logo Animation): This sophisticated template adds an elegant twist to logo animations. Employing a paper-folding animation style, it beautifully unveils your logo with a touch of class and refinement.
The emphasis across Motion Array's offerings is on user-friendliness and accessibility. The introduction of new filters on the Motion Array platform further simplifies the process of finding the most straightforward templates. These easy-to-edit templates are invariably accompanied by detailed tutorials, are ready for immediate import into your editor, and empower you to transform your video with just a few quick customizations. This means you can select a simple-to-edit template, access all the necessary instructions, and commence creating your projects faster than ever before. The overarching goal is to make the creation of professional-quality video content more accessible and efficient for a broad range of users, from beginners to seasoned professionals.