Changing the color of images in Photoshop is a straightforward process, offering a quick and efficient way to adapt existing visuals for new purposes. This handy trick can save considerable time, eliminating the need to recreate graphics or purchase new assets when a different hue is desired. This is particularly useful when working with clip art or other digital art derived from hand-drawn images, where vector files are often unavailable. While vector graphics offer greater flexibility for color manipulation, raster images, such as PNGs, can be effectively modified using Photoshop's powerful tools. This tutorial will guide you through several methods for changing the color of PNG files in Photoshop, from simple adjustments to more nuanced control.
The Hue/Saturation Adjustment Layer: A Primary Method
One of the most common and effective methods for altering the color of a PNG in Photoshop is by utilizing the Hue/Saturation adjustment layer. This approach is non-destructive, meaning your original image data remains intact, allowing for easy revisions.
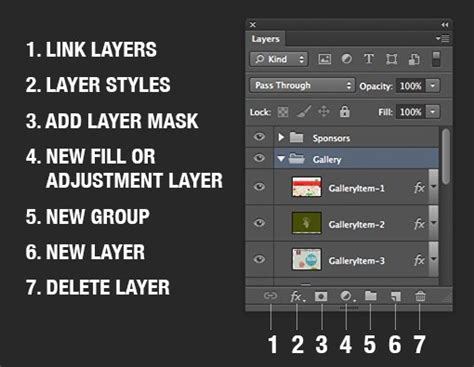
To begin, open your PNG file in Photoshop by navigating to File > Open. If your file contains multiple layers, it is crucial to select the specific layer whose color you wish to modify. In the Layers Panel, locate the black and white circle icon at the bottom. Clicking this icon reveals a list of image adjustment options. From this menu, select "Hue/Saturation."
Upon selecting Hue/Saturation, a new adjustment layer will be created above your selected layer in the Layers Panel, and a Properties box will appear. This box contains sliders for Hue, Saturation, and Lightness. By moving the "Hue" slider, you can cycle through the entire spectrum of colors. The "Saturation" slider controls the intensity of the color, ranging from vibrant to grayscale. The "Lightness" slider adjusts the overall brightness of the color. Experiment with these sliders until you achieve the desired color. For instance, if you have a pink background and wish to change it to blue, you would typically move the Hue slider to the left.
Once you are satisfied with the color change, you can save your file in your preferred format. This method is highly versatile and works across various file formats, including PSD, JPG, and PNG.
Understanding Color Components: Hue, Saturation, and Lightness
To effectively manipulate colors in Photoshop, it's beneficial to understand the fundamental components that constitute color: Hue, Saturation, and Lightness (often referred to as HSL).
- Hue: This refers to the pure color itself - the primary colors like red, green, blue, yellow, and so on. When you adjust the Hue slider in Photoshop, you are essentially changing the color's position on the color wheel.
- Saturation: This determines the intensity or purity of the color. A highly saturated color is vivid and pure, while a desaturated color appears muted or closer to gray. The Saturation slider allows you to control how much gray is mixed into the color.
- Lightness: This controls the overall brightness or darkness of the color. A high lightness value results in lighter tints, approaching white, while a low lightness value leads to darker shades, approaching black.
Understanding these three elements provides a framework for making precise and intentional color adjustments.
Master NEW Hue/Saturation Start to Finish in Photoshop!
Alternative Color Replacement Techniques
While the Hue/Saturation adjustment layer is a popular choice, Photoshop offers other powerful tools for color modification, each suited for different scenarios.
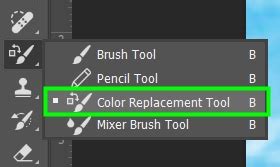
The Color Replacement Tool
For more targeted color changes, the Color Replacement tool can be invaluable. To access this tool, click and hold the Brush tool in the toolbar; the Color Replacement tool is typically found within this group. This tool allows you to "paint" over existing colors with a new one.
When using the Color Replacement tool, you can define the color you want to replace and the new color you want to apply. You can set the sampling method to "Once" to sample the color only when you first click, or "Continuous" to continuously sample the color as you drag. The "Limits" option allows you to choose whether to replace colors within the "Contiguous" pixels you are painting over, or all pixels within the selection that match the sampled color. The "Tolerance" slider is crucial here; it determines how closely Photoshop matches the sampled color. A higher tolerance will replace a wider range of similar colors, while a lower tolerance will be more precise.
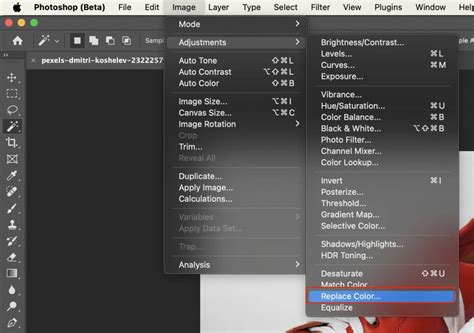
Image > Adjustments > Replace Color
Another direct method for global color replacement is found under the Image > Adjustments > Replace Color menu. This command allows you to select a specific color range within your image and replace it with a new color.
When you select Image > Adjustments > Replace Color, a dialog box appears. You'll use the eyedropper tool within this dialog to click on the color you wish to replace in your image. The "Fuzziness" slider (similar to tolerance in the Color Replacement tool) controls the range of similar colors that will be selected. After defining the color to be replaced, you can then use the "Hue," "Saturation," and "Lightness" sliders in the dialog box to specify the new color. This method is effective for changing a dominant color across an entire image or a selected area.
Using Selections with Adjustment Layers
For the most precise control, especially when you need to change the color of a specific object or area without affecting the rest of the image, combining selection tools with adjustment layers is the professional approach.
- Make a Selection: Employ Photoshop's selection tools, such as the Quick Selection Tool, Magic Wand Tool, Lasso Tool, or Pen Tool, to carefully isolate the area you want to recolor. The Pen Tool offers the most precise selections for complex shapes.
- Create an Adjustment Layer: With your selection active, create a Hue/Saturation adjustment layer (as described earlier). Photoshop will automatically create a layer mask based on your active selection. This mask ensures that the Hue/Saturation adjustment only affects the pixels within the selected area.
- Adjust Colors: Now, use the Hue/Saturation sliders in the Properties panel to modify the color of the masked area. You can refine the layer mask by painting on it with black or white to add or subtract from the selection, further fine-tuning the affected area.
This method provides non-destructive editing and allows for granular control over color changes, making it ideal for complex designs and professional workflows.
Browser-Based PNG Color Replacers: Online Solutions
For users who may not have Photoshop or prefer a quick, online solution, browser-based utilities offer a convenient alternative. These tools are designed to replace any color in a PNG image with a new one.
These online PNG color replacers function by allowing you to upload your image and then specify the color to be replaced and the new color. You can often input the color using a color name, a hexadecimal (hex) code, or an RGB function. Many also provide an eyedropper tool to select the color directly from the uploaded image.
A key feature of these utilities is the "similar color match" option. When set to a value greater than 0%, not only the exact specified color but also its shades and tones are replaced. This is useful for handling gradients or variations in the original color.
To maintain the visual integrity of the image, options like "Preserve Color Shades" are often available. This feature attempts to retain the original lightness of the pixels, ensuring that tints, shadows, and gradients are preserved in the output PNG. Additionally, an "edge smoothing" option can help to blend the edges between the old and new colors, creating a more seamless transition and eliminating any residual pixels from the original color. A "preview mask" option is also helpful, as it visually highlights exactly which colors in the input PNG were matched and replaced.
Considerations for Online Tools
While convenient, it's important to note that the precision and quality of color replacement can vary between different online tools. For critical projects requiring exact color matching and high-fidelity results, desktop software like Photoshop generally offers superior control and a wider array of advanced features. However, for quick edits or when working with simpler graphics, these browser-based solutions can be very effective.
Beyond Hue/Saturation: Other Photoshop Color Adjustments
Photoshop offers a comprehensive suite of tools for color manipulation, extending beyond the Hue/Saturation adjustment.
The Sponge Tool
For localized adjustments to color intensity, the Sponge tool can be employed. This tool allows you to either "desaturate" (remove color) or "saturate" (increase color) specific areas of an image. You can select the mode (Desaturate or Saturate) and adjust the flow rate to control the intensity of the effect. This is useful for subtly enhancing or muting colors within a particular object.
Layer Comps and Batch Processing
For users working with multiple images or complex projects, Photoshop provides features for efficiency.
- Layer Comps: If you are working with a PSD file and need to explore various color schemes for the same graphic, Layer Comps can save different states of your layers, including color adjustments. This allows you to quickly switch between different color variations without duplicating the entire file.
- Batch Processing: For changing colors across a large number of images simultaneously, Photoshop's Batch Processing (found under
File > Automate > Batch) is indispensable. You can create an Action that performs a series of color adjustment steps (e.g., opening a file, applying a Hue/Saturation adjustment, saving the file) and then run this Action on an entire folder of images. This automates repetitive tasks and ensures consistency across multiple files.
Working with Color Modes and File Formats
Understanding Photoshop's color modes and how they interact with file formats like PNG is also important.
- Color Modes: Photoshop primarily works with different color modes, such as RGB (Red, Green, Blue) for digital displays and CMYK (Cyan, Magenta, Yellow, Key/Black) for print. PNG files typically use RGB. If you encounter a PNG that seems to have limited color options, it might be in an Indexed Color mode. You can convert this to RGB by going to
Image > Mode > RGB Color. - Saving for Web: When saving PNGs, especially for web use, consider using
File > Export > Save for Web (Legacy). This dialog box offers optimized settings for PNG compression, transparency, and color reduction, which can help manage file size while maintaining visual quality.
Considerations for Non-Photoshop Users
For those who find Photoshop to be too expensive or complex for their needs, alternative image editing software offers similar functionalities.
- GIMP: A powerful, free, and open-source image editor, GIMP provides a wide range of tools for color manipulation, including hue/saturation adjustments and color replacement features.
- Acorn (Mac Only): Acorn is a more affordable, Mac-exclusive image editor that offers many of Photoshop's core features, including robust color editing options, support for various file formats like PNG and SVG, and tools for color selection via RGB, hex codes, or a color grabber.
- Paint.NET: This free Windows-based image editor also provides color adjustment tools, though some users find its hue adjustments less precise compared to Photoshop or Acorn, often requiring more guesswork with sliders.
Regardless of the software used, the fundamental principles of color manipulation-understanding hue, saturation, and lightness, and employing selection techniques-remain consistent. By mastering these techniques, you can effectively change the color of PNG images to meet your creative and practical requirements.