Procreate offers a vast landscape for digital artists to explore, and at the heart of this creative environment lie its brushes. Beyond the pre-installed options, the ability to craft entirely unique brush strokes unlocks a near-limitless potential for artistic expression. This tutorial delves into the intricate world of Procreate brush creation and customization, from combining existing brushes to fine-tuning every aspect of a brush's behavior. Whether you're a beginner looking to understand the fundamentals or an experienced artist seeking to expand your toolkit, this guide will equip you with the knowledge to design your perfect Procreate brushes.
The Power of Dual Brushes: Combining for Unique Effects
One of the most exciting ways to generate novel brushstroke effects in Procreate is by combining two individual brushes. This feature allows for the creation of complex textures and dynamic strokes that would be difficult to achieve with a single brush.
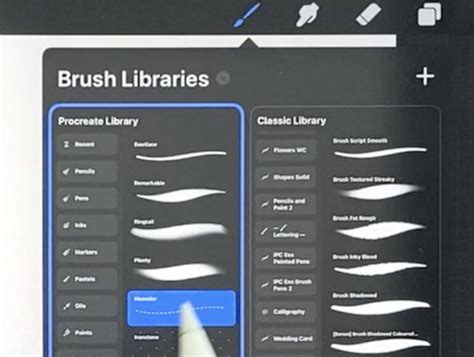
To begin combining brushes, navigate to the Brush Library by tapping the Paint, Smudge, or Erase button. For two brushes to be combinable, they must reside within the same brush set. It's important to note that you can only combine single brushes; pre-existing Dual Brushes cannot be further combined.
The process involves selecting a "Primary" brush first. Tap on the desired brush, and it will be highlighted in bright blue, indicating its selection as the Primary. Next, swipe through the brush library to select a "Secondary" brush. This brush will then appear in dark blue. Once both a Primary and Secondary brush are selected, the word "Combine" will materialize at the top right of the brush library. Your newly created Dual Brush will inherit the name of the Primary brush.
Tapping on your new Dual Brush will open the Brush Studio, where you can meticulously edit the settings of each individual brush independently. To edit a specific brush within the pair, simply tap on it, and a blue line will appear beside it, signifying its active selection for editing.
A crucial element in customizing Dual Brushes is the "Combine Mode." Experimenting with different Combine Modes can lead to fascinating and unexpected visual mixes. To access these modes, tap your Dual Brush to enter the Brush Studio. At the top left of the Brush Studio interface, you'll see a preview of the two brushes that constitute your Dual Brush. By default, the Combine Mode is set to "Normal." Tapping on any of the available Combine Modes will instantly update the preview on the Drawing Pad, allowing you to see the results live.
Crafting Your Own Brushes from Scratch: The Brush Studio Essentials
For those who wish to create entirely unique custom brushes in Procreate, the Brush Studio is your ultimate creative hub. To begin, enter the Brush menu (also known as the Brush Library) by tapping on the Brush tool. From there, select the plus sign (+) located in the top-right corner of the menu. This action will create a new brush, initially named "Untitled Brush," which you can then customize within the Brush settings menu, also referred to as the Brush Studio.
Understanding Procreate's diverse brush settings is paramount to creating your perfect custom brush. Let's explore the key areas:
Stroke Path: Defining the Brush's Movement and Spacing
The "Stroke Path" menu governs how individual brush elements are laid out along a stroke.
- Spacing: This setting dictates the distance between each individual shape that forms your overall brush stroke. Adjusting the Spacing slider will determine whether your brush strokes appear as a smooth, continuous line or as a series of distinct, spaced-out shapes. When Spacing is increased, you'll observe each component shape of your brush becoming more separated.
- Jitter: Similar to Spacing, Jitter also affects the distribution of shapes within your brush stroke, introducing a degree of randomness to their placement.
- Fall Off: The amount of "Fall Off" applied to your brush influences the length and tapering of your brush strokes.
- StreamLine: This crucial setting refers to your brush's line stabilization. It's particularly important for achieving smooth, consistent lines, especially for lettering and drawing.
Shape: The Foundation of Your Brush
The "Shape" menu defines the fundamental form or texture that constitutes your brush.
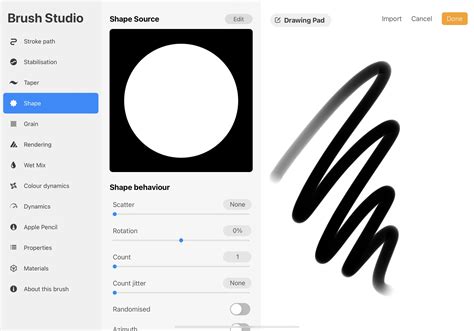
- Shape Source: This is the foundational shape for your entire brush. For many basic brushes, this might be a simple circle, oval, or square. However, you can import custom shapes to create highly specific brush effects.
- Scatter: This setting controls whether the brush shape moves in a continuous line along the stroke or scatters around the stroke path, adding a textured or dynamic quality.
- Shape Filtering: When working with tools, you have three options for shape filtering: Non, Classic, and Improved. These options affect how the edges of your brush shape are rendered.
Grain: Adding Texture and Realism
"Grain" is essentially the texture applied to the shape of your brush, allowing you to mimic the look of various traditional art mediums.
- Movement: The Movement slider helps customize how the brush's grain behaves as you draw.
- Rotation: This setting controls the direction of the grain in relation to your stroke.
- Depth: Adjusting the Depth slider changes the visibility or intensity of the grain.
Rendering: How Color and Texture Blend
Procreate offers six unique rendering modes, each affecting how the brush color and texture interact with the canvas: Light Glaze, Uniformed Glaze, Intense Glaze, Heavy Glaze, Uniform Blending, and Intense Blending. Experimenting with these modes is essential, as each produces a distinct visual outcome.
Dynamics: Responding to Input
The "Dynamics" menu allows your brush to respond to various inputs, enhancing its expressiveness.
- Flow: This setting controls how much color or value your brush applies. It can be helpful to think of Flow like controlling the amount of paint on a brush in traditional painting.
- Maximum and Minimum Size: These sliders control the variation in size your brush can achieve, from its smallest to largest possible diameter.
- Maximum and Minimum Opacity: Similar to the size sliders, these allow you to control the range of opacity your brush can produce, from fully transparent to completely opaque.
Advanced Brush Customization: Taper, Dynamics, and More
Beyond the foundational settings, Procreate offers deeper customization options to sculpt your brush's behavior.
Taper Menu: Controlling Stroke Weight Variation
The "Taper" menu is crucial for creating brushes that mimic the natural variations in line weight found in traditional tools.
- Pressure Taper: This taper affects your brush stroke based on the pressure applied with your Apple Pencil. The default pen taper might not offer the desired level of variation for your drawing style, making this setting essential for customization.
- Touch Taper Settings: Since finger drawing doesn't involve pen pressure, these settings allow you to introduce natural-looking taper effects to your brush strokes when using your finger as the drawing tool.
Color Dynamics: Injecting Color Variation
This menu allows for sophisticated color variations within your brush strokes, creating effects not possible with traditional media.
- Color Dynamics: This menu allows you to customize the color variation of your brush. You can set it to change color randomly, based on pressure, or in other dynamic ways.
Apple Pencil Settings: Tailoring to Stylus Input
These settings specifically control how your Apple Pencil interacts with the brush.
- Tilt: Adjusting tilt settings can significantly alter how your brush behaves when the Apple Pencil is held at an angle, mimicking the shading effects of a traditional pencil.
- Pressure: As mentioned with the Taper menu, pressure sensitivity is key to achieving variable line weights.
Properties: Global Brush Behavior
The "Properties" menu contains global settings that affect the overall behavior of your brush.
- Drawing Assist: This can be toggled on to enable Procreate's built-in drawing guides, helping to create more precise shapes and lines.
- Smudge Slider: This setting influences how the brush behaves when used as a smudge tool, affecting its blending capabilities.
- Resizing: Some brushes, especially those designed for specific effects like pixel art, may appear very small on the canvas. Understanding how to resize your artwork using the Selection tool (set to Uniform) is important for achieving the desired scale.
Specialized Brush Creation Techniques
Procreate's flexibility extends to creating highly specialized brushes for specific artistic needs.
Stamp Brushes: Imposing Shapes with Precision
Stamp brushes are ideal for quickly applying recurring shapes, patterns, textures, templates, logos, or decorative elements.
To create a stamp brush:
- Open a square canvas in Procreate.
- Navigate to the Actions Menu (wrench icon) and open the Brush Shape settings.
- Tap on "Shape Source" to open the Shape Editor.
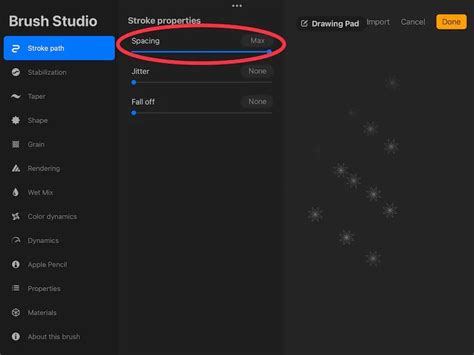
- In the "Stroke Path" menu, adjust the "Spacing" slider to 100% or Max. This ensures each instance of the shape is applied individually.
Pixel Brushes: Crafting Resolution-Independent Art
For pixel art enthusiasts, creating a dedicated pixel brush in Procreate is a game-changer. These brushes allow for artwork that can be resized to any scale without losing quality.
To create a pixel brush:
- Open a square canvas.
- Navigate to the Brush Menu and select the plus sign to create a new brush.
- In the Brush Settings, go to the "Shape" menu and tap "Shape Source."
- Enter the "Stroke Path" menu and set the "Spacing" slider to 0% or None.
- Next, open the "Taper" settings. In the "Pressure taper" section, set both the size and opacity sliders to 100% (Max). This prevents tapering at the beginning and end of your brushstroke.
- Consider adjusting the "Wet Mix" settings for specific blending behaviors.
- Move to the "Apple Pencil" menu to fine-tune how your pencil affects the brush.
- In the "Properties" menu, set the "Smudge" slider to 50%.
- Test your new brush on the canvas. You may need to zoom in while drawing to see the individual pixels clearly. When resizing your pixel art, ensure your Selection tool is set to "Uniform" in the menu bar.
Image Brushes: Leveraging Existing Artwork
One of the most powerful ways to create unique textures is by using an image as a brush source. Almost any image can be transformed into a custom brush.
To create an image brush:
- Edit your Image: Open your desired image in your iPad's photo editor. To ensure the image works correctly as a brush, you'll want a high-contrast image with a white background. If your image has a dark background, it will result in a square brush. Use filters (like "Mono" or "Monochrome") to convert your image to grayscale. Ensure the background is pure white and the subject is black or dark gray.
- Import into Procreate: Save your edited image.
- Open the Brush menu, create a new brush, and navigate to the "Shape" settings.
- Tap on "Shape Source" to open the Shape Editor.
- Tap "Import" and select your edited image.
- In the "Apple Pencil" settings, you might want to change the opacity to 0% if you want the brush to be affected by the opacity slider in the main Procreate interface rather than having a fixed opacity.
Hand Lettering Brushes: Precision and Style
For hand lettering artists, finding or creating the perfect brush is paramount. While many brushes can be adapted, specific settings cater to the demands of elegant letterforms.
Key Settings for Lettering Brushes
- StreamLine: This is arguably the most important setting for hand lettering. A higher StreamLine value (often between 65-85%) creates smoother, more consistent lines, reducing shakiness and giving a "magnet" effect that helps strokes snap into place.
- Taper (Pressure Taper): Crucial for achieving the signature thick and thin strokes of hand lettering. By adjusting the pressure taper, you define how your stroke weight varies based on the pressure applied with your Apple Pencil. This involves defining the change in size based on pressure and potentially adjusting the Brush Behavior settings in the Properties category.
- Tilt: If you tend to hold your stylus at an angle, adjusting the Tilt settings in the Apple Pencil category can create nuanced variations in stroke weight and shading, similar to how a traditional pencil can shade with its side.
- Brush Behavior (Opacity): Fine-tuning opacity settings in the Brush Behavior area can further refine the character of your lettering strokes.
Understanding Brush Categories and Examples
Procreate's default brushes are categorized, and understanding these can guide your custom brush creation:
- Inking Brushes: Often feature well-defined textures that can vectorize well for font creation.
- Sketching Brushes: May lack extensive streamlining, resulting in charming, organic lines suitable for expressive lettering.
- Calligraphy Brushes: Designed to mimic traditional calligraphy tools, offering varied line weights and flow.
The text provided mentions several specific brushes and their ideal uses:
- Ink Lovers Brush Set: Offers brushes that mimic sumi ink textures.
- Font Lovers Brush Set: Includes brushes with unique writing styles and monoweight options with grainy textures.
- Beautiful Lettering Brush Set: Features a highly used brush with subtle edge texture perfect for lettering and doodling, a favorite lettering pencil brush, a "blunt crayon" for childlike lettering, and a brush with a rougher edge aesthetic for a specific stylistic look.
The Art of Practice and Experimentation
Creating custom brushes in Procreate is an iterative process. The "Drawing Pad" within the Brush Studio serves as your personal notepad, allowing you to test your brush settings in real-time. You can clear the Drawing Pad or reset all brush settings for the current brush from its settings menu. Experiment with different preview sizes to see how your brush behaves at various scales.
Exploring Stabilization in the Brush Studio | Learn to Procreate
Remember that sometimes one setting can inadvertently cancel out another, so a methodical approach to adjustments is key. Don't be afraid to dive into the advanced brush settings, where you can numerically input values for precise control or use Scribble to input values with your Apple Pencil. The advanced settings panel allows you to attach specific behaviors to sliders, including Numeric, Pressure, Tilt, and Barrel Roll (for Apple Pencil Pro), offering unparalleled control over your brush's responsiveness.
Mastering the art of creating thick and thin strokes is fundamental to visually stunning hand-lettered compositions. Whether you're aiming for the refined elegance of calligraphy or the playful character of bounce lettering, Procreate's brush engine provides the tools to bring your vision to life. The journey of brush creation is as much about artistic exploration as it is about technical mastery. By understanding these settings and embracing experimentation, you can unlock a universe of unique brush possibilities within Procreate, transforming your digital art with custom textures and dynamic strokes.