Creating a compliant passport or visa photo can often feel like navigating a labyrinth of strict regulations. The journey from a regular photograph to one that meets the exacting standards of official bodies like the U.S. Department of State or the UK Home Office Identity and Passport Service can be challenging. Fortunately, with the advent of specialized tools, this process can be significantly simplified. Photoshop passport photo templates offer a streamlined solution, enabling individuals to produce compliant images without the need for professional studio visits or complex editing skills.
Understanding Passport Photo Requirements
Before diving into the technical aspects of using a Photoshop template, it's crucial to understand the fundamental requirements for a valid passport photo. These guidelines are designed to ensure that the photograph clearly and accurately represents the applicant. According to the U.S. Department of State, several key criteria must be met:
- High Resolution: The image must be clear and sharp, free from blurriness or pixelation.
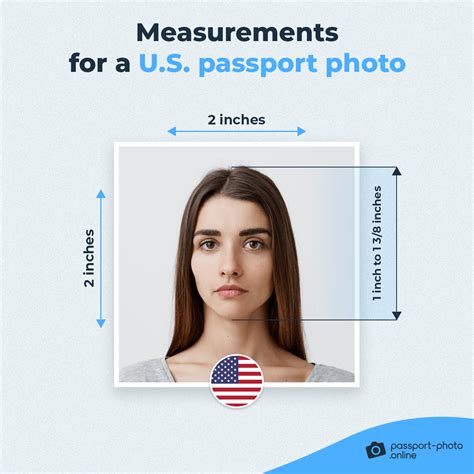
- Specific Size: The photograph must be 2x2 inches (approximately 51x51 mm).
- Head Size: The head of the applicant, from the top of the forehead to the bottom of the chin, should measure between 1 and 1 3/8 inches (approximately 25 to 35 mm).
- Facial Expression and Pose: The applicant must maintain a neutral facial expression and look directly at the camera. A no-tilt position is mandatory, meaning the head should not be angled up, down, or to the side.
- Eyes Open: Both eyes must be open and clearly visible.
- Background: A plain white or off-white background is universally required.
- Attire and Accessories: Hats, head coverings (unless for religious or medical reasons, with full face visible), sunglasses, and headphones are generally not permitted. While glasses are sometimes allowed, reflections or glare on the lenses can cause rejection. It's often advisable to remove them.
Adhering to these rules is paramount, regardless of how the photo is processed, whether it's through Photoshop, an online tool, a photo studio, or a retail store like Walgreens.
Simplifying the Process with Photoshop Templates
The primary purpose of a passport photo template for Photoshop is to demystify and expedite the creation of compliant photos. These templates act as pre-designed canvases that incorporate the correct dimensions, resolution, and often include guides for optimal head placement and background preparation.
The Photoshop Passport Photo Template v1.1
For those looking to use Photoshop for professional purposes or to gain more control over the editing process, specific software versions are available. The "Photoshop Passport Photo Template v1.1" is designed for such users. This version, often available for a nominal license fee (around $20), provides a robust framework for editing passport photos. The license can typically be purchased through the creator's website, such as www.nicmyers.com/photoshop-passport-template-v1/.
Key Features and Benefits of Using Templates
- Time and Cost Savings: By using a template, users can avoid the expense and inconvenience of visiting physical photo booths or studios. The ability to process photos at home saves both time and money.
- Compliance Assurance: Reputable templates are designed and tested to meet the specific sizing and formatting requirements of various passport and visa agencies, including the U.S. Department of State and the UK Home Office.
- Ease of Use: Templates often come with included instructions or tutorials. Basic usage details are frequently found in a "readme.txt" file within the archive, or more comprehensive guides with screenshots might be available online.
- Professional Results: Even without professional photography experience, a template can help achieve a polished and compliant final image.
Step-by-Step Guide to Using a Photoshop Template
While specific template interfaces may vary, the general workflow for creating a passport photo in Photoshop using a template often involves these key steps:
Step 1: Photo Selection and Initial Cropping
Begin by opening your chosen photograph in Adobe Photoshop. Select the "Crop Tool" from the toolbar. The template will typically guide you on how to fit the crop frame. The objective is to ensure your head occupies a significant portion of the frame, aligning with any pre-set guides within the template.
Step 2: Setting Image Dimensions and Resolution
Once the initial crop is satisfactory, it's time to set the precise dimensions. Navigate to Image > Image Size. Here, you will input the required width and height, which is typically 51 mm by 51 mm for U.S. passports. Crucially, set the resolution to 300 pixels per inch (ppi). This high resolution ensures the photo will be sharp enough for printing.
Step 3: Background Refinement
A plain white background is non-negotiable. If your original photo doesn't have a perfectly white background, Photoshop offers tools to correct this.
- Magic Wand Tool: Select the "Magic Wand Tool" (you can often access it by pressing
Ctrl+Fand typing its name). Use this tool to select the background area. - Refining Selections: If the Magic Wand selects unwanted areas (like parts of your hair), you can exclude them by holding down the
Altkey while clicking on those areas. - Filling with White: Once the background is selected, you can fill it with white. Go to
Image > Adjustments > Hue/Saturationand select "Color" from the contents, then pick White. Alternatively, you can create a new layer, fill it with white, and then mask out your subject. - Brush Tool: For any missed spots or areas requiring finer detail, the "Brush Tool" can be used for manual correction. Ensuring your hair is neatly styled can significantly reduce the effort required for background cleanup.
How to Make a Passport Size Photo in Photoshop: The Quick and Easy Way
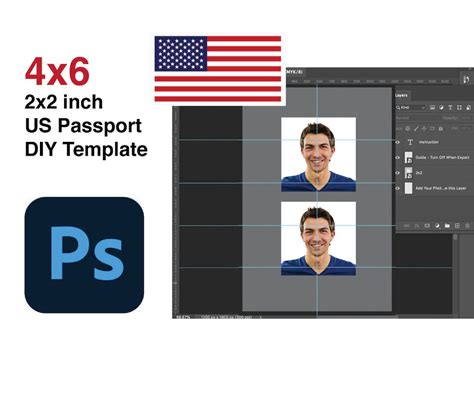
Step 4: Arranging Multiple Photos for Printing
Passport photos are often required in multiples, and printing services usually accommodate standard photo paper sizes like 4x6 inches. To optimize printing costs, you can arrange several passport-sized photos onto a larger canvas.
- Create a New Document: Go to
File > New > New Document. Select a preset like "Photo" and choose a canvas size suitable for printing, such as 4x6 inches (Landscape or Portrait orientation). - Copy and Paste: Return to your edited passport photo. Select the entire image (
Ctrl+A) and copy it (Ctrl+C). Then, paste it into the new 4x6 document (Ctrl+V). - Arrangement and Duplication: Within the 4x6 document, you can duplicate your passport photo to fill the space. The goal is to fit as many compliant images as possible without overlap, typically accommodating 2 to 4 photos on a single print. Adjust their positions precisely, ensuring no borders are present between them if the template guides suggest this. Some templates provide pre-set layouts for this purpose.
Step 5: Exporting the Final Image
Once you have arranged your photos on the print-sized canvas, you need to export the file in a format suitable for printing.
- Export as JPG: Go to
File > Export > Export as JPG. This format is widely accepted by printing services. - Save the File: Click "Export" and save the JPG file to your hard drive or flash card. This file can then be sent to a printing service. Many services, like Walmart, offer inexpensive prints for a few cents per 4x6 photo, making it an economical way to get multiple copies.
Professional Templates and Services
Beyond individual templates, there are also professional solutions designed for more frequent use or for businesses.
PassportPhotoApp.com Templates
Services like PassportPhotoApp.com offer Photoshop templates that aim to automate the process. These templates are designed to take a professional photo and quickly generate multiple standard-sized photos on various print layouts. They emphasize adherence to visa and passport agency regulations.
Premium Template Features often include:
- White Labeling: The ability to apply your own branding, which is useful for professional photographers or businesses.
- Standard Outputs: The templates produce images in standard print sizes, making them compatible with common photo printing services.
- Fast Processing: Utilizing Photoshop Actions (ATN files), these templates automate the creation process, eliminating manual copy-pasting and saving valuable time.
- Simplicity: The user typically just needs to position their photo and run the pre-defined action.
These professional template packages often include the Photoshop Template (PSD file), Photoshop Actions (ATN), free product updates, a commercial license, and product support. Payment is usually secured through platforms like Stripe, and a money-back guarantee is often provided.
Cost Considerations
While a DIY approach using basic Photoshop skills and free guides can be very cost-effective, professional templates and services come with a price. The "Photoshop Passport Photo Template v1.1" might cost around $20 for a license. More comprehensive professional packages, like those from PassportPhotoApp.com, can range from $35 to $40 or more, depending on the features and versions offered (e.g., US Version, EU & UK Version). These prices reflect the development, testing, and support that go into creating compliant and user-friendly solutions.
Avoiding Common Pitfalls
Even with a template, certain mistakes can lead to photo rejection.
- Incorrect Background: Ensure the background is uniformly plain white or off-white. Shadows or patterns are not allowed.
- Head Position and Size: Double-check that the head is centered and within the specified size range.
- Facial Expression: A neutral expression is key. Smiling or frowning can lead to rejection.
- Image Quality: Avoid blurry, overexposed, or underexposed photos.
- Digital Alterations: While templates help with sizing and background, excessive retouching that alters facial features is prohibited.
By understanding the requirements and utilizing the power of Photoshop templates, individuals can confidently create compliant passport and visa photos, saving time, money, and avoiding the frustration of rejection. The availability of both free guides and professional software ensures that there's a solution for nearly everyone looking to get their passport photos right.