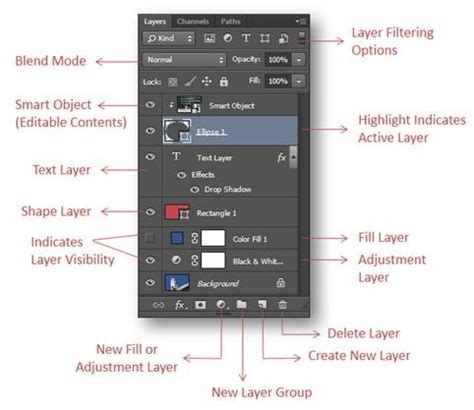
Photoshop layers are the bedrock of non-destructive image editing, offering unparalleled flexibility and control. They allow for the creation of multiple images within a single file, where each layer functions as a separate, independently editable image. This fundamental concept is what empowers users to manipulate individual elements of an image with precision, dictating precisely how the final artwork looks and functions. Beyond individual element control, layers are crucial for organizing diverse components within a file, further enhancing the mastery over visual output. For instance, a layer can be expertly employed to construct a mask, a powerful tool for selectively hiding or revealing portions of an image, thereby enabling a vast array of creative effects.
However, the very power and complexity of Photoshop's layer system can, at times, lead to a perplexing and frustrating experience: missing layers. When a user finds themselves unable to locate a crucial layer, it can halt workflow and breed a sense of helplessness. This article aims to demystify this common predicament, exploring the myriad reasons why layers might disappear and, more importantly, providing a comprehensive guide to their recovery and prevention.
The Genesis of Disappearing Layers: Common Culprits
Understanding why layers go missing is the first step toward resolving the issue. Several common scenarios can lead to this unwelcome phenomenon:
- Accidental Deletion: The most straightforward reason is unintentional removal. In the heat of editing, it's possible to inadvertently select a layer and press the delete key or drag it to the trash icon. Unfortunately, once a layer has been deleted, it cannot be recovered through conventional means; there is no "recycle bin" for deleted Photoshop layers within the program itself.
- Hidden Layers: Layers can be made invisible without being deleted. This is typically achieved by clicking the "eye" icon next to a layer in the Layers panel. While this is a deliberate action for managing visibility, it can lead to confusion if the user forgets which layers have been hidden.
- Forgetting to Save: While not directly causing layers to disappear from an open document, a failure to save the file, especially in a format that preserves layer information like PSD or TIFF, means that any work done on those layers will be lost if the application is closed or the system crashes.
- User Errors and Accidental Actions: Beyond simple deletion, other user errors can contribute. For example, accidentally applying a mask that hides the entire layer's content, or inadvertently grouping layers in a way that obscures their visibility, can create the illusion of missing layers.
- File Corruption: Though less common, Photoshop files can become corrupted. This can manifest in various ways, including the disappearance or inaccessibility of layers.
- Technical Issues: System glitches, software bugs, or unexpected program closures can sometimes lead to data loss or corruption, impacting layer visibility.
Navigating the Labyrinth: Methods for Locating Missing Layers
When layers vanish, a systematic approach is crucial for their retrieval. Fortunately, Photoshop offers several built-in tools and workflows to help users track down elusive elements:
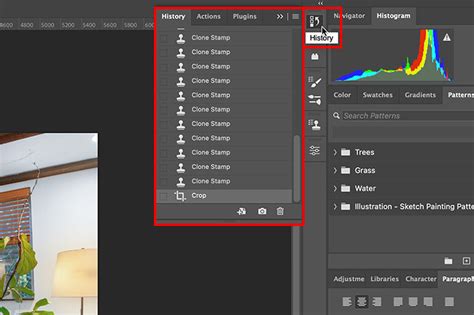
The History Panel: A Time Machine for Your Edits
The History panel acts as a chronological record of every action taken within a Photoshop session. This makes it an invaluable tool for recovering from accidental deletions or other undesirable changes.
- Accessing the History Panel: Navigate to
Window > History. - Reverting to a Previous State: Scroll through the list of states. If you can identify a point in time before the layer disappeared, clicking on that state will revert the document to that condition. This allows you to then find any layers that may have been lost.
- Caution with History: It's important to note that the History panel's content is cleared when you close and reopen Photoshop. Therefore, this method is most effective for recovering from recent mistakes within the current editing session.
The "Find Layers" Feature: Targeted Layer Discovery
While Photoshop doesn't have a direct "Find Layers" button in the way one might expect, the Layers panel itself offers powerful filtering and searching capabilities that can effectively help locate hidden or misplaced layers.
- Utilizing the Search Box: At the top of the Layers panel, there is a search box. Typing the name of a layer here will filter the panel to show only layers that match the query. If you have a general idea of the layer's name, this can be a quick way to isolate it.
- Filtering by Layer Type: The dropdown menu above the search box allows you to filter layers by type (e.g., pixel layers, adjustment layers, text layers, shape layers). This is useful if you know the type of layer you're looking for.
- "Find Layers" Plugin (Third-Party): For more complex documents, third-party plugins like the "Layer Search" plugin can significantly expedite the process. These plugins often allow you to search for layers by name, color, blending mode, or other attributes. To use such a plugin, you would typically go to
Window > Extensions > Layer Search(or a similar path depending on the plugin), input your search criteria, and then click on the desired layer to select it in the Layers panel.
The "Undo" Command: A Single Step Back
The most basic and often the first line of defense is the "Undo" command.
- Accessing Undo: Press
Ctrl+Z(Windows) orCommand+Z(Mac) repeatedly to step backward through your recent actions. - Immediate Reversal: This is ideal for undoing the very last action, which might have been the accidental deletion or hiding of a layer.
Checking for Hidden and Locked Layers
Before resorting to more advanced methods, a thorough check of the Layers panel for hidden or locked layers is essential.
- Hidden Layers: As mentioned, hidden layers are indicated by the absence of an "eye" icon. To reveal all hidden layers, you can click the "eye" icon at the top of the Layers panel, which toggles the visibility of all layers. Alternatively, you can click on the empty space where the eye icon should be for individual layers to make them visible again.
- Locked Layers: Locked layers are indicated by a small padlock icon on the layer. Clicking this padlock will unlock the layer. Sometimes, certain tools or actions are restricted on locked layers, which might lead to them appearing unresponsive or "missing" in functionality.
Advanced Troubleshooting: Beyond the Obvious
When the basic troubleshooting steps don't yield results, it's time to explore more advanced possibilities:
Layer Groups and Organization
Layers can be organized into groups for better management. If a layer is inside a collapsed group, it might appear to be missing.
- Expanding Groups: Look for small arrow icons next to folder-like icons in the Layers panel. Clicking these arrows will expand the group and reveal its contents.
- Creating Layer Groups: To organize layers, select the layers you wish to group, right-click on one of them, and choose "New Group from Layers." This creates a new folder containing the selected layers, which can then be renamed by double-clicking its name.
Smart Objects and Adjustment Layers
Smart Objects and Adjustment Layers have unique editing workflows.
- Editing Smart Objects: To edit a Smart Object, you typically double-click on its thumbnail in the Layers panel. This opens the Smart Object in a separate window. If you forget to save and close the Smart Object after editing, the changes won't reflect in the main document, potentially leading to confusion.
- Editing Adjustment Layers: Similarly, to edit an Adjustment Layer, double-click on its thumbnail. These layers affect other layers non-destructively.
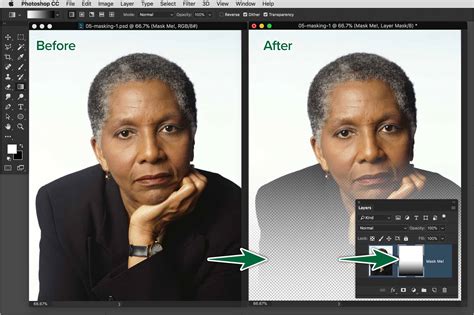
Layer Masks and Their Impact
Layer masks are powerful for selectively hiding or revealing parts of a layer.
- Understanding Masks: A layer mask is a grayscale image attached to a layer. White on the mask reveals the layer's content, black hides it, and shades of gray create partial transparency. If a layer appears blank or its content is missing, it's possible that the layer mask is entirely black, effectively hiding everything.
- Editing Masks: You can edit the layer mask by selecting its thumbnail in the Layers panel and painting on it with black or white.
- Applying Layer Masks: The main benefit of using Layer Masks in Photoshop is that it allows you to selectively hide or reveal parts of an image. This can be used for a variety of creative effects, such as masking out the sky in an image or creating a vignette effect. Layer masks are also easy to use, as they can be applied with a few clicks.
Photoshop Preferences and Corrupted Settings
Corrupted Photoshop preferences can lead to a wide range of unexpected behaviors, including issues with the Layers panel.
- Resetting Preferences: A common troubleshooting step for many Photoshop problems is to reset its preferences. To do this, hold down
Command+Option+Shift(Mac) orCtrl+Alt+Shift(Windows) immediately after clicking the Photoshop icon to launch the application. You will be prompted to confirm that you want to delete the settings file. It is advisable to make a note of your custom preferences before resetting them so they can be restored later.
Dual Monitor and Display Issues
In some instances, especially with complex multi-monitor setups, Photoshop's interface can behave unexpectedly.
- Window Placement: There are reports of layers disappearing when the Photoshop window is stretched across multiple monitors with different resolutions. Moving the Photoshop window entirely onto one monitor, particularly the primary display, has resolved this for some users. This may occur because Photoshop struggles to display both screen resolutions simultaneously.
Video Timeline and Clip Import
If you've been working with video elements or the Timeline feature in Photoshop, this can sometimes interfere with layer visibility.
- Clearing the Timeline: If you suspect this might be the cause, try clearing or deleting any imported video clips or timeline elements from the Timeline panel (
Window > Timeline).
Third-Party Software Conflicts
External software, particularly plugins or extensions that are not fully compatible with your version of Photoshop, can cause conflicts.
- Disabling Plugins: Try temporarily disabling any third-party plugins or extensions to see if the layer visibility issue resolves. If it does, you'll need to investigate the specific plugin for updates or compatibility issues.
System Requirements and Version Compatibility
Older versions of Photoshop or insufficient system resources can sometimes lead to unexpected behavior.
- Version Limitations: Certain features, such as 3D layers, might not be available or function correctly in older versions.
- System Resources: Insufficient RAM or an outdated graphics card can impact Photoshop's performance and stability, potentially leading to display anomalies.
Recovering Deleted Layers: The Unfortunate Truth
Regarding the recovery of deleted layers, the answer is generally, unfortunately, no. Once a layer has been deleted, it cannot be recovered directly within Photoshop. This is why maintaining good saving habits and utilizing the History panel is so critical.
Working with Layers in Other Adobe Software
Photoshop's layer-based workflow is a cornerstone of the Adobe Creative Suite.
- Interoperability: Yes, you can work with layers in other Adobe software. Photoshop's layers can be imported into other Adobe applications, such as InDesign for page layout, Illustrator for vector manipulation (though vector layers in Photoshop are often rasterized upon import to Illustrator unless specifically handled as vector data), and After Effects for motion graphics and visual effects. This allows for a seamless integration of assets across different creative disciplines.
Proactive Measures: Preventing Layer Disappearance
The best approach to missing layers is to prevent them from disappearing in the first place.
- Frequent Saving: Regularly save your work using
File > SaveorFile > Save As. Crucially, save in a format that preserves layer information, such as Adobe's native.PSD(Photoshop Document) format or.TIFF(Tagged Image File Format). Avoid saving as JPEG or PNG if you need to retain your layers, as these formats flatten the image. - Utilize Layer Comps: The Layer Comps panel (
Window > Layer Comps) is an excellent tool for managing different states or configurations of your layers. You can save various versions of your layer visibility and properties, allowing you to quickly switch between them. To use it, select the layer you want to save in the Layers palette and then click the "Create New Layer Comp" button at the bottom of the Layer Comps panel. Give the layer comp a name and click "Save." - Employ Layer Groups: As mentioned earlier, organizing layers into logical groups makes your Layers panel much more manageable and reduces the chance of overlooking individual layers.
- Develop a Naming Convention: Consistently naming your layers and layer groups makes them easier to find and identify.
- Backup Regularly: Implement a robust backup strategy for your project files. This could involve using cloud storage services, external hard drives, or dedicated backup software.
- Understand Layer Visibility and Locking: Be mindful of the "eye" icon for visibility and the padlock icon for locking layers. Regularly check these indicators to ensure layers are not unintentionally hidden or locked.
- Save As Before Major Changes: Before undertaking significant edits or experimenting with new features, consider using
File > Save Asto create a backup copy of your file. This provides a safety net if something goes wrong. - Automate with Scripts and Actions: For repetitive tasks, consider using Photoshop's Scripts and Actions panel (
Window > Actions). You can record a sequence of steps as an action and play it back later, or use scripts to automate more complex operations, potentially reducing the likelihood of manual errors.
Conclusion: Mastering the Layers Panel
The disappearance of layers in Photoshop, while initially alarming, is almost always a solvable problem. By understanding the potential causes and systematically applying the troubleshooting methods outlined above, users can regain control of their workflow. From the straightforward "Undo" command and the detailed history log to the more advanced techniques of preference resetting and third-party plugin utilization, a comprehensive approach ensures that even the most elusive layers can be brought back into view. Furthermore, adopting proactive habits like frequent saving, organized layer management, and regular backups will significantly minimize the chances of encountering this frustrating issue in the future, allowing for a smoother and more enjoyable creative process.
Layers in Photoshop Explained - Ultimate Guide for Beginners 2022
tags: #photoshop #layers #disappeared