When the skies refuse to cooperate and a real storm photoshoot isn't feasible, the power of Photoshop allows you to conjure dozens of different lightning strikes onto your digital canvases. Real lightning, a phenomenon of immense power and transient beauty, is notoriously difficult to capture accurately in a photograph. However, by leveraging a few key tools and adjustment layers within Photoshop, you can transform a captured image of lightning into a versatile lightning bolt brush, or even create entirely new, stylized bolts from scratch. Photoshop brushes, in general, are incredibly versatile tools, offering the ability to adjust color, opacity, and a myriad of other elements. This granular control allows you to achieve the exact electric spark or ethereal glow you envision for your artwork.
From Photograph to Brush: Capturing the Essence of Real Lightning
The journey to creating a convincing lightning brush often begins with a real-world reference. The first crucial step is to find an actual picture of lightning that aligns with the aesthetic and narrative you are trying to create. This image will serve as the foundation for your digital replication. Once you have your source image, the process of isolating and preparing it for brush creation begins.
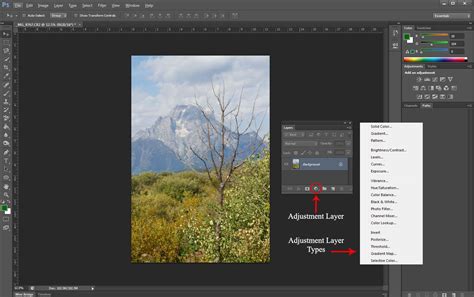
The initial manipulation involves converting the image into a grayscale format, ensuring that the lightning bolt itself is starkly black against a pure white background. This is achieved by navigating to the Layers panel and clicking "Create New Fill or Adjustment Layer." From the dropdown menu, select "Gradient Map." It is imperative that this new layer is positioned directly above your original background layer. By setting your colors to black on white within the Gradient Map options, you effectively desaturate your image, rendering it in shades of gray. The goal here is to achieve a clear distinction: your lightning bolt should be black, and the surrounding background should be white.
Following the Gradient Map, the next step is to refine the tonal range, making the image even more starkly black and white. This is accomplished by introducing a "Levels" adjustment layer. Again, click "Create New Fill or Adjustment Layer" in the Layers panel and select "Levels." This tool allows you to precisely control the highlights, midtones, and shadows. By adjusting the sliders, you can deepen the blacks and brighten the whites, ensuring that only the essential details of the lightning bolt remain, while the background becomes a uniform, unblemished white.
Refining the Bolt: Precision Painting for Brush Creation
With the tonal values adjusted, you'll notice that some areas of shadow or darkness might still be present in your image that are not part of the intended lightning bolt. These extraneous dark areas need to be meticulously removed, as they will be interpreted as part of the brush tip when you define it. To address this, you will employ a painting technique.
First, click the plus icon within the Layers panel to create a new, empty layer. Crucially, this new layer must be positioned directly above your original background layer (and below your adjustment layers). Select black as your primary color. Now, utilizing the Brush tool, you will carefully paint over any unwanted dark areas, effectively erasing them and ensuring that only the lightning bolt itself remains a dark, solid shape against the white background. This painting process is akin to meticulously cleaning up a sketch, preparing it for its final form.
Defining Your Brush: Transforming the Bolt into a Reusable Tool
Now that your lightning bolt has been precisely isolated and is a distinct black shape on a white canvas, it's time to transform this visual element into a functional Photoshop brush. With both the Brush tool still active and the layer containing your cleaned-up lightning image selected, navigate to the "Edit" menu. From the dropdown options, choose "Define Brush Preset." A dialog box will appear, prompting you to name your new brush. Give it a descriptive name, such as "Realistic Lightning Bolt," and click "OK." Voila! You have successfully created a custom lightning brush.
How to Make Photoshop Brushes
This newly defined lightning brush is a powerful tool, but your creative journey doesn't necessarily end here. The true magic of digital art lies in the subsequent photo manipulations that bring your created lightning to life within a larger context, making it appear authentic and integrated into the scene.
Integrating Lightning: Photo Manipulations for Believability
Once you have your lightning brush, the next phase involves integrating it seamlessly into your chosen photograph. This is where the art of photo manipulation truly shines.
Layer Masks: The Art of Non-Destructive Editing
A fundamental technique for achieving realistic integration is the use of layer masks. Layer masks allow you to selectively conceal or reveal parts of a layer non-destructively. This means you can experiment with different opacities, blend modes, and even paint away sections of your lightning effect without permanently altering the underlying pixels. For instance, if your lightning bolt appears too harsh or too uniformly opaque, a layer mask, combined with a soft brush, can be used to subtly fade its edges or create areas of transparency, making it blend more naturally with the existing light and atmosphere of the photograph.
The Influence of Light: Soft Brushes and Blending Options
A key aspect of making lightning look believable is to consider the light it emits. A flash of lightning is an intense burst of energy that illuminates its surroundings. If you have a bolt of lightning appearing in an image with no corresponding light effect on the environment, it can look jarring and unnatural. This is where the concept of a "soft brush" becomes invaluable. A soft brush, characterized by its feathered or lighter edges, is perfect for layering subtle color and light effects. You can use a soft brush with a low opacity and a color that complements the lightning bolt (perhaps a cool blue or a vibrant white) to paint a glow around the lightning strike, simulating the way it would illuminate clouds, objects, or even a landscape.
Furthermore, Photoshop offers a suite of powerful tools for controlling how layers interact with each other. For quick alterations to how your lightning is appearing, explore the "Layer Style" options. Navigate to "Layer" > "Layer Style" > "Blending Options." Within this menu, you can experiment with various blend modes (such as "Screen," "Add," or "Linear Dodge (Add)") to change how your layer of lightning bolts interacts with the layers beneath it. These blend modes are specifically designed to simulate how light behaves, allowing your lightning to "add" its brightness to the underlying image in a convincing manner. You can also adjust the opacity of the lightning layer itself, further refining its intensity and integration.
Stylized Lightning: Creating Bolts from Scratch
While using photographic references is excellent for realism, Photoshop also empowers you to create entirely stylized lightning bolts without relying on existing imagery. This approach offers immense creative freedom for more graphic or illustrative styles.
The process begins with a blank canvas. For a stylized lightning bolt instead of a realistic one, you don't need to start with a photo at all. The first step is to simply draw a lightning bolt shape. You can achieve this using the Brush tool with a hard edge, or for more precise control over curves and angles, the Pen tool is an excellent choice. Draw your desired lightning bolt shape onto a white background. For this method, it's often best to fill your lightning shape with black. The principle remains similar to the photographic approach: dark areas will define your brush.
Once your black lightning bolt is drawn on a white background, you can then proceed to define it as a brush preset using the "Edit > Define Brush Preset" command, just as you did with the photographic reference. This allows you to create a library of custom, stylized lightning brushes that you can then use repeatedly in your designs.
Enhancing Overall Lighting in Your Work
Beyond creating specific lightning effects, Photoshop also offers numerous tools to improve the general lighting of your artwork. These tools can be used to enhance the mood, add depth, and ensure that all elements within your composition are well-lit and balanced.
Adjustment Layers: A Versatile Toolkit
Adjustment layers are non-destructive ways to modify the color and tonal qualities of your image. Beyond the Gradient Map and Levels we've already discussed, consider others like:
- Brightness/Contrast: A straightforward way to adjust the overall lightness or darkness and the difference between the light and dark areas.
- Exposure: Similar to Brightness/Contrast but can also simulate the effect of camera exposure settings, offering more nuanced control over highlights and shadows.
- Curves: The most powerful tool for tonal adjustments, allowing you to precisely manipulate the brightness and contrast of specific tonal ranges within your image. You can create dramatic lighting effects, lift shadows, or deepen blacks with incredible precision.
- Hue/Saturation: Useful for adjusting the intensity and color of your lightning, or for ensuring that the colors in your overall image are harmonious. You can also use this to desaturate areas that might appear too vibrant or to add subtle color casts.
- Color Balance: Allows you to shift the overall color tone of your image towards warmer (reds, yellows) or cooler (blues, cyans) hues, which can dramatically impact the mood and atmosphere.
By strategically applying these adjustment layers, you can ensure that your lightning effects don't exist in isolation but are an integral part of a well-lit and visually cohesive composition.
The Limitless Potential of Photoshop
When you are working in Photoshop, especially when it comes to creating effects like lightning, your limit is truly your imagination. The combination of precise tools, versatile brushes, and powerful adjustment layers provides an expansive toolkit for artists and designers. Whether you're aiming for hyper-realistic storm simulations or fantastical, otherworldly electrical discharges, Photoshop offers the means to bring your vision to light. Experiment with different brush settings, explore various blend modes, and don't shy away from layering multiple effects. The ability to refine, adjust, and iterate non-destructively means you can explore a vast range of possibilities until you achieve the perfect electrifying result.