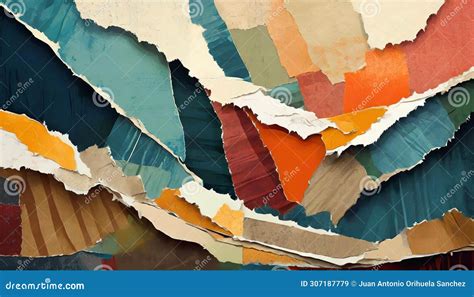
Creating a torn paper effect in Photoshop is a powerful technique for achieving a collage look on your designs. This effect instantly imbues digital creations with a handcrafted feel, adding a layer of texture and imperfection that is often difficult to replicate through purely digital means. The rough edges of torn paper are a key element in producing a distressed or collage aesthetic, making it an invaluable asset for designers looking to add a realistic touch to their images. This tutorial will guide you through an easy method to create your own torn paper effect from scratch, allowing for precise control over the final appearance.
Setting Up Your Canvas and Initial Layers
To begin, open Adobe Photoshop and create a new file. The size of the canvas can be anything you desire, depending on your project. The first crucial step is to establish a base for your torn paper effect. Navigate to Layer > New Fill Layer > Solid Color. This will create a new layer filled with a solid color. For the purpose of this tutorial, we will refer to this layer as "Torn Color." It's important to have this layer active when proceeding to the next step.
Following this, you'll create another essential layer. Go to Layer > New Fill Layer > Solid Color again. This new layer will serve as the foundation for the paper's texture and will be named "Background Paper." Ensuring the "Torn Color" layer is selected, you will then proceed to modify its properties.
Developing the Torn Edge: Using Filters and Transformations
The illusion of torn paper is largely created by manipulating the edges. With the "Torn Color" layer selected, double-click on its layer thumbnail in the Layers panel. This action opens the Layer Style dialog box. Here, you will apply an Inner Shadow effect. This effect will begin to give the impression of depth, as if the paper is lifting slightly from the background. Experiment with the settings for the Inner Shadow to achieve a subtle, realistic shadow that enhances the three-dimensionality of the torn edge.
Next, we focus on refining the shape of the "Torn Color" layer to simulate a ripped edge. Select the "Torn Color" layer. In the top toolbar, which appears when a transform tool is active, set the transformation to 105% in Width and 101% in Height. This slight distortion can help break up the perfect uniformity of a digital shape.
To further enhance the torn paper look, apply a blur effect. Go to Filter > Blur > Gaussian Blur. A small radius, typically between 1 to 3 pixels, is usually sufficient to soften the edges just enough to mimic the fibers of paper. This softening is crucial before applying more aggressive edge-defining filters.
Now, we will work with the Layer Mask of the "Torn Color" layer. Make sure the Layer Mask is selected (you'll see a white or black thumbnail next to the layer thumbnail). With the mask active, go to Filter > Filter Gallery. Within the Filter Gallery, navigate to the Artistic tab and select the Cutout effect. The Cutout filter, with its adjustable settings for levels, edge simplicity, and smoothness, is excellent for creating irregular, blocky edges that resemble the jagged nature of torn paper. Adjust these settings until you achieve a rough, uneven edge that looks convincingly torn.
After applying the Cutout filter, you'll want to further refine the transformed edge. With the Layer Mask still selected, press Ctrl+T (or Cmd+T on macOS) to activate the Free Transform tool. In the top toolbar, set the Width to 101% and the Height to 99%. This subtle adjustment can help to break up any repetitive patterns or unnatural straight lines that might have resulted from the previous filters.
Adding Texture and Dimension
The "Torn Color" layer now has a rudimentary torn edge. However, paper is not just a flat color; it has texture. To introduce this, you can drag and drop a paper texture image from your desktop directly into your open Photoshop document. Ensure this new layer, which contains your paper texture, is placed just above the "Torn Color" layer. Resize this texture layer to fill the entire canvas.
To integrate this texture with the torn edge, you will use clipping masks. Right-click on the paper texture layer and select Create Clipping Mask. This will confine the texture to the shape of the layer directly below it, which is the "Torn Color" layer with its torn edges. This step ensures that the texture only appears within the bounds of your torn paper piece.
To add a more pronounced sense of dimension, and to further enhance the realism of the torn edge, you can revisit the Layer Styles of the "Torn Color" layer. Double-click on the "Torn Color" layer thumbnail again to bring up the Layer Style dialog. Here you can add effects like an Inner Shadow, Bevel and Emboss, or even a subtle Drop Shadow to the "Torn Color" layer itself. These effects will help to create the illusion that the paper is casting a shadow or has depth, making it appear as if it’s a physical object placed on your design. The Bevel and Emboss effect, in particular, can be used to simulate the thickness of the paper and the raggedness of the torn edge, giving it a more tactile quality.
How to Create a Cinematic Movie Poster in Photoshop | Torn Paper Effect Tutorial | For Beginners
Incorporating Content into Your Torn Paper
With the main torn paper effect created, the next step is to place your desired content within these paper pieces. The "Background Paper" layer you created earlier is where you will place your image or design. Select the "Background Paper" layer and place any image or design you want right above this layer. Resize it to fill the whole canvas.
If you are working with a more complex design, such as a photograph with a subject, you might want to isolate elements of that photograph to appear within the torn paper. An artist like Lidia Lukianova, known for her passion for illustration and a penchant for mystery, often uses torn paper effects in her work. In one of her techniques, she used the Lasso Tool (L) to meticulously draw the jagged edge of the ripped paper directly across a model's face.
Once the desired edge is drawn with the Lasso Tool, you can convert this selection into a path. With the Lasso Tool still selected, right-click (or CMD-Click on macOS) on the mask and select Make Work Path from the menu. This path can then be used to define the torn edge more precisely.
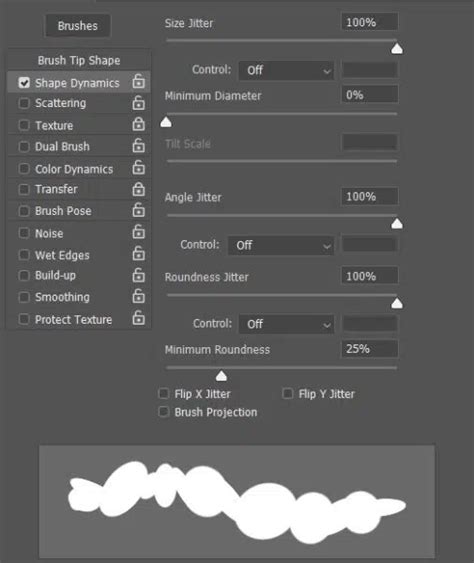
To apply this path as a torn edge, you can then right-click (or CMD-Click) on the path again and select Stroke Path from the menu. Ensure that the Tool selected from the drop-down menu is set to Brush. Crucially, ensure Simulate Pressure is turned off. Before stroking the path, it's essential to set up your brush. Head over to the Brush Options window and adjust the Shape Dynamics settings. These settings are key to creating a fibrous, irregular stroke that mimics the natural fraying of paper fibers. Adjusting jitter, angle jitter, and roundness can all contribute to a more organic and realistic torn edge.
Alternatively, if you have a pre-existing layer that represents the torn edge (like the "Paper edge layer" in some workflows), you can use it to create a selection. With the "Paper edge layer" selected, you can use Control+click (Windows) or Command+click (macOS) on the mask of another layer (for example, the "Model layer" if you are working with a portrait) to make a selection that follows the contours of that mask.
After making the selection, it's important to deselect the original layer if you no longer need it active for the selection process. You can do this by holding Control+D (Windows) or Command+D (macOS). Then, drag the "Paper edge layer" below the layer you want it to interact with, such as the "Model layer."
To further customize the shape of the torn edge and make it look less uniform and more natural, you can use the Warp tool. With the "Paper edge layer" still selected, go to Edit > Transform > Warp. By dragging the top handles of the bounding box, you can bend, twist, and distort the edge, creating organic variations that are characteristic of real torn paper.
Advanced Techniques for Realism
For those aiming for an even higher degree of realism, consider incorporating real torn paper textures or using more advanced brushwork. You can find numerous pre-made torn paper brushes online, or even create your own by scanning real torn paper edges. When using brushes, pay close attention to the Shape Dynamics and Texture settings within the Brush Options. Experimenting with different brush tips and opacity settings can lead to highly convincing results.
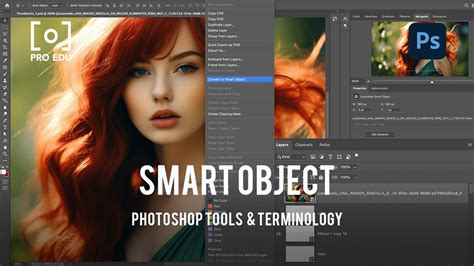
One effective approach to adding depth is to treat each piece of torn paper as a separate entity with its own layers for color, texture, and shadow. This allows for more granular control over the appearance of each element. For instance, if you have a specific image you want to appear within a torn section, you can place that image into a Smart Object. Then, by placing this Smart Object inside the torn paper's layer, you can let Photoshop handle the rest of the rendering, often resulting in a seamless integration.
The concept of creating a "work path" from a selection, as mentioned earlier, is a powerful way to generate custom torn edges. Once you have a path, you can stroke it with a textured brush, as described, or even use it to create a layer mask. This provides a non-destructive way to define the torn boundaries of your paper.
When you are happy with the basic torn edge, you can refine it further. The Filter Gallery offers a range of artistic filters beyond Cutout that can be useful. For example, the Brush Strokes filters, such as Ink Outlines or Spatter, can be used subtly on a mask to add a more fibrous, painterly texture to the torn edges, mimicking the way paper fibers might fray.
Remember that paper is not always a perfect, flat surface. To add to the realism, consider applying subtle distortions or warping to your paper texture layers as well. This can simulate the way paper might curl or bend. The Edit > Transform > Warp tool is invaluable for this.
Finally, the interplay of light and shadow is crucial for creating a convincing three-dimensional effect. Beyond the initial Inner Shadow and Bevel and Emboss on the paper layer itself, consider adding subtle Drop Shadows to individual paper pieces. These shadows should be adjusted to match the direction of your assumed light source and should have a soft edge to appear natural. If you are layering multiple torn paper pieces, the shadows cast by the upper layers onto the lower layers will significantly enhance the sense of depth and realism.
The process of creating torn paper effects in Photoshop is iterative. Don't be afraid to experiment with different filters, brushes, and layer styles. By combining these techniques, you can create a wide range of torn paper looks, from subtly distressed edges to dramatically ripped collages, all contributing to that desirable handcrafted aesthetic.