Photoshop texture overlays are a powerful technique for graphic designers and photographers alike, offering a versatile way to imbue designs and images with unique visual character. By layering textures onto existing graphics or photographs and employing blending modes and opacity settings, users can achieve a myriad of effects. This process allows for the transformation of a simple family photo into a vintage-inspired piece with a paper aesthetic, or a logo design into something with a raw, grungy concrete texture. Textures are exceptionally effective tools for adding visual interest to vector graphics and web designs, with options like old paper or canvas textures readily available to impart an aged, vintage appearance to photographs. The adaptability of textures means they can be applied with precision using Photoshop brushes to target specific areas of a project, further enhancing creative control. For those seeking readily available options, Adobe Stock offers a wealth of free, high-resolution texture packs.
Importing and Manipulating Textures in Photoshop
The fundamental process of incorporating a texture into your Photoshop project begins with opening your primary image file. From there, navigate to File > Place Linked. This command allows you to import the desired texture image directly into your main document. A significant advantage of using "Place Linked" is that it keeps the texture file separate from the original, maintaining its integrity and allowing for non-destructive editing. Once the texture is imported, it appears as its own layer above your base image.
You then gain the flexibility to resize, rotate, adjust opacity, and reposition the texture layer until the desired visual harmony is achieved. This iterative process of adjustment is key to seamlessly integrating the texture. After making your adjustments, commit to them by pressing 'Return'.
Understanding Blending Modes for Texture Application
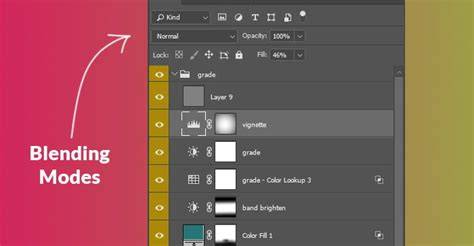
The true magic of texture overlays lies in the application of blending modes. These modes dictate how the pixels of your texture layer interact with the pixels of the layers beneath it. While the default 'Normal' blend mode simply layers the texture, a host of other options unlock dramatic transformations.
For adding texture to an image, certain contrast-focused blending modes are particularly effective. These include Overlay, Soft Light, and Hard Light. The Overlay mode, for instance, will darken lighter areas and lighten darker areas of the texture, often creating a strong sense of depth and integration. Soft Light offers a gentler approach, providing a diffused lighting effect that can subtly enhance the texture without overpowering the original image. Hard Light, on the other hand, is more intense, creating a strong contrast that can yield a bold, dramatic texture.
Experimentation is highly encouraged, as different textures will respond uniquely to various blending modes. Beyond these three, modes like Multiply (which darkens the image based on the texture's color) and Screen (which lightens the image based on the texture's color) can also produce compelling results.
A highly efficient method for exploring these options is to utilize keyboard shortcuts. With the texture layer selected and the Move Tool active, you can cycle through the blend modes using Shift + Plus (+) to move forward through the list or Shift + Minus (-) to move backward. This allows for rapid visual assessment of how each mode affects the overall composition.
Refining the Texture Effect with Opacity and Masks
Once a suitable blending mode has been selected, the Opacity setting becomes your next crucial tool for fine-tuning the texture's impact. Located in the Layers panel, typically near the Blend Mode option, opacity controls the transparency of the texture layer. By default, it's set to 100%, meaning the texture is fully opaque. Lowering the opacity allows more of the underlying image to show through, creating a more subtle integration. This is particularly useful when a texture is too dominant and you want to achieve a faded or worn-out appearance.
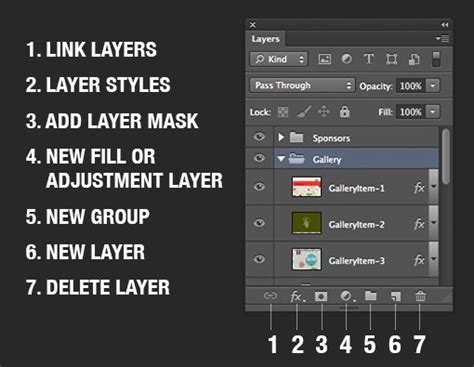
Layer masks offer an even more granular level of control. By applying a layer mask to the texture layer, you can selectively reveal or conceal parts of the texture. This is achieved by painting on the mask with black to hide areas of the texture or with white to reveal them. Grays will create semi-transparent areas. This technique is invaluable for ensuring that the texture enhances, rather than detracts from, the most important elements of your base image. For instance, you might want to keep a subject's face sharp and clear while applying a grunge texture to the background.
Photoshop Layer Masks Explained in 7 Minutes!
To activate a layer mask for editing, simply click on its thumbnail in the Layers panel. Once active, you can "copy pixels onto it" by painting directly onto the mask. This allows for precise control over where the texture is applied and where it is not.
Advanced Texture Techniques: Desaturation, Inversion, and Brushes
Beyond basic blending and opacity adjustments, several advanced techniques can further enhance your texture overlays.
Desaturating Textures
Often, when applying a texture, you might want to incorporate its tonal qualities (lightness and darkness) without introducing its colors, which could clash with your base image. The easiest way to achieve this is by desaturating the texture layer. Navigate to Image > Adjustments > Desaturate (or Ctrl+Shift+U / Cmd+Shift+U). This command strips all color information from the layer, converting it to grayscale. While not the most sophisticated method for creating black and white images, it's highly effective for texture overlays where only the luminance values are desired.
Inverting Textures
Another powerful manipulation involves inverting the texture. This process reverses its brightness values, turning light areas dark and dark areas light. To invert a texture, go to Image > Adjustments > Invert (or Ctrl+I / Cmd+I). This can dramatically alter the impact of the texture, sometimes revealing a more desirable effect than the original. For example, a texture with prominent dark lines might become a texture with prominent light lines after inversion, which could be more suitable for your design.
Creating Custom Brushes from Textures
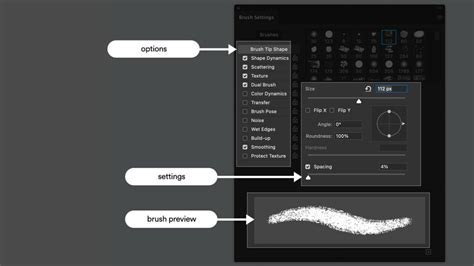
For ultimate creative freedom, you can transform a texture into a custom Photoshop brush. This multi-step process allows you to "paint" with the texture itself, applying it to specific areas with brush dynamics.
- Select the Texture Area: Use a selection tool, such as the
Lasso Tool, to isolate the portion of the texture you wish to convert into a brush. - Define Brush Preset: With the desired area selected, navigate to
Edit > Define Brush Preset. Give your new brush a descriptive name.
This custom brush can then be selected from the Brush tool's preset picker and used like any other brush, offering a unique way to add depth and detail to your projects.
Sourcing and Creating Textures
The availability of textures is vast, both online and through self-creation.
Digital Resources
- Adobe Stock: As mentioned, Adobe Stock is a rich repository of high-resolution textures, many of which are available for free as part of their collection. These can be licensed and added directly to your Creative Cloud libraries for easy access.
- Online Search: A simple web search for "Photoshop textures" or "free texture packs" will yield countless results from various design websites and stock photo providers.
In-Camera and Scanner Creation
You can also become a texture creator yourself by capturing textures from the real world. Consider:
- Everyday Objects: Point your camera at interesting designs found on leaves, rocks, wood, or patches of rust. Frost on a windowpane can also make for a compelling texture.
- Scanners: Place objects directly onto a scanner to capture their details with high fidelity. Old book covers, maps, crumpled paper, pieces of cloth, or even carpet can yield excellent results.
Combining Images and Creating Effects
The techniques discussed for texture overlays are foundational to many other image manipulation processes in Photoshop. The concept of layering images and using blending modes extends to creating complex compositions.
Image Overlays
An image overlay occurs when you place one image or text element on top of a base image. This is common in posters, advertisements, and even memes. The ability to stack multiple graphics and designs is simplified with Photoshop's layer-based workflow. By opening your base image and then adding subsequent images or photos on new layers, you can arrange and blend them to create entirely new visuals.
Double Exposure Effects
A popular creative effect that utilizes texture and blending principles is the double exposure. This technique merges two distinct images, often a portrait and a landscape or abstract element, to create a surreal and artistic composite. A quick video tutorial on creating a seamless double exposure effect can provide a visual guide to combining two photos in interesting ways, building upon the foundational skills of layering and blending.
Photoshop Layer Masks Explained in 7 Minutes!
Artistic Enhancement
Ultimately, applying textures and mastering blending modes is about imparting an artistic and creative edge to your work. Whether it's giving a photograph a faded, worn-out look through subtle blurring and saturation adjustments on duplicated layers, or applying a bold grunge effect, these techniques empower you to move beyond the ordinary and imbue your images with a unique narrative and aesthetic appeal. The journey from a raw image to a polished, textured piece involves understanding the interplay of layers, blend modes, opacity, and masks, all while exploring the vast possibilities offered by both digital and self-created textures. The ability to combine multiple graphics, photos, or designs into a single frame is a testament to Photoshop's power as a creative tool.