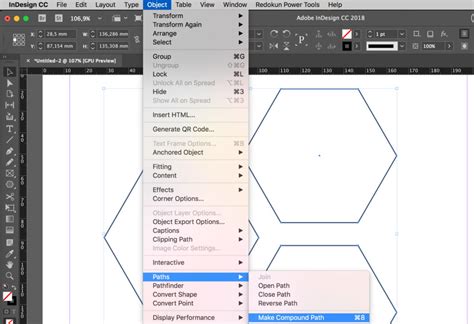
A clipping mask in InDesign is a fundamental yet powerful technique that allows designers to precisely control how images or graphics are displayed within a layout. At its core, it involves placing an image inside a custom shape, ensuring that only the visible area within that shape is rendered. This method is indispensable for creating professional layouts, achieving striking text effects, and composing intricate image arrangements. Whether your project is destined for print or digital consumption, understanding and utilizing clipping masks will significantly enhance your ability to manage image presentation.
What is a Clipping Mask?
A clipping mask is a design methodology that dictates which portions of an image or object remain visible, governed by the outline of another object. It serves as a sophisticated cropping tool, enabling the concealment of extraneous areas while preserving the entirety of the original image data. This non-destructive approach ensures that the underlying image remains intact and editable.
Clipping masks are instrumental in a variety of design applications. They are used to crop images into specific shapes, create captivating effects where images fill text, facilitate creative layout designs, and integrate multiple visual elements into a cohesive and polished composition.
In Adobe InDesign, the concept of clipping masks is intrinsically linked to its frame-based structure. Unlike some other Adobe applications, such as Photoshop, which employ a distinct "clipping mask" command, InDesign leverages its frames as the masking mechanism. When an image is placed within a frame, the frame's boundaries automatically define the visible area of the image. This inherent functionality simplifies the masking process, making it a core feature of the software.
What is InDesign?
Adobe InDesign is a professional-grade desktop publishing and layout design software developed by Adobe Systems. It is a cornerstone of the design industry, extensively used for the creation of both print and digital media. This includes a wide array of publications such as magazines, newspapers, brochures, posters, interactive PDFs, and eBooks. InDesign is meticulously engineered with robust tools and features specifically tailored for sophisticated layout design, precise typesetting, and comprehensive graphic design workflows. Its frame-centric approach, as seen with clipping masks, is a testament to its focus on organizing and presenting content effectively.
Step-by-Step: How to Create a Clipping Mask in InDesign
In InDesign, the fundamental principle is that most objects, including images and graphics, are contained within frames. These frames, by their very nature, function as clipping masks. The software's architecture allows for the independent movement and manipulation of both the frame and its content. This inherent capability makes masking a built-in feature, accessible through straightforward workflows.
The process of creating a clipping mask in InDesign essentially involves designing a vector shape and then placing your desired image within that shape. This vector shape then acts as the clipping mask, overriding the default rectangular boundary that would typically enclose the image. This method is consistent and applicable to any vector shape you create or utilize within InDesign.
A. Clipping Masks Using the Frame Tool
The Frame Tool is the most direct way to initiate the clipping mask process in InDesign. It is designed to hold content, and by its nature, it masks that content.
Step 1 - Launch Adobe InDesign and Place Your ImageBegin by launching Adobe InDesign and opening an existing document or creating a new one. Navigate to "File" > "Place" to import the image or graphic you intend to use into your document.
Step 2 - Select the Appropriate Frame ToolFrom the Tools panel, typically located on the left side of your workspace, select the Rectangle Frame Tool. Alternatively, you can choose any other frame shape tool that suits your design needs, such as the Ellipse Frame Tool or the Polygon Frame Tool.
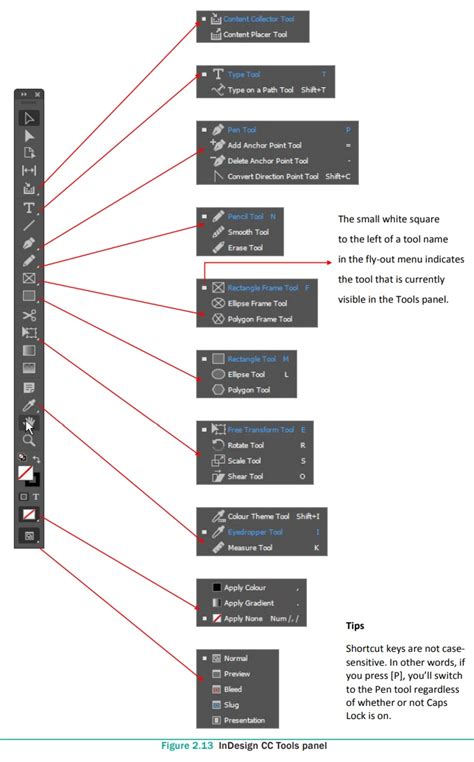
Step 3 - Create a Frame ShapeClick and drag on your document canvas to draw the desired frame shape. This shape will serve as the boundary for your image, defining the area that will be visible. The size and proportions of this frame are entirely up to your design requirements.
Step 4 - Place the Image into the FrameWith the newly created frame still selected, go to "File" > "Place" again. Select the image file from your computer that you wish to clip within this frame. InDesign will automatically place the image inside the selected frame.
Step 5 - Adjust Image Placement and SizeOnce the image is placed, you will likely need to adjust its position and scale to fit the frame effectively. Use the Selection Tool (the black arrow) to select the image within the frame. You can then click and drag to reposition the image, or use the transform controls to scale it. The frame itself acts as the mask, so resizing or moving the image content will reveal different parts of it within the frame's boundaries.
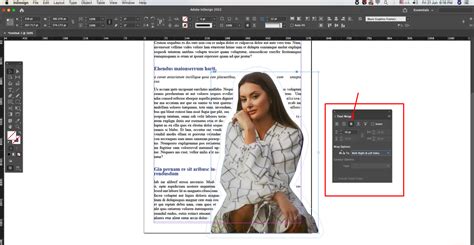
Step 6 - Understanding the Frame as a MaskCrucially, the frame you've created automatically functions as a clipping mask. There is no separate command to "apply" a clipping mask in this context. The frame's shape inherently dictates which part of the placed image is visible. You can further refine the clipping by resizing or reshaping the frame itself using the Selection Tool.
Step 7 - Layer Order (Often Implicit)While InDesign typically handles layer order correctly when placing content into frames, it's good practice to be aware of it. If you encounter issues, ensure the image layer is indeed within and behind the frame layer. You can manage this through "Object" > "Arrange" > "Send to Back" if necessary, though usually, placing an image into a frame places it correctly by default.
Step 8 - Adjusting the Frame ShapeThe frame shape now dictates the visible portion of your image. You can freely adjust or reposition this frame shape, and the image content will dynamically update its visibility within the new clipping area. This flexibility allows for iterative design adjustments.
B. Clipping Mask Using Customized Frame Shapes in InDesign
Beyond the basic frame tools, you can leverage InDesign's powerful drawing tools to create more intricate custom shapes that will act as your clipping masks.
Step 1 - Open Adobe InDesign and Prepare Your DocumentAs before, start by opening Adobe InDesign and your document or creating a new one.
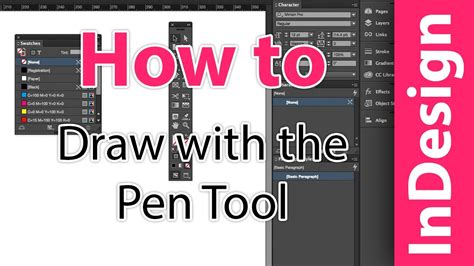
Step 2 - Select Drawing ToolsFrom the Tools panel, select the Pen Tool, Pencil Tool, or any other shape-creation tool (like the shapes found under the Rectangle Tool). These tools allow for the creation of complex vector paths.
Step 3 - Draw Your Customized ShapeUsing your chosen drawing tool, meticulously draw the customized shape on your document. This involves clicking to create anchor points and dragging to form curves, building the exact form you envision. This shape will serve as the precise boundary for your image.
Step 4 - Select the Shape with the Selection ToolOnce your custom vector shape is complete, switch to the Selection Tool (black arrow) from the Tools panel. Click on your custom shape to select it.
Step 5 - Place the ImageNow, you need to place the image that will be clipped within this custom shape. Go to "File" > "Place" and select your image file. InDesign will place the image, and if the custom shape is selected, it might attempt to place it within. If not, or if you want to be explicit, you can cut the image (Edit > Cut) and then select the custom shape, go to "Edit" > "Paste Into." This command is specifically designed to place content within a selected object, effectively turning that object into a container or mask.
Step 6 - Position and Resize the ImageWith the image now contained within your custom shape, use the Selection Tool to adjust its placement and scale. You can move the image freely inside the shape, and scale it up or down to achieve the desired composition. The custom shape acts as the window through which you view the image.
Step 7 - Layer Order (Ensuring Correct Placement)Similar to the Frame Tool method, ensure the image is correctly nested within the custom shape. If you used "Paste Into," this is usually handled automatically. If you simply placed the image and then drew the shape over it, you might need to use "Object" > "Arrange" > "Send to Back" on the custom shape to ensure it's the top-most object defining the mask.
Step 8 - The Customized Shape as the Clipping MaskYour custom vector shape now functions precisely as a clipping mask. The image is confined to the boundaries of this shape. Any part of the image extending beyond the shape's edges will be hidden.
Step 9 - Adjust or Reposition the Shape and ImageYou retain full control. You can move the entire masked object (the shape and its contained image) by selecting both and dragging. You can also adjust the custom shape itself, and the image will adapt its visible area accordingly. This dynamic relationship allows for fluid design adjustments.
C. Clipping Mask Using Typeface in InDesign
One of the most visually striking applications of clipping masks is using text as the mask itself, allowing an image to fill the letters. This creates a powerful typographic effect.
Step 1 - Use the Text ToolBegin by selecting the Text Tool from the Tools panel. Click on your document and type the desired text. Choose your typeface, font size, and any other text attributes before proceeding. The clarity and style of the font will significantly impact the final result.
3 EASY InDesign Clipping Techniques You Should Know
Step 2 - Convert Text to OutlinesOnce you have your text formatted as desired, switch to the Selection Tool (black arrow). Click on the text frame to select it. Then, navigate to the Type menu at the top of the screen and select "Create Outlines." This command converts the live text into a series of vector shapes, essentially turning each letter into a compound path. This is a crucial step, as it transforms the text into an object that can contain an image.
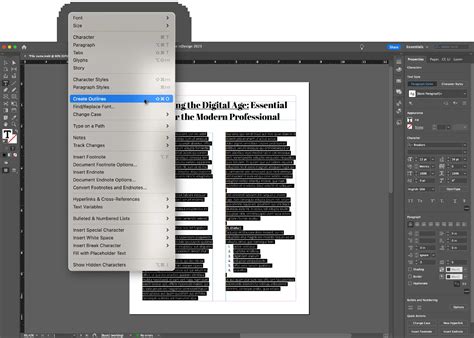
Step 3 - Place and Paste the Image into the OutlinesWith the text now converted to outlines, you can treat it as a container. Go to "File" > "Place" and select the image you want to fill the text with. After placing the image somewhere on your pasteboard or document, cut it ("Edit" > "Cut"). Now, select the outlined text object. Navigate to "Edit" > "Paste Into." This command will insert the cut image directly into the outlined text, with the text shape acting as the clipping mask.
Step 4 - Adjust the Image Position within the TextAfter using "Paste Into," the image will fill the text outlines. You will likely need to adjust the image's position and scale within the text to achieve the desired effect. Use the Selection Tool to select the image content inside the text. You can then drag it to reposition it, or scale it to reveal different parts of the image within the letters. The outlined text remains the mask.
Step 5 - Refine and FinalizeContinue adjusting the image placement and scale until you are satisfied with how the image interacts with the typography. You can also adjust the color of any remaining background or stroke on the text outlines if needed, though typically the goal is for the image to fully define the letterforms.
Frequently Asked Questions
1. How do you create a clipping mask in InDesign?To create a clipping mask in InDesign, you draw a frame shape using the Frame Tool, place an image inside it using "File" > "Place," and then adjust the image within the frame using the Selection Tool. The frame automatically acts as a mask, showing only the area inside its shape.
2. Can you make a clipping mask in InDesign like Photoshop?InDesign does not utilize a separate "clipping mask" command in the same way Photoshop does. Instead, InDesign's frames inherently function as masks. Placing an image inside any frame shape automatically creates the desired masking effect.
3. How do you mask an image in InDesign?To mask an image in InDesign, you first create a frame using any of the available shape tools. Then, you place your desired image into that frame. Finally, you reposition and resize the image within the frame as needed. Only the portion of the image that falls within the boundaries of the frame will remain visible.
4. What is the shortcut for clipping mask in InDesign?InDesign does not have a dedicated shortcut specifically for creating clipping masks because the functionality is integrated into the frame system. However, you can quickly place an image into a selected frame using the shortcut Ctrl + D (on Windows) or Command + D (on Mac).
5. How is a clipping mask different from cropping in InDesign?Cropping is a destructive process that permanently removes portions of an image, reducing its file size and data. A clipping mask, on the other hand, merely hides areas of an image that fall outside the defined mask shape. The hidden parts of the image remain intact and can be accessed, repositioned, or revealed again at any time by adjusting the mask or the image content.
6. Where is the clipping mask option in InDesign?There is no explicit "Clipping Mask" menu option in InDesign. The frames themselves serve as clipping masks. Therefore, the process involves creating a frame (using frame tools or drawing shapes) and then placing an image inside it. The shape of the frame automatically creates the clipping mask effect.
7. Can you use multiple shapes as a clipping mask in InDesign?Yes, you can group multiple vector shapes together. Once grouped, this combined shape can then be used as a frame or container for an image, effectively acting as a single, complex clipping mask. You can also use the "Paste Into" command with a group of shapes to achieve this.
Advanced Considerations and Workflow
The fundamental principle of InDesign's masking is that the topmost object in a stack defines the visible area of the object(s) below it. This is particularly relevant when working with custom vector shapes or text converted to outlines. When you "Paste Into" an object, InDesign intelligently places the content inside and sets up the correct stacking order.
For instance, when using text as a mask, the process involves selecting the text frame, going to "Type" > "Create Outlines," and then using "Edit" > "Paste Into" to insert an image. This command is a specialized form of pasting that respects the boundaries of the selected object. The outlined text then acts as the mask, controlling which parts of the pasted image are visible. This functionality has been available in InDesign CS5 and later versions.
It's important to differentiate clipping masks from pure cropping. Cropping is akin to cutting away parts of an image, permanently altering its dimensions. A clipping mask, however, is a non-destructive overlay. The image data remains complete; only its display is limited by the mask's boundaries. This allows for greater flexibility in design, as the clipped image can be repositioned or resized within the mask at any time.
When you need perfectly isolated images for print layouts, product catalogs, or marketing materials, professional clipping path services can ensure clean, accurate cutouts that are ready for seamless integration into InDesign, Photoshop, and other design software. These services often leverage advanced techniques to create precise paths that can be used for masking.
The concept of clipping paths, often associated with image editing software like Photoshop, also has relevance in InDesign. A clipping path essentially crops an artwork so that only a portion is visible through a defined shape. This can be created using various tools, including alpha channels or saved paths within a graphic file itself. InDesign can interpret these embedded paths when an image is placed, using them as a form of clipping mask. This is particularly useful when images are prepared in advance with specific masking requirements.
For example, a graphic might have an alpha channel saved with it, which InDesign can then use to define the clipping path. Alternatively, a path can be defined within the image file itself, and InDesign can be instructed to use this path. This approach is common when working with complex silhouettes or when an image needs to be precisely contained within a non-standard shape that is part of the image file's metadata. In such cases, the "Clipping Path Options" dialog box in InDesign provides controls to select which path or channel to use.
The "Convert Clipping Path to Frame" command is another useful feature. If you have an image with an existing clipping path, this command allows you to convert that path into an InDesign frame, which then functions as a clipping mask. This streamlines the workflow when importing pre-masked images.
Understanding the interplay between frames, vector shapes, outlined text, and imported clipping paths provides a comprehensive toolkit for mastering image presentation in InDesign. The flexibility offered by these techniques empowers designers to achieve sophisticated and visually compelling results.