In the realm of graphic design and digital publishing, Adobe InDesign stands as a cornerstone for creating professional layouts. A fundamental concept within InDesign, and indeed any design software, revolves around the effective use of "objects" and "frames." Understanding these elements is crucial for managing content, achieving precise visual arrangements, and ensuring a polished final product. An object, in essence, is any item you add or create within your InDesign document. This broad category encompasses a variety of elements, including paths, shapes, rasterized artwork, 3D objects, and any files you might place into your project. The ability to create, resize, and strategically move these objects and frames around your layout is paramount to achieving the perfect design for your specific project.
Understanding Frames: More Than Just Containers
Frames in InDesign serve a dual purpose: they act as containers for your content, and they also function as objects themselves that can be manipulated. You can create frames using InDesign's built-in drawing tools, such as the Rectangle Frame tool. These frames can be drawn to specific dimensions, allowing for precise placement within your layout. Importantly, frames can be designated to hold either text or graphics. This flexibility makes them indispensable for organizing different types of content within a single document.
Initially, you might draw empty placeholder shapes using the drawing tools. These placeholders can then be defined as either text or graphics frames. This approach is particularly useful for setting up a layout before the final content is ready. By drawing empty placeholder shapes using drawing tools, you create designated areas where importing final text or graphics takes just one step. The type of frame-text or graphic-can be redefined at any time using the Object > Content menu. For instance, a frame initially intended for a graphic can be redefined as a text frame, and vice versa. This adaptability is key to efficient workflow, especially when designs need to be adapted to fit a new layout or when content changes.
Types of Frames and Their Purpose
InDesign offers distinct types of frames tailored for different content needs:
- Graphics Frames: These are specifically designed to hold images, illustrations, or other graphic elements. When you use the Rectangle Frame tool, you are inherently creating a graphics frame. This frame acts as a container, and the image you place within it can be scaled, positioned, and cropped independently of the frame itself. A graphics frame placeholder is visually distinct, often showing a crosshair in the center when empty.
- Text Frames: These frames are intended for textual content. When you select the Type tool and click and drag, you create a text frame. Text flows within these frames, and their properties, such as alignment and spacing, are controlled within the frame.
- Unassigned Frames: Initially, a frame might be unassigned, meaning it hasn't been explicitly designated as a text or graphics frame. You can redefine its content type using the Object > Content menu.
The ability to switch between these frame types, or to redefine them, ensures that your design process remains fluid and responsive to evolving project requirements. This also means that a path, or a path as a frame, can be redefined at any time, offering a high degree of creative control.
Creating and Importing Graphics into Frames
The process of creating image frames and importing images into these frames is a fundamental skill in InDesign. Let's delve into the practical steps involved.
Drawing Image Frames
To begin, you'll typically select the Rectangle Frame tool from the InDesign toolbar. With this tool active, you can simply click and drag on your document's page to create frames of the desired size and proportion. These frames will appear on your layout, often with an "X" visible in the middle, signifying that they are placeholders awaiting content. For example, on the front page of a design, you might click and drag from one corner to create a frame positioned precisely between other design elements, like a top rectangle and a rectangle below it. Similarly, you can add frames in various locations, such as on the bottom right of a page or in the top-left corner of another.
Importing Images into Frames
Once your frames are in place, you have two primary methods for importing images:
- Using the "Place" Command: Navigate to
File > Place. This is the standard InDesign terminology for bringing external files into your document. Within the dialog box, you can select the image file you wish to import. After selecting the file and clicking "Open," the image will load into your cursor. You can then click within a frame to place the image, or click and drag to resize it as it's being placed. - Using the Properties Panel: Alternatively, you can select an existing frame and then use the
Import Fileoption, often found in the Properties panel or accessible by right-clicking within the selected frame. This method directly places the chosen image into the pre-existing frame.
Manipulating Content Within Frames
A key aspect of working with frames is the ability to manage the content within them independently of the frame itself. When you place an image into a frame, you'll notice two distinct elements: the frame itself and the actual image content.
- Selecting the Frame: If you click once with the Selection tool on the frame, you are selecting the frame's bounding box. This allows you to resize, move, or delete the frame.
- Selecting the Content: If you double-click inside the frame with the Selection tool, you are now selecting the actual image content. This enables you to resize, move, or reposition the image within the confines of its frame.
This distinction is crucial for achieving precise visual compositions. You can resize the frame to fit your layout, and then adjust the image within it to highlight specific areas or achieve a desired aesthetic.
Advanced Frame and Content Adjustments
InDesign offers a sophisticated set of tools and options for fine-tuning how images fit within their frames, ensuring that your visuals are presented effectively.
Fitting Options for Images
When an image is placed into a frame, it may not automatically align perfectly. InDesign provides several "Fitting" options to help you achieve the desired look:
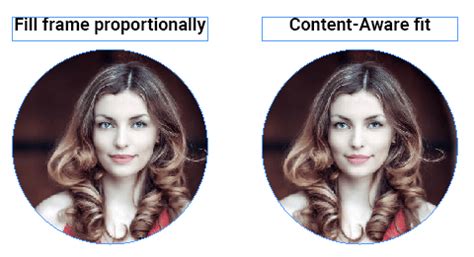
- Fill Frame Proportionally: This option scales the image so that it fills the entire frame while maintaining its original aspect ratio. Parts of the image may be cropped if they extend beyond the frame's boundaries. This is useful when you want the frame to be completely covered by the image.
- Fit Content Proportionally: This option scales the image so that the entire image is visible within the frame, again maintaining its original aspect ratio. This ensures no part of the image is cropped, but there might be empty space within the frame if the image's aspect ratio doesn't match the frame's.
- Content-Aware Fit: A more advanced option, Content-Aware Fit allows InDesign to analyze the image content and intelligently determine the best way to fit it within the frame. It attempts to preserve important visual elements while ensuring a good overall composition.
To access these options, you typically right-click on the image within the frame and navigate to the "Fitting" submenu. The choice of fitting option often depends on the specific image and the design's requirements.
Cropping and Masking
Cropping and masking are terms that describe hiding part of an object. In the context of frames, this often refers to how the image content is displayed within the frame. When you use the "Fill Frame Proportionally" option, for instance, you are effectively cropping the image to fit the frame. You can also manually crop a graphic by selecting the object using the Selection tool and dragging any handle on its bounding box. Masking can be achieved by placing a shape over an object to hide portions of it, or by using the frame itself to mask the image content.
Transforming and Flipping Images
Beyond fitting, you can also transform and flip images within their frames. For example, if an image is oriented incorrectly, you can right-click on it, go to Transform, and select Flip Horizontal or Flip Vertical to correct its orientation. This is particularly useful when you want a specific part of the image to be visible or positioned in a certain direction within the frame.
Adjusting Frame and Content Alignment
After applying fitting options, you may still need to fine-tune the position of the image within the frame. By selecting the content (double-clicking inside the frame), you can click and drag the image to align specific elements, like a person's face or a key detail, within the frame's boundaries. Similarly, you might need to adjust the frame itself to align perfectly with guides or other layout elements. This often involves zooming in closely to ensure edges meet precisely and to avoid small gaps or overlaps.
Advanced Features and Export Options
InDesign's capabilities extend beyond basic frame manipulation, offering features that enhance workflow and output quality.
Display Performance
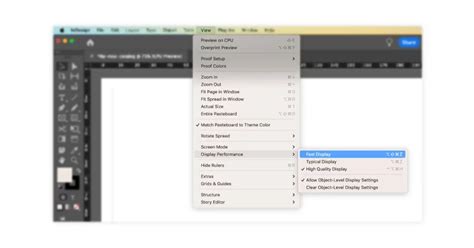
Sometimes, images in InDesign may appear pixelated or low-resolution. This is often a display performance setting, where InDesign defaults to a faster display mode to improve performance, especially with complex documents. To view your images in higher resolution, you can adjust this setting. Right-click on an image and navigate to Display Performance > High Quality Display. You can also apply this setting globally by going to View > Display Performance > High Quality Display. This ensures you're working with an accurate visual representation of your graphics.
Object Export Options
For documents intended for digital distribution, such as EPUBs, HTML, or accessible PDFs, InDesign provides Object Export Options. This feature allows you to specify export parameters for individual objects or frames. You can select optimized image formats like GIF, JPEG, SVG, or PNG, and even specify settings like inserting page breaks with images or defining CSS width relative to text flow or text size for EPUB and HTML layouts. This granular control ensures that your exported digital content is optimized for its intended platform.
Using Frames as Placeholders
Frames can also be used as placeholders for content that will be added later. By drawing empty placeholder shapes using the drawing tools and defining them as text or graphics frames, you can establish the structure of your document in advance. This streamlines the process of importing final text and graphics, as the frames are already in place and correctly sized.
Anchored Objects
InDesign also supports the concept of anchored objects, where an object (like a graphic) is attached to a specific point in the text. This means that as the text reflows or moves, the anchored object moves with it, maintaining its relative position to the text. This is managed through the Anchored Object Options dialog box and is invaluable for ensuring that illustrations or callouts remain correctly associated with the relevant text, especially when the page size changes or columns are resized.
Layout Adjustment
For dynamic layouts, InDesign's Layout Adjustment feature can be a powerful tool. This feature allows InDesign to automatically adjust objects, including graphics, frames, and groups, when page sizes, margins, or column guides are changed. Objects can be set to move proportionally from page edges, margins, or column guides, or to maintain specific distances. This ensures that your design remains cohesive and well-proportioned even when adapting to different page dimensions or orientations.
Learn Adobe InDesign in 11 MINUTES! | Formatting, Tools, Layout, Text Etc. | 2023 Beginner Basics
By mastering the creation, manipulation, and advanced options associated with frames in InDesign, designers can achieve greater precision, efficiency, and creative control over their layouts, ensuring that both print and digital publications are visually stunning and functionally effective. The ability to treat frames as both containers and manipulable objects, coupled with sophisticated fitting and export options, makes them a cornerstone of professional design workflows.