Photoshop, while primarily known as a powerful raster image editor, also offers robust vector-based tools for creating and manipulating shapes. Understanding how to work with paths and shapes is crucial for achieving precise, scalable graphics and intricate designs. This tutorial delves into the fundamental concepts and practical applications of paths and shapes within Photoshop, guiding you from basic path creation to advanced manipulation.
Understanding the Anatomy of a Path
A path in Photoshop is a vector-based drawing that consists of one or more straight or curved segments. These segments are defined by anchor points, which mark the endpoints of each segment.
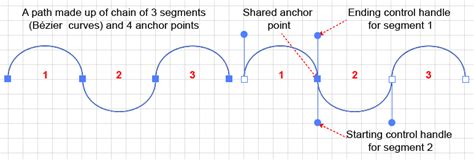
- Path Segment: This is a portion of a path, which can be either a straight line or a curve.
- Anchor Point: These are the markers that define the beginning and end of path segments. They are the control points for the path's shape.
- Direction Line (or Handle): For curved segments, direction lines extend from anchor points. These lines, along with their direction points, control the curvature and flow of the path.
- Direction Point: The end of a direction line, which can be dragged to adjust the curve.
Paths do not have to be a single, continuous line. A path can be composed of multiple distinct and separate path components. When you select a path component or segment, all its associated anchor points and direction lines become visible, allowing for detailed editing.
Smooth Points vs. Corner Points
The nature of the connection between path segments at an anchor point determines whether it's a smooth point or a corner point:
- Smooth Points: Anchor points where curves are connected smoothly, creating a continuous flow. Adjusting the direction lines on one side of a smooth point will affect the curve on both sides symmetrically.
- Corner Points: Anchor points where straight segments meet, or where two curved segments meet at an angle. If a corner point has direction lines, they can often be manipulated independently, allowing for sharper transitions or distinct curve shapes on either side of the point.
Working with Paths: Selection and Manipulation
Photoshop provides intuitive tools for selecting and modifying paths, allowing for precise control over your vector artwork.
Selecting Paths and Components
To select an entire path component, including shapes within a shape layer, you typically use the Path Selection Tool (often referred to as the black arrow). Clicking anywhere inside a path component will select it.
- Selecting Segments and Anchor Points: The Direct Selection Tool (often referred to as the white arrow) is used to select individual path segments or anchor points. Once a curved segment or its anchor points are selected, their direction lines will appear, enabling detailed adjustments.
- Isolation Mode: For focused editing, you can work with paths in isolation mode. With a path active, double-clicking with a selection tool can isolate the layer containing that path.
Editing Path Segments and Curves
Once a path segment or anchor point is selected, you can manipulate it in several ways:
- Adjusting Segment Position: Dragging a selected curved segment directly will move it.
- Refining Curve Shapes: With a curved segment or anchor point selected, dragging the anchor point or its direction points will alter the shape of the curve on either side. This action intuitively transforms path shapes by adjusting related segments.
- Deleting Segments: Selected path segments can be deleted using the Delete key.
- Converting Anchor Points: The Convert Anchor Point Tool allows you to change the nature of an anchor point. Clicking on a smooth point with this tool will convert it into a corner point, and vice versa. You can also drag from a corner point to create direction lines, transforming it into a smooth point.
Extending and Connecting Paths
Paths can be extended or connected to create more complex shapes:
- Extending an Open Path: With the Pen tool selected, position it where you want to end a new segment and click. If you're adding a curved segment, you'll drag to establish the curve.
- Connecting Paths: To connect two separate paths, select the path you want to extend. Then, with the Pen tool, click on an endpoint of the other path. A small merge symbol next to the pointer indicates that the paths will be joined.
Adding and Removing Anchor Points
Adding anchor points provides greater control over a path or allows for extending open paths. However, it's advisable to add only necessary points, as paths with fewer points are generally easier to edit, display, and print.
- Automatic Tool Switching: By default, the Pen tool automatically switches to the Add Anchor Point tool when positioned over a selected path, and to the Delete Anchor Point tool when positioned over an anchor point.
- Manual Selection: You can also manually select the Add Anchor Point or Delete Anchor Point tools from the Pen tool's fly-out menu.
Working with Multiple Paths
Photoshop allows for simultaneous selection and editing of multiple paths. This is particularly useful for aligning or distributing components.
- Selecting Multiple Paths: Use the Path Selection tool to select individual paths or drag a bounding box around them. Holding the Shift key while clicking allows for multi-selection.
- Aligning and Distributing: With multiple path components selected, you can use alignment and distribution options (similar to those for objects) to arrange them precisely.
Photoshop's Drawing Modes: Shapes vs. Paths vs. Pixels
When drawing shapes in Photoshop, you have three primary drawing modes to choose from, located in the Options bar: Shape Layers, Paths, and Fill Pixels. Understanding the distinctions between these modes is fundamental to efficient workflow.
Shape Layers (Vector Shapes)
This is generally the preferred mode for creating shapes in Photoshop.
- Vector-Based: Shapes created with the Shape Layers option are vector-based. This means they are defined by mathematical equations rather than pixels.
- Scalability: The most significant advantage of vector shapes is their infinite scalability. You can resize them to any dimension without any loss of quality, crispness, or sharpness. They are resolution-independent.
- Editability: Vector shapes are highly editable. You can easily change their color, fill, stroke, and precisely reshape them by manipulating their anchor points and direction handles.
- Layer Structure: Each new vector shape drawn in this mode is placed on its own dedicated Shape Layer in the Layers panel. This keeps your artwork organized and allows for easy manipulation of individual shapes.
- Combining Shapes: Multiple vector shapes can be combined on the same Shape Layer, creating complex composite shapes through operations like adding, subtracting, intersecting, or excluding areas.
Paths
When you select the Paths option in the Options bar, you are creating vector-based outlines.
- Vector Outlines: Paths are also vector-based, composed of mathematical points, lines, and curves, just like vector shapes.
- No Fill by Default: Unlike Shape Layers, paths by themselves do not have a fill color or stroke applied by default. They are essentially outlines.
- Independence from Layers: Paths are independent of layers. They are managed in their own dedicated Paths panel, which is typically grouped with the Layers and Channels panels.
- Temporary Nature: Paths created this way are initially referred to as "Work Paths." They are temporary and will not be saved with the document unless you explicitly save them by renaming them in the Paths panel.
- Conversion: A path can be converted into a Shape Layer, a selection, or used to create a mask. This conversion process allows you to add color, stroke, or other properties to the path.
Fill Pixels (Pixel-Based Shapes)
This mode creates shapes made of pixels, similar to how digital photographs are constructed.
- Pixel-Based: Shapes created with the Fill Pixels option are rasterized. They are composed of individual pixels.
- Limited Scalability: Pixel-based shapes have significant limitations when it comes to scaling. Enlarging them beyond their original size will result in a loss of sharpness, leading to a blurry or "pixelated" appearance. They are resolution-dependent.
- Less Editability: Changing the color or reshaping pixel-based shapes is more challenging and less precise compared to vector shapes. Resizing can degrade quality.
- Layer Structure: Pixel shapes are drawn onto the currently active layer. If you want a pixel shape on its own layer, you must create a new blank layer before drawing.
Practical Applications and Workflow Tips
Paths and shapes in Photoshop offer a wide range of applications for graphic designers, illustrators, and photo editors.
Creating Logos and Graphics
The vector-based nature of shapes and paths makes them ideal for creating logos, icons, and other graphics that need to be scaled to various sizes without losing quality.
Precise Selections and Masking
Paths are invaluable for creating precise selections of objects from their backgrounds. You can convert a path into a selection, which can then be used to create layer masks for non-destructive editing.
Stylizing Text and Typography
Paths can be used to create custom text paths, allowing you to make text follow a curve or any other defined path, adding an artistic flair to typography.
Combining and Modifying Shapes
When working with Shape Layers, you can combine multiple shapes using boolean operations (Add, Subtract, Intersect, Exclude) to create intricate and unique forms.
Workflow Tips for Paths and Shapes
- Use Shape Layers Whenever Possible: For most shape creation tasks, the Shape Layers option is the most efficient and versatile.
- Leverage the Paths Panel: Familiarize yourself with the Paths panel for managing, saving, and converting your paths.
- Save Paths for Reuse: If you create a complex path that you anticipate using again, save it in the Paths panel.
- Zoom In for Precision: When working with anchor points and direction lines, zoom in to ensure accurate adjustments. Use
Command + +(Mac) orCtrl + +(Windows) to zoom in. - Organize Your Layers: Keep your Shape Layers organized in the Layers panel, using descriptive names.
- Convert Paths to Selections: A common workflow involves drawing a path and then converting it into a selection for further editing or masking.
- Understand Tool Options: Pay close attention to the Options bar when using shape and path tools. The selected drawing mode (Shape Layers, Paths, Fill Pixels) and any associated options (like shape combination modes) significantly impact the outcome.
Master the Pen Tool in 30 Minutes | Photoshop In-Depth Tutorial
By mastering the concepts of paths and shapes in Photoshop, you unlock a powerful set of tools for creating professional, scalable, and editable graphics. Whether you're designing a logo, creating intricate illustrations, or refining selections, a solid understanding of these vector-based features will significantly enhance your creative capabilities.