Photoshop has long been the industry standard for image manipulation, offering a vast array of tools to refine and alter photographs. Among its most powerful recent additions is the AI-powered Remove Tool, a revolutionary feature designed to make the process of removing unwanted people, objects, and distractions from images simpler and more intuitive than ever before. This tutorial will guide you through the fundamentals of using this groundbreaking tool, exploring its capabilities, and comparing its effectiveness with traditional Photoshop methods.
Understanding the Remove Tool: A New Era of Object Removal
The Remove Tool represents a significant leap forward in Photoshop's retouching capabilities. Unlike previous tools that often required intricate selections, complex masking, or multiple steps, the Remove Tool leverages artificial intelligence and machine learning to achieve remarkable results with minimal user input. Its core functionality is straightforward: you simply paint over the unwanted element, and Photoshop's AI intelligently analyzes the surrounding pixels to generate a seamless replacement. This approach eliminates the need for confusing dialog boxes or precise selection techniques, making advanced object removal accessible to users of all skill levels.
The Remove Tool is particularly adept at cleaning up imperfections that can arise even from other AI-powered tools. For instance, when using Photoshop's Generative Fill feature, you might encounter slight anomalies or unwanted artifacts. The Remove Tool acts as the perfect companion in these scenarios, allowing you to quickly and easily rectify any issues within the AI-generated content, ensuring a polished and professional final image.
Getting Started: The Basics of Removal
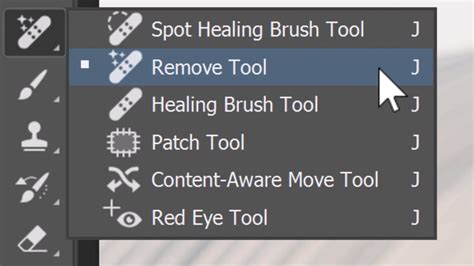
To begin using the Remove Tool, locate it within Photoshop's toolbar. It resides in the same group as other healing tools, such as the Spot Healing Brush. If you haven't used it recently, you might need to click and hold on the Spot Healing Brush icon to reveal the Remove Tool.
The Remove Tool functions as a brush, not a selection tool. The process is as simple as painting directly over the person or object you wish to eliminate. You can adjust the brush size to suit the area you're working on by using the left and right bracket keys ([ and ]) on your keyboard. Once you've selected your brush size, carefully paint over the entire area of the person or object you want to remove.
By default, the Remove Tool will automatically process the removal and attempt to fill the area as soon as you release your mouse button. While this behavior is convenient for smaller objects, we'll explore how to modify this setting later for more complex removals.
Initial Results and Comparison with the Spot Healing Brush
After releasing the mouse button, Photoshop's AI gets to work. For many common scenarios, the results are surprisingly impressive, even if not always perfect on the first attempt. The Remove Tool does an amazing job of intelligently analyzing the background and reconstructing the area where the object once was.
To illustrate the effectiveness of the Remove Tool, let's compare it with one of Photoshop's traditional tools: the Spot Healing Brush. In a side-by-side comparison, the Spot Healing Brush, when used on the same image, might make less ideal choices. For example, it could inadvertently incorporate parts of the removed object into the filled area, leading to unnatural or distorted results. The Remove Tool, on the other hand, typically provides a cleaner and more contextually appropriate fill, demonstrating its superior AI-driven capabilities. The winner in such comparisons is often obvious, with the Remove Tool producing a more aesthetically pleasing and believable outcome.

It's important to note that the Remove Tool is not only capable of removing objects but also of correcting its own imperfections. If an initial removal isn't entirely satisfactory, you can often refine the area further by painting over it again. This iterative process allows for a degree of cleanup and improvement, ensuring you achieve the desired result.
Non-Destructive Editing with the Remove Tool
A critical aspect of professional image editing is non-destructive workflow. This means making edits in a way that allows you to go back and modify them later without permanently altering the original image data. Initially, when you use the Remove Tool, it might make a direct, destructive edit to the layer you're working on, typically the Background layer. This means the removed person or object is gone from that layer permanently.
Fortunately, the Remove Tool can also be used in a non-destructive manner. To achieve this, you first need to ensure your edit will be applied to a new layer. This is typically done by creating a new, empty layer above your background layer before selecting the Remove Tool.
Once you have your new layer selected and the Remove Tool active, ensure that the "Sample All Layers" option is checked in the Options Bar. This setting tells the Remove Tool to consider all visible layers when analyzing the image for content to fill the removed area. Now, when you paint over an object on the background layer, the removal and reconstruction will be applied to the active, empty layer, leaving your original image untouched.
Handling Multiple Objects and Complex Areas
The Remove Tool excels even when dealing with multiple objects that are close to each other. If you have several people or objects situated next to each other with no significant gap, you can often remove them all with a single, continuous brush stroke. Simply paint over the entire group, and upon releasing the mouse button, the AI will process the removal for all of them simultaneously.
When comparing this to the Spot Healing Brush again, the Remove Tool's advantage becomes even more apparent. The Spot Healing Brush might struggle with overlapping or closely packed elements, leading to a more fragmented or less coherent result. The Remove Tool, with its advanced AI, is better equipped to understand the context and blend the filled areas harmoniously.
Refining the Edges and Repairing Artifacts
While the Remove Tool is powerful, there might be instances where its initial removal leaves behind minor artifacts or requires further refinement, especially in areas with intricate details like beaches or water. For example, a triangle-shaped artifact might appear on a beach after a removal.
This is where the ability to paint over an area multiple times becomes invaluable. You can continue to paint over these problematic areas with the Remove Tool until you are satisfied with the result. This iterative approach allows you to meticulously clean up the edges and smooth out any inconsistencies.
Master Brush Tool from Start to Finish - Photoshop for Beginners | Lesson 12
Controlling the Removal Process: "Remove After Each Stroke"
By default, the Remove Tool performs its magic as soon as you lift your mouse button. This is perfectly fine for small, isolated objects. However, when dealing with larger areas or more complex scenes, you might prefer more control over when the removal is applied.
This is where the "Remove after each stroke" option in the Options Bar comes into play. If you uncheck this box, the Remove Tool will not process the removal immediately after you finish painting a stroke. Instead, it will wait until you explicitly tell it to do so, usually by clicking a checkmark icon in the Options Bar or by pressing Enter. This allows you to meticulously paint over a large or intricate area with multiple strokes, defining the exact boundaries of the removal before Photoshop's AI intervenes.
When removing a large person, for instance, you can use a smaller brush to carefully paint along the edges, defining the precise outline of what needs to be removed. Then, you can switch to a larger brush to quickly fill in the remaining central area. Only when you've completed all your strokes and are ready for the AI to work do you trigger the removal process.
The Remove Tool as a Detail Repairer
The Remove Tool's capabilities extend beyond simple object deletion. It can also function as a sophisticated tool for repairing and aligning intricate details, such as architectural lines or textures.
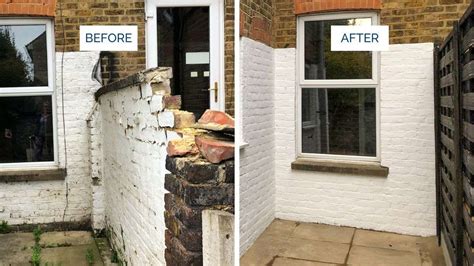
Consider a scenario where you need to remove a person standing in front of a brick wall, and the removal process leaves misaligned or broken brick lines. Normally, you might resort to the Clone Stamp Tool to manually repair these edges, a process that can be time-consuming and require significant skill. However, the Remove Tool, with its AI, can often handle this task automatically.
For such detailed repairs, it's often beneficial to re-enable "Remove after each stroke." The trick to effectively repairing edges with the Remove Tool is to use numerous short strokes and exercise patience. Instead of attempting to fix a large section of the edge all at once, focus on smaller segments. Paint across a smaller section of the edge, and when you release your mouse button, the AI will analyze and attempt to align that specific segment. Repeating this process along the entire broken edge allows the AI to intelligently snap each section into alignment, reconstructing the wall's integrity.
While the Remove Tool is remarkably adept at repairing many types of edges, it's important to acknowledge its limitations. In highly complex scenarios, such as repairing intricate details on uneven ground where a person was standing, the AI might not always achieve a perfect result. In such cases, a combination of the Remove Tool and traditional tools like the Clone Stamp might be necessary to achieve the absolute best outcome.
Advanced Scenarios: Removing Difficult Subjects and Combining Techniques
The AI-powered Remove Tool, while incredibly powerful, is not the only method for removing subjects from photographs. Depending on the complexity of the image and the desired outcome, different approaches may be more suitable. Let's explore two distinct scenarios for removing a person from a photo.
Scenario 1: Utilizing a Clean Background Plate
This is often the ideal scenario for professional retouching. If you have the opportunity during the photoshoot, the best approach is to capture a separate image of the background without the subject present. This "clean background plate" provides perfect, unadulterated source material.
If you're working with an image from a stock photo service like Adobe Stock, you might be able to find additional photos from the same shoot that can serve this purpose. By searching for other images from the same session, you might find one that captures a different angle or reveals a part of the background that was obscured by the subject in your primary image.
Once you have your primary image and a suitable background plate, you can import the background plate into the same Photoshop document as your main photo. Then, you can drag this new image into the tab of your main photo document. After the document opens, position the background plate so that it covers the area where the person was. By carefully aligning and blending this clean background layer over the subject in the original image, you can achieve a seamless removal. For instance, painting the top half of the image with the clean background layer can make it look perfect. However, one might still need to address subtle elements like shadows, such as a shadow on a crosswalk, which may require further refinement.
Scenario 2: Removing a Person from a Single Image
In many situations, you'll only have a single image to work with, and no clean background plate is available. This is where tools like the Remove Tool and the Clone Stamp Tool become essential.
With your person selected in the image, you have two primary paths: either meticulously fix the rest of the photo using the available tools or employ techniques that leverage parts of the existing image to patch the area.
The Remove Tool can be very effective here. You paint over the person, and the AI attempts to fill the space. However, as we've seen, this might require subsequent cleanup.
Alternatively, you can utilize the Clone Stamp Tool. This tool allows you to sample a part of the image (by pressing Alt/Option and clicking) and then paint that sampled area onto another part of the image. This is incredibly useful for copying textures, patterns, or background elements to cover up the unwanted subject. You can clone bits in the photo to plug in the holes and hide areas that look weird. It's often best practice to clone onto a new layer, which keeps your edits non-destructive. Don't worry if you go over the intended area; these imperfections can be fixed with further cloning or by using the Remove Tool.
Sometimes, you'll encounter challenges, like needing to sample from an area with a different angle or perspective. The Clone Stamp Tool allows you to adjust the angle and scale of your brush to better match the target area. You can also use the "X" key to quickly swap foreground and background colors, which can be useful in certain cloning workflows.
For particularly tricky areas, a combination of techniques often yields the best results. For example, you might use the clean background from the first technique for the upper portion of an image and then use cloning or the Remove Tool for the more complex foreground elements like a crosswalk.
Master Brush Tool from Start to Finish - Photoshop for Beginners | Lesson 12
Photoshop's AI-Powered Remove Tool: A Paradigm Shift
In conclusion, Photoshop's AI-powered Remove Tool marks a significant advancement in digital image editing. It empowers users to remove people and objects from photos with unprecedented speed and ease, far surpassing many traditional methods. Its intuitive brush-based interface, combined with sophisticated AI analysis, makes complex retouching tasks accessible to a broader audience.
While Photoshop's established healing and retouching tools, such as the Spot Healing Brush and Clone Stamp Tool, continue to hold their value for specific applications and nuanced control, the Remove Tool offers a revolutionary approach to object removal. Its ability to intelligently fill gaps, repair edges, and work non-destructively when used with layers positions it as an indispensable tool in any photographer's or retoucher's arsenal. Whether you're cleaning up a casual snapshot or undertaking professional-grade retouching, the Remove Tool streamlines the process, allowing you to achieve cleaner, more polished images with greater efficiency.
tags: #photoshop #remove #person #from #background