DaVinci Resolve templates are an invaluable asset for content creators, offering a powerful way to produce high-quality videos efficiently and cost-effectively. By leveraging pre-designed elements, you can significantly reduce the time spent on repetitive tasks, allowing you to focus on the creative aspects of your projects. This guide will walk you through the essential steps of importing, customizing, and troubleshooting DaVinci Resolve templates, empowering you to elevate your video editing workflow.
Importing and Understanding Your DaVinci Resolve Template
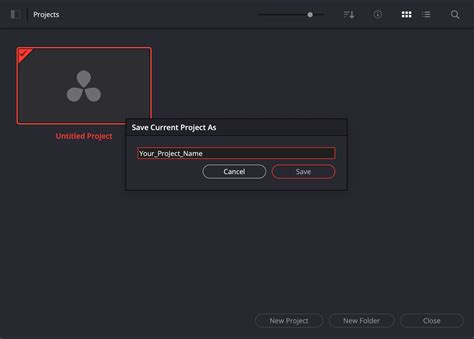
The initial step in utilizing a DaVinci Resolve template involves importing it into the software. The most straightforward method is through the Project Manager.
Upon downloading a DaVinci Resolve template, you'll typically find it as a project archive. To open it, navigate to the DaVinci Resolve Project Manager. Right-click anywhere within the Project Manager window and select the "Restore Project Archive" option. Subsequently, direct the software to the folder where you've saved your template and click "Open." The template project will then appear in your Project Manager list. Double-click on it to open the project.
It's crucial to ensure that any custom fonts included with the template are installed on your system before opening the project. This pre-emptive step guarantees that all text elements within the template will render correctly, preventing potential visual disruptions and saving you troubleshooting time later on.
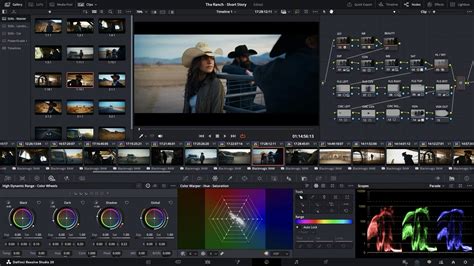
Once the template project is open, you'll likely observe that instead of the specific media you intend to use, the project is populated with a series of placeholders. This is a standard feature of templates, designed to be easily swapped out with your own content.
Customizing Your Template: Swapping Placeholders and Editing Assets
The true power of DaVinci Resolve templates lies in their customizability. You can effortlessly replace the generic placeholders with your own images, footage, and text.
Replacing Media Placeholders:
To begin editing the assets within the template, navigate to the "Edit" folder within your project. Within the "Edit" folder, locate and select the "Shots" folder. Here, you'll find the individual placeholder elements. Double-click on a specific shot, and your main timeline will be replaced by the timeline that houses this placeholder.
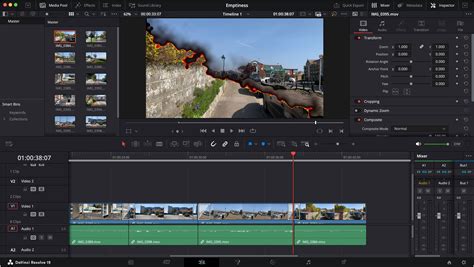
To replace the placeholder, simply delete it from the timeline and then drag and drop your desired image or footage file from your computer directly into the Media Pool. Once your media is in the Media Pool, you can then drag it from the Media Pool onto the timeline, replacing the deleted placeholder.
To return to the main timeline of your project, you can navigate to the "Render" folder and double-click on the main timeline. Alternatively, and often more conveniently, you can switch between different timelines by using the tabs located at the top of the timeline interface. This allows for quick toggling between your editing views.
After successfully swapping out the media, your project timeline will now be updated with your own footage, and your project will begin to take shape.
Editing Text and Titles:
Beyond visual media, templates also offer customizable text elements. To modify these, return to the "Edit" folder and then navigate to the "Titles" folder. Here, you'll find the pre-designed title elements. Double-click on the title you wish to change. This will typically open the title in the Fusion page or a dedicated title editor, allowing you to modify the text content.
When incorporating your own logos into title templates, it's paramount to ensure that any logo you use has a transparent background. This is usually achieved by saving your logo file in a format that supports transparency, such as a PNG. A transparent background will allow the logo to blend seamlessly with the template's design, rather than appearing as a solid block with a white or colored background.
How To Make A Logo Background Transparent | No Software Required!
Troubleshooting Common Template Import Issues
While DaVinci Resolve templates are designed for ease of use, you might occasionally encounter challenges, particularly when dealing with different project settings.
Handling Frame Rate Mismatches:
A common issue arises when you attempt to import a project with a specific frame rate into a template project that uses a different frame rate. For instance, you might have a project set to 23.976 frames per second (fps) and want to integrate it into a template project configured for 25 or 30 fps.
When faced with this scenario, the recommended approach is to import the template project into your existing project, rather than the other way around. To do this, open your existing project. Then, go to the Project Manager, right-click, and select "Restore Project Archive" to open the template. Once the template project is open, you can then copy and paste its contents into a new timeline within your existing project. The reason for pasting it into a new timeline is to ensure that all the extra material from the template appears in a new bin within your project.
While this method successfully brings all the template's assets into your project, it doesn't automatically change the timeline's frame rate. To achieve a consistent frame rate, you would typically need to adjust the project settings of your main project to match the template's frame rate, or vice versa, depending on your needs.
The Reverse Import Scenario:
You can also perform the import in the reverse direction: import your template project into a different project. However, it's important to be aware that some templates, especially those from sources like Motion Array, integrate Fusion compositions. When you import such a template into another project, some of these Fusion-based elements or materials may become disconnected. This occurs because Fusion compositions are often self-contained and might not transfer perfectly when copied between projects, especially if the source project has a complex Fusion setup.
Conversely, if your own project contains a significant number of Fusion elements, importing a template into it might also lead to disconnections. Essentially, if you encounter problems with elements becoming disconnected or not appearing as expected, experimenting with importing projects from the other direction can often resolve the issue. This involves either importing the template into your main project or importing your main project into the template project.
General Troubleshooting Tips:
- Check Plugin Compatibility: Ensure you have all necessary third-party plugins installed that the template might rely on.
- Verify Media Format: Make sure your imported media files are in a format that DaVinci Resolve supports.
- Update DaVinci Resolve: Sometimes, older versions of DaVinci Resolve might have compatibility issues with newer template features.
- Consult Template Documentation: Many template providers offer specific instructions or FAQs that can help troubleshoot common problems.
The Broader Impact of Using Templates in Video Editing
The adoption of DaVinci Resolve templates extends beyond mere convenience; it represents a strategic shift in how video content is produced. By embracing templates, editors can:
- Accelerate Production Timelines: Pre-designed elements like titles, transitions, and lower thirds drastically reduce the time spent on creating these from scratch. This is particularly beneficial for creators working under tight deadlines or producing a high volume of content.
- Maintain Brand Consistency: Templates can be customized to align with specific brand guidelines, ensuring a consistent visual identity across all video projects. This includes using specific color palettes, fonts, and logo placements.
- Enhance Production Value: Even for beginners, templates offer a way to incorporate professional-looking graphics and animations into their videos, elevating the overall production quality without requiring advanced design skills.
- Democratize Advanced Editing Techniques: Complex visual effects and motion graphics that might otherwise require specialized knowledge and software can be accessed and implemented through templates, making advanced editing techniques more accessible.
- Foster Creative Exploration: By offloading the burden of repetitive design tasks, editors are freed up to experiment more with storytelling, pacing, and narrative, leading to more innovative and engaging content.
The use of a collection of pre-set titles, transitions, and other graphical elements within DaVinci Resolve templates can genuinely speed up projects. With a modest amount of setup time required to import your own media and swap out the placeholders, you will be well-equipped to expedite your editing process and create exceptional content in a significantly shorter timeframe. The ability to seamlessly integrate personal assets into a professionally designed framework is what makes DaVinci Resolve templates such a powerful tool in the modern video production landscape.