The digital landscape is constantly evolving, and with it, the tools and formats we use to present information. Among these, image formats play a crucial role in how efficiently and effectively we convey visual content. The WebP format, a modern image format developed by Google, has emerged as a significant player, offering advanced compression algorithms that result in significantly reduced file sizes while maintaining excellent visual quality. This makes it a highly advantageous format for web-based projects that demand faster loading times. However, for many designers and photographers, integrating this efficient format into their existing workflows, particularly within Adobe Photoshop, has presented a challenge. This guide aims to demystify working with WebP in Photoshop, covering its fundamental understanding, the essential steps for enabling its support, and the myriad benefits it brings to your creative process.
Understanding the WebP Format: Efficiency Meets Quality
WebP is a modern image format that provides advanced compression algorithms, resulting in significantly reduced file sizes while maintaining excellent visual quality. It offers both lossy and lossless compression modes, making it a versatile format for various applications. Compared to traditional formats like JPEG and PNG, WebP delivers smaller file sizes, which is particularly advantageous for web-based projects that require faster loading times. Google launched the WebP format as part of its mission to make loading times faster across the internet. You can choose to save WebP files with either lossless or lossy compression. This means you can either compress images without losing data or with losing only some non-essential information. The WebP format is relatively new, dating back to 2010. Each WebP file consists of VP8 or VP8L image data. Over the years, the format has evolved to keep pace with shifting consumer habits and emerging digital trends. WebP files were designed entirely with the internet in mind. With the help of predictive coding, WebP files compress photos and graphics without reducing the quality of their appearance.
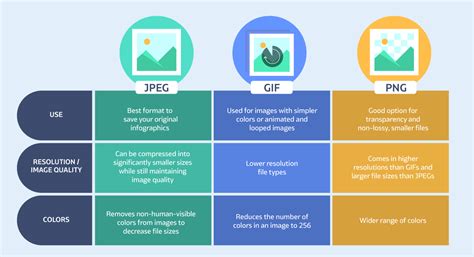
The format supports features like transparency, which is typically handled by PNG, and animation, a domain historically dominated by GIF. WebP's ability to combine these capabilities with superior compression makes it a compelling alternative to these older formats. Unlike JPG, it offers a completely lossless format to completely avoid any artifacts, albeit with a larger file size than a high-quality JPG. It is worth noting that there is an important difference between the lossless format and 100% quality lossy. Very small areas of color detail (such as a red light in a cityscape) may look significantly desaturated compared to the lossless version. In general, you’ll probably need to look extremely close to notice the difference, but high-frequency color is one use case where the extra size of the lossless format may make sense. This behavior may be inherent to the WebP format or Adobe’s implementation, but differences have been observed in several test images. Aside from this narrow difference, the high-quality lossy version generally looks identical to the lossless version for most viewers at a normal viewing distance. Differences are typically only apparent when pixel peeping closely.
The maximum size of WebP images is 16,383 x 16,383 pixels. WebP images are a type of raster file, which consists of individual pixels, as opposed to vector graphics that use mathematical equations and paths.
Key Advantages of WebP:
- Smaller File Sizes: Significantly reduces file sizes compared to JPEG and PNG at comparable quality, leading to faster website loading.
- High-Quality Output: Offers both lossy and lossless compression to maintain excellent visual fidelity.
- Transparency Support: Can handle transparency, similar to PNG, without the large file size penalty.
- Animation Capabilities: Supports animation, providing an alternative to animated GIFs with better compression.
- Widespread Browser Support: Supported by all major modern web browsers, including Chrome, Firefox, Edge, and Opera. Internet Explorer does not support it.
Integrating WebP into Photoshop: Overcoming Default Limitations
WebP files won't open in Photoshop by default because Adobe doesn't include native WebP support in most versions prior to Photoshop 23.2. This means that without the proper codec or plugin, you'll encounter error messages when trying to edit these files. Fortunately, there are straightforward solutions to enable Photoshop to open, edit, and even save images in the .webp format.
Solution 1: Utilizing the Official WebPShop Plugin (for Older Photoshop Versions)
For users of older Photoshop versions (prior to CC 2019 or versions earlier than 23.1), the fastest and most reliable way to open WebP files is by installing the official WebPShop plugin developed by Google's WebM project team. This plugin adds full WebP support to Photoshop, allowing you to open, edit, and save WebP images just like any other format.
Installation Steps:
Download the Correct Plugin:
- For Intel processors (Windows):
WebPShop_0_4_3_Win_x64.8bi - For ARM processors (Windows):
WebPShop_0_4_3_Win_ARM64.8bi - For Mac users:
WebPShop.plugin(typically found within a folder likebin/WebPShop_0_3_2_Mac_x64)
Note: Your Chrome browser might flag these downloads as "insecure downloads," but both files are safe and clean.
- For Intel processors (Windows):
Install the Plugin:
- Windows: Navigate to your Photoshop plugins folder. This is usually located at
C:\Program Files\Adobe\Adobe Photoshop CC\Plug-ins. Copy the downloaded.8bifile into this folder. - Mac: Copy the
WebPShop.pluginfile into your Photoshop'sPlug-insdirectory. The path is typicallyApplications/Adobe Photoshop/Plug-ins.
No restart of Photoshop is required after copying the file.
- Windows: Navigate to your Photoshop plugins folder. This is usually located at
Open WebP Files:Launch Photoshop and use
File → Opento select any WebP image. The format will now work seamlessly with all Photoshop tools and features.
This plugin solution is compatible with Photoshop CC 2019 and newer versions on both Windows and Mac, and it supports all WebP variants, including lossy and lossless.
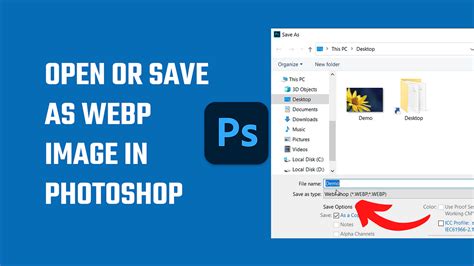
Solution 2: Native Support in Recent Photoshop Versions (23.2 and later)
Adobe has recognized the growing importance of the WebP format and has integrated native support for it starting with Photoshop version 23.2. This means that if you are using a recent version of Photoshop, you no longer need to rely on external plugins to work with WebP files.
Working with WebP in Newer Versions:
- Opening WebP Files: Simply use
File → Openand select your WebP image. - Saving as WebP: After editing your image, navigate to
File → Save a Copy. In the dropdown menu labeled 'Format', you will find the WebP option.
This native support simplifies the workflow significantly, allowing for a more integrated experience when working with WebP images.
How to Open WebP File in Photoshop (Easy Method)
Why WebP Files Matter for Your Workflow
Integrating WebP into your Photoshop workflow offers substantial advantages, particularly for web designers, developers, and digital content creators. The primary benefit lies in the dramatic reduction of file sizes, which translates directly into improved performance and user experience.
Optimizing for the Web
WebP images are typically 25-30% smaller than JPEG files with identical quality, making them essential for modern web projects. Smaller file sizes mean:
- Faster Loading Times: Websites load quicker, leading to a better user experience and potentially improved search engine rankings.
- Reduced Bandwidth Consumption: Less data is transferred, which is beneficial for users with limited data plans and for overall server efficiency.
- Lower Storage Costs: Storing a large number of WebP images requires less disk space compared to their JPEG or PNG counterparts.
Professional Results and Versatility
Once WebP support is enabled in Photoshop, you gain the ability to:
- Edit WebP Images with Full Layer Support: Work on WebP files without losing the integrity of your layers.
- Save Directly to WebP Format: Export your creations directly in the optimized WebP format.
- Maintain Image Quality During Editing: The plugin and native support ensure that image quality is preserved throughout the editing process.
- Utilize All Photoshop Filters and Adjustments: Apply the full range of Photoshop's powerful editing tools to your WebP images.
- Convert Between WebP, PNG, and JPG Formats Seamlessly: Easily convert existing files to WebP for optimization or convert WebP files back to more universally compatible formats when needed.
Converting Existing Files to WebP Format
If you already have a library of PNG or JPG files that you want to optimize for web use, you can easily create WebP versions. While Photoshop's "Save a Copy" feature allows for direct WebP export, there are also free online WebP converters available that can process both TO and FROM WebP formats instantly, without requiring software installation or account registration. These tools can be particularly useful for batch conversions.
Advanced Considerations and Best Practices
While WebP offers significant advantages, understanding its nuances and potential edge cases can help you leverage it most effectively.
Lossy vs. Lossless Compression: Choosing the Right Mode
- Lossy Compression: This mode achieves the smallest file sizes by discarding some image data. For most photographic images viewed at a normal distance, the quality difference between a high-quality lossy WebP and a lossless version is often imperceptible. However, in cases with very fine details or vibrant, high-frequency colors (like city lights at night), some desaturation or loss of detail might occur.
- Lossless Compression: This mode preserves all original image data, ensuring no loss of quality. The resulting file size is larger than lossy WebP but typically smaller than a comparable PNG. This is ideal when absolute fidelity is critical, such as for graphics with sharp lines, text, or when dealing with subtle color gradients.
Recommendation: For general web use, a high-quality lossy WebP (e.g., 75-90% quality) often strikes the best balance between file size and visual fidelity. Use lossless WebP when preserving every pixel is paramount, or when you encounter issues with color banding in lossy formats.
When to Stick with JPEG or PNG
Despite WebP's advantages, there are still scenarios where traditional formats might be preferred:
- Universal Compatibility: If you need to ensure that an image can be opened by absolutely any device or software, JPEG remains the safest bet due to its ubiquity.
- Edge Cases with High-Frequency Color: As mentioned, if your image contains vibrant, small details (like neon signs in a cityscape) where even a slight desaturation is unacceptable, you might opt for a high-quality JPEG or a lossless WebP.
- 16-Bit Workflows: If you encounter extremely rare scenarios where visible banding occurs in your output and you require 16-bit color depth to avoid it, PNG is the current standard. However, this comes with a significant file size penalty.
Working with Other Modern Formats: AVIF
As the digital world progresses, new formats continue to emerge. For instance, AVIF is another modern image format that offers even better compression than WebP. If you find yourself working with AVIF files, you'll need to follow a companion guide on how to open AVIF files in Photoshop, as it also requires specific support or plugins.
Enhancing Exports with Tools like Web Sharp Pro
For users looking to go beyond basic WebP conversion and add advanced features to their image exports, tools like Web Sharp Pro offer a comprehensive solution. Web Sharp Pro v3.7, for example, has added support for WebP, along with features like custom templates, blurred borders, watermarks, advanced crops, film grain, and batch processing. Such tools can streamline the workflow for creating professional-quality exports tailored for various platforms.
When using tools like Web Sharp Pro or Photoshop's native export options:
- The "ultimate" quality setting typically exports with the lossless format.
- The "high" setting is designed to offer quality comparable to similar settings for JPG, but with somewhat smaller final file sizes.
- The "good" setting offers further size savings over a comparable quality JPG.
A Quick Recap of the WebP Plugin Installation
For those still using older versions that require the plugin, remember the process is quick and straightforward: download the correct .8bi or .plugin file, copy it into your Photoshop Plug-ins folder, and you're ready to go. This entire process can often be completed in under 5 minutes, making your Photoshop WebP-ready almost instantly.
In conclusion, embracing the WebP format within your Photoshop workflow is a strategic move towards more efficient, faster, and higher-quality image delivery for the web. Whether you're using the latest Photoshop versions with native support or older versions with the WebPShop plugin, the benefits of reduced file sizes and excellent visual quality are undeniable. By understanding the format's capabilities and following these straightforward integration steps, you can significantly enhance your digital content creation process.