Photoshop's Smart Filters offer a powerful and flexible way to enhance your images without permanently altering them. This tutorial delves into the intricacies of applying and managing Smart Filters, transforming your editing workflow into a non-destructive, highly adaptable process. By understanding Smart Objects, the foundation of Smart Filters, you unlock a new level of creative control and efficiency.
The Power of Non-Destructive Editing with Smart Objects
At the heart of Smart Filters lies the concept of Smart Objects. Think of a Smart Object as a container, a digital "bag" for your image data. When you place an image or a layer into a Smart Object, you're essentially putting it inside this protective container. Any edits or filters applied to the Smart Object are applied to the container, not directly to the original pixels. This means you can later remove, modify, or rearrange these edits without affecting the underlying image.
This non-destructive approach is a cornerstone of modern digital art and photo manipulation. Unlike traditional filters that permanently alter pixels, Smart Filters allow for unlimited revisions. If you decide you've blurred an image too much, or that a particular effect isn't working, you can simply adjust or remove the Smart Filter without degrading the image quality. This flexibility is invaluable for experimentation, allowing artists to try out different looks and effects with confidence.
Converting Layers to Smart Objects
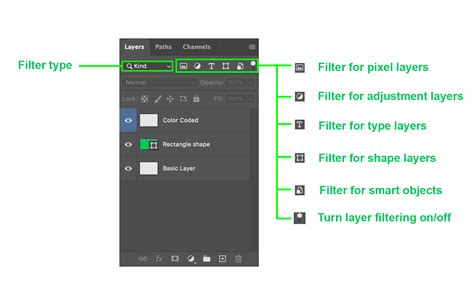
Before you can apply a Smart Filter, the layer you're working on needs to be a Smart Object. If you're starting with a document open in Photoshop CC, and you've added text, for instance, you'll notice it's on a Type layer. If you try to apply a filter directly to this Type layer, Photoshop will prompt you to either rasterize it (making it a pixel-based layer, thus destructive) or convert it to a Smart Object.
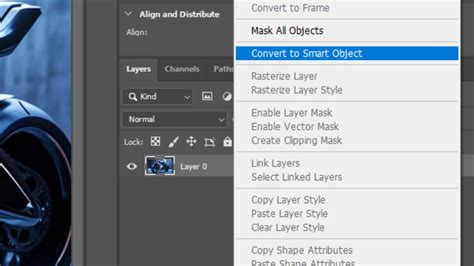
To convert a layer to a Smart Object, you can select the layer in the Layers panel and then choose "Convert to Smart Object" from the Layer menu, or right-click on the layer and select the same option. Once converted, the layer's thumbnail in the Layers panel will change, often displaying a small icon indicating it's now a Smart Object. This signifies that the original content, whether it's pixels or editable text, is now encapsulated within this special layer type.
Applying Your First Smart Filter
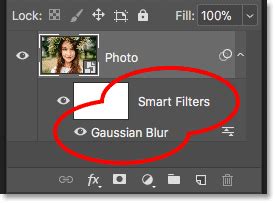
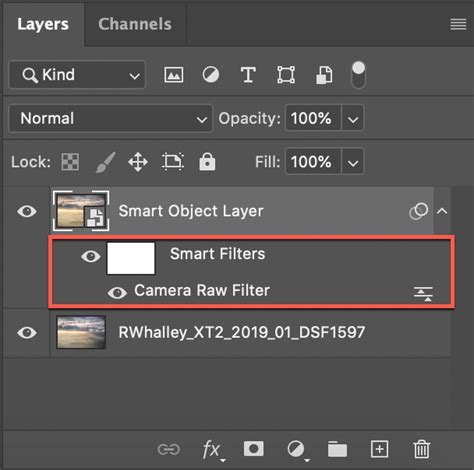
Once a layer is a Smart Object, applying a filter automatically turns it into a Smart Filter. Let's consider applying a Gaussian Blur to text. After converting the Type layer to a Smart Object, selecting the Gaussian Blur filter will open its dialog box. You set your desired radius, and upon clicking "OK," the filter isn't permanently applied. Instead, it appears in the Layers panel, listed beneath the Smart Object.
The true magic lies in the editability. If you decide the blur amount needs adjustment, you don't need to undo and reapply. Simply double-click the name of the Smart Filter (e.g., "Gaussian Blur") in the Layers panel. This re-opens the filter's dialog box with the current settings. You can then tweak the Radius value, or any other applicable setting, and click "OK." The preview updates instantly, reflecting your changes without any loss of quality or commitment to the previous setting. This is the essence of non-destructive editing.
Editing Smart Filter Settings
The ability to edit Smart Filter settings is the primary advantage over traditional filters. If you had rasterized the text and applied Gaussian Blur directly, that blur would be baked into the pixels. With Smart Filters, however, you can change the blur amount from, say, 6 pixels to 20 pixels, and then back down to 2 pixels, all without any degradation. Photoshop remembers the original filter and its editable parameters.
You can also undo edits to Smart Filters. If you've made a change and want to revert to the previous setting, Photoshop's "Undo" command (Ctrl+Z or Cmd+Z) will often be context-aware. Instead of saying "Undo Gaussian Blur," it might say "Undo Edit Filter Effect," indicating that you're undoing a modification to an existing filter, not the filter's initial application.
Hiding and Deleting Smart Filters
Smart Filters also offer control over their visibility. To the left of a Smart Filter's name in the Layers panel, you'll find a small eyeball icon. Clicking this icon toggles the filter's visibility on and off, allowing you to quickly see the image with and without the filter's effect. This is incredibly useful for comparing results or temporarily disabling an effect.

If you decide you no longer need a Smart Filter, you can easily remove it. Right-clicking (or Control-clicking on a Mac) on the filter's name in the Layers panel will bring up a context menu, where you can select "Delete Smart Filter." This removes the filter entirely, returning the Smart Object to its state before that specific filter was applied.
Advanced Smart Filter Techniques
The versatility of Smart Filters extends beyond single applications. You can apply multiple Smart Filters to the same Smart Object, creating complex and layered effects.
Applying Multiple Smart Filters
Imagine you've applied a Gaussian Blur to your text. You can then add another filter, such as Motion Blur, to the same Smart Object. Photoshop doesn't warn you about rasterization this time because the layer is already a Smart Object. This new filter will also appear in the Layers panel, stacked below the Gaussian Blur.
The order in which these Smart Filters are listed is crucial. Photoshop applies them from the bottom up. This means the filter at the very bottom of the list is applied first to the Smart Object's content, and then the filter above it is applied to the result of the first filter, and so on.
You can easily reorder these filters by clicking and dragging them in the Layers panel. For example, if you have Motion Blur applied and then add a Ripple filter, the order will determine how the ripple effect interacts with the motion blur streaks. By changing the order, you can significantly alter the final appearance, allowing for a wide range of creative possibilities.
Adjusting Blend Modes and Opacity of Smart Filters
A particularly powerful feature of Smart Filters is the ability to adjust their blend modes and opacity independently of the layer itself. While you can change the blend mode and opacity of the entire Smart Object layer, you can also fine-tune these settings for individual Smart Filters.
To do this, click on the "Blending Options" icon, which appears to the right of the Smart Filter's name in the Layers panel. This opens a dialog box similar to the main layer blending options, allowing you to set the blend mode (e.g., Overlay, Multiply) and opacity for that specific filter. This allows for intricate layering of effects, where one filter can interact with the Smart Object's content in a unique way before the next filter is applied.
For instance, you could set the blend mode of a Motion Blur filter to "Overlay" and reduce its opacity. This would allow the underlying text to show through the blur, creating a more integrated and nuanced effect than a standard blur applied directly to pixels. The order of operations and blending interactions become a key part of the creative process.
Isolating Filter Effects with Layer Masks
Smart Filters come with a built-in layer mask, which is a powerful tool for controlling where the filter's effect is visible. This mask is displayed as a thumbnail directly above the list of Smart Filters in the Layers panel. By default, it's usually filled with white, meaning the filter's effect is visible everywhere.
You can paint on this mask with black to hide the filter's effect in specific areas, or with white to reveal it. For example, if you've applied a blur to a composite image and want the blur to affect only certain elements, you can use the mask to selectively apply it. If you want to hide the effects from the word "Smart" and keep them visible only on the word "Filters," you would select the layer mask, fill the area corresponding to "Smart" with black, and then deselect. This allows for precise control over where your filters are applied, adding another layer of non-destructive editing.
Understanding the Nuances of Smart Objects
Smart Objects are more than just containers for filters; they are fundamental to preserving image quality and enabling advanced workflows.
Preserving Image Quality Through Transformations
When you need to resize or transform a layer multiple times, using a regular pixel layer can lead to a noticeable loss of quality with each transformation. Pixels become interpolated, resulting in a softer, degraded image. Smart Objects, however, avoid this problem. When you transform a Smart Object, you're transforming the container, not the pixels directly. This means you can scale, rotate, and distort a Smart Object repeatedly without any loss of sharpness or detail.
When a layer is converted to a Smart Object, it becomes an "Embedded Smart Object," referencing a separate document created by Photoshop that contains all the original image information. Alternatively, "Linked Smart Objects" reference an external file. This is particularly useful when you have a single asset, like a logo, that needs to be used across multiple Photoshop projects. If you update the external file, all the linked Smart Objects in your PSDs will automatically update, ensuring consistency and saving significant time.
Instance Behavior and Linked Smart Objects
A fascinating aspect of Smart Objects is their "instance behavior." When you duplicate a Smart Object, you're not creating a completely independent copy. Instead, you're creating instances that all point back to the original source content. This means if you edit the content of one instance (e.g., change the color of a duplicated butterfly), all other instances of that Smart Object will update simultaneously.
This instance behavior is incredibly powerful for making mass changes or ensuring consistency across a design. For example, if you have several instances of a product image in a layout, and you need to adjust the color of the product, you only need to edit one instance, and all others will reflect the change.
However, there are times when you need an independent copy. To create a truly separate version of a Smart Object, you can duplicate the layer and then choose to "Rasterize" it or, more usefully, "Create new Smart Object via copy." This new Smart Object will be independent, allowing you to make changes to it without affecting the original or other instances.
Nesting Smart Objects
The concept of Smart Objects can be taken even further with nesting. You can convert multiple regular layers into a single Smart Object. When you double-click this nested Smart Object, it opens in a new document window, revealing all the individual layers within. This is like having a "bag of potatoes," and then putting that bag inside another bag.

You can also nest Smart Objects within other Smart Objects. This creates a hierarchical structure, similar to Russian nesting dolls. This allows for incredibly complex compositions and organizational structures. While applying a Smart Filter to a nested Smart Object might seem to yield the same result as applying it to an individual instance, the key advantage comes with using masks on the Smart Filters. This allows you to vary how the filter affects groups of objects within the nested structure in ways not possible with individual instances.
When to Use Smart Objects (and When Not To)
Given their immense power and flexibility, it's natural to wonder why you wouldn't use Smart Objects for everything. While they are a revolutionary tool, there are a few considerations.
Firstly, not all Photoshop filters are compatible with Smart Objects. While most of the standard filters work seamlessly, a few exceptions exist, such as Lens Blur, Flame Picture Frame, Trees, and Vanishing Point. If you attempt to apply a non-compatible filter, Photoshop will likely disable it in the menu or prompt you to rasterize the layer.
Secondly, there are limitations to direct interaction. You cannot directly paint on a Smart Object layer or distort its shape in the same way you would a regular pixel layer. To make such edits, you need to double-click the Smart Object thumbnail to open its contents in a separate document, make your changes there, and then save the Smart Object.
Regular layers still have their place for quick, direct pixel manipulation where non-destructive editing isn't the primary concern, or when working with filters that are not compatible with Smart Objects. However, for any significant editing, transformation, or filter application, Smart Objects offer a superior, quality-preserving workflow.
Practical Applications and Examples
The practical applications of Smart Filters are vast, spanning various aspects of image editing and graphic design.
Enhancing Photography
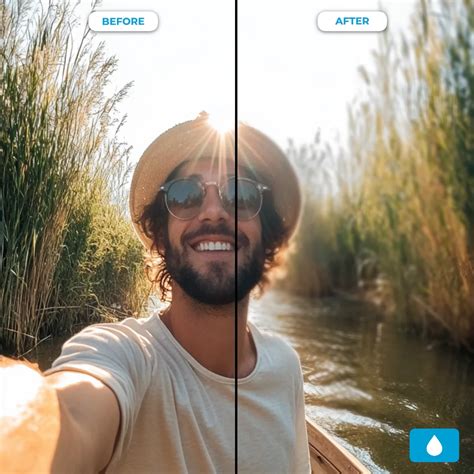
- Blurring Backgrounds: Adding a pleasing background blur, often referred to as "bokeh," is a popular photographic effect. Smart Filters, particularly the Gaussian Blur or Lens Blur (when applied to a Smart Object), allow you to achieve this non-destructively. You can adjust the blur intensity and even use layer masks to selectively apply the blur, ensuring that the subject remains sharp while the background recedes beautifully.
- Sharpening Images: High Pass sharpening is a highly effective technique for enhancing detail. When applied as a Smart Filter to a Smart Object, it allows you to precisely control the sharpening amount and even mask it to specific areas, preventing over-sharpening or haloing.
- Adding Noise: To give digital photos a more organic, "shot-on-film" look, adding noise can be beneficial. Smart Filters make this process adjustable, allowing you to fine-tune the amount and type of noise added without permanently altering the image.
Graphic Design and Compositing
- Text Effects: As demonstrated, Smart Filters are invaluable for applying dynamic effects to text. Motion blur, ripple effects, or even more complex distortions can be applied and edited at any time, allowing designers to iterate on typographic treatments rapidly.
- Compositing Images: When combining multiple images, Smart Objects and Smart Filters are essential for maintaining flexibility. You can transform elements, apply adjustments, and blend them seamlessly, knowing that you can always go back and tweak any part of the process.
- Creating Patterns and Textures: Filters like "Clouds" or "Fibers" can be used to create unique textures. Applying these as Smart Filters to a Smart Object allows you to experiment with different settings and blend modes to integrate them seamlessly into your designs.
Working with Video
While Photoshop is primarily an image editor, its capabilities extend to video. You can place video files into Smart Objects and apply Photoshop filters to them. This opens up possibilities for creating stylized video effects directly within Photoshop, or preparing video assets for use in other editing software.
Photoshop Smart Filter Explained in 2 Minutes
Conclusion: The Future of Photoshop Editing
Smart Objects and Smart Filters represent a paradigm shift in how we approach image editing in Photoshop. They empower users to work non-destructively, experiment freely, and achieve highly refined results with unparalleled flexibility. By embracing these tools, beginners and professionals alike can elevate their creative output, streamline their workflows, and ensure that their work remains adaptable and high-quality, no matter how many revisions are needed. The ability to apply, edit, mask, and reorder filters at will transforms Photoshop from a pixel-pushing tool into a dynamic creative environment.