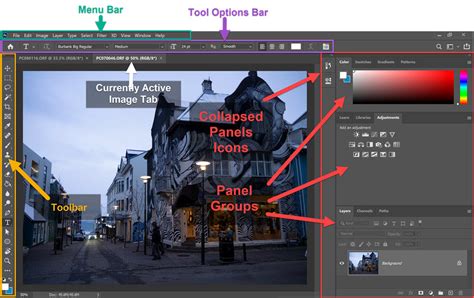
Photoshop's exceptional tool flexibility stands as a cornerstone of its design, significantly simplifying user workflows and profoundly enhancing overall productivity. At the heart of this adaptability lies the Options Bar, a crucial interface element that acts as a direct gateway to all settings and functionalities associated with the currently selected tool. This dynamic bar enables seamless customization and precise control, fundamentally dictating how each Photoshop tool operates and what parameters can be adjusted.
Understanding the Core Functionality of the Options Bar
The Options Bar is not a static entity; it is intrinsically linked to the active tool, meaning its configuration and displayed options change dynamically as you switch between different instruments. This context-aware behavior ensures that users are presented with only the relevant settings for the task at hand, preventing information overload and streamlining the editing process. For instance, when the Rectangle Tool is selected, the Options Bar will populate with options specifically for adjusting a rectangle's properties. This includes controls for selecting the fill color, modifying the stroke width and type, setting precise height and width dimensions for the shape, and much more.
The ability to interact with these tool-specific settings is remarkably smooth and intuitive. The general workflow involves selecting any desired tool from the left-hand toolbar. Immediately, one will notice a distinct change in the Options Bar, reflecting the new tool's available configurations. Taking a moment to observe these settings is key to mastering Photoshop. Users can then interact with these options to fine-tune their work. For example, when using the Brush Tool, one can adjust the brush size, select a preferred blending mode, or choose a specific brush shape, all directly from the Options Bar.
This context-based adjustment capability is a significant time-saver. Whether resizing an image, creating new shapes, or cropping a photograph, the Options Bar provides direct input fields for desired sizes or ratios, eliminating the need to navigate through multiple menus or dialog boxes. In essence, the Options Bar is all about what a tool offers and how it can be tailored to your specific creative vision. It provides tool-specific settings that allow you to customize your tools and offers you context-based adjustments, ensuring your workflow is not interrupted by helping you throughout your work.
The Strategic Location and Visibility of the Options Bar
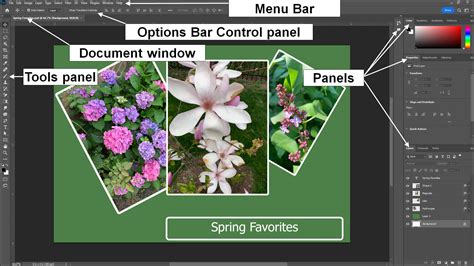
By default, the Options Bar is strategically positioned directly above the document window, situated just below the main Menu Bar. This placement makes it readily accessible without obstructing the primary workspace. However, in the dynamic and often complex landscape of a Photoshop interface, it's not uncommon for users to sometimes misplace or accidentally hide this vital element.
If you find yourself unable to locate the Options Bar, a simple solution is to navigate to the "Window" menu on the overhead toolbar. From the drop-down menu that appears, select "Options." This action will immediately bring the Options Bar back into view. It's important to remember that even if it seems to have disappeared "out of the blue," it's rarely gone forever. You may have inadvertently removed, hidden, or closed it. The procedure to restore it remains the same: access the "Window" menu and ensure "Options" is checked.
Repositioning and Customizing the Options Bar for Enhanced Workflow
Beyond its default location, Photoshop offers the flexibility to reposition the Options Bar to suit individual preferences and workspace configurations. At the left edge of the Options Bar, a subtle handle is present. This handle allows users to click and drag the bar to a different location on the screen. This feature is particularly useful for users who prefer a more minimalist interface or who have specific monitor setups.
Furthermore, the concept of customizing the workspace extends to the primary toolbar itself. A well-organized workspace is crucial for efficient work in Photoshop. The toolbar, with its multitude of tools, can initially appear overwhelming. However, by customizing it to fit your specific needs, you can significantly speed up your editing process. To begin customizing your toolbar, ensure it’s visible by navigating to "Window > Tools." Similar to the Options Bar, the main toolbar can also be freely moved by clicking and dragging it to any desired location on your screen.
For those seeking to maximize screen real estate, the toolbar can be compacted into a single vertical row by clicking the double-arrow icon at the top of the toolbar. To re-dock it to its default left-hand position, simply click and drag it to the far left until a blue mounting icon appears, indicating a successful reattachment.
Photoshop Toolbar Missing | Photoshop Options Bar Missing | Missing Panels In Photoshop
Advanced Toolbar Customization: The "Edit Toolbar" Window
Photoshop provides an even deeper level of customization through the "Edit Toolbar" window. Within this window, your current toolbar is displayed on the left, and "Extra Tools" are presented on the right. To remove a tool from your main toolbar, you can simply click and drag it from the left column to the "Extra Tools" section. This action hides the tool from immediate view but keeps it accessible via the "…" menu within the toolbar itself, should you need it later. This allows for a cleaner, more focused toolbar.
The ability to reorder tools is also a powerful feature. You can click and drag tools up or down within their current groups to arrange them in an order that best reflects your most frequent usage patterns. For tools that have sub-options, typically indicated by a small arrow next to the tool icon, you can click and hold the tool to reveal the nested tools. This is a common convention for tool groups in Photoshop.
It's also worth noting that many tools share a single keyboard shortcut. For example, 'J' might be the shortcut for the Spot Healing Brush, but pressing it repeatedly or holding Shift while pressing it can cycle through other related tools within that group, such as the Remove Tool. Understanding these shortcuts and the grouping mechanism can dramatically accelerate your workflow. Once you have refined your toolbar to your liking, click "Done" to save your changes. Photoshop allows you to save your customized toolbar as a preset for future use or restore it to default settings at any time from within the "Edit Toolbar" menu. This level of control ensures that your Photoshop environment is perfectly tailored to your individual working style.